AI在乳腺癌检测中的应用
2020-01-03
目录
背景
- 全球挑战:2018年造成100万人死亡(女性第二致死率癌症)
- 世卫组织建议项目:X线钼靶筛查
- 缺点:高的假阳性和假阴性;解读成本高;
模型:谷歌+DeepMind
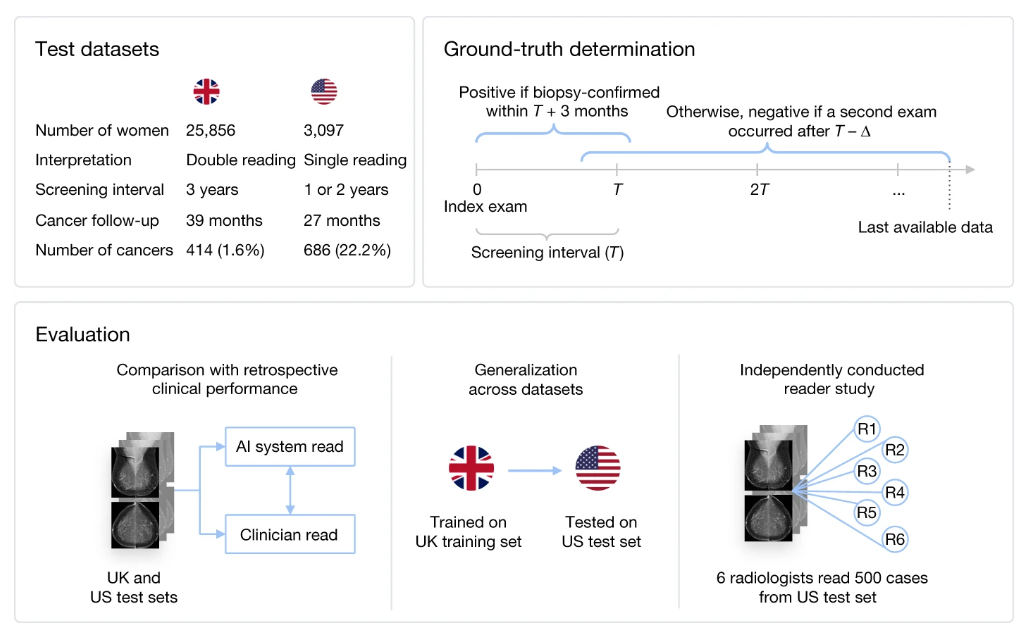
- 数据集的来源,这里只是验证集,不包含训练集
- 如何确定ground truth?通过预后跟踪,三个月的缓冲期
- 三种评估所建模型的效果
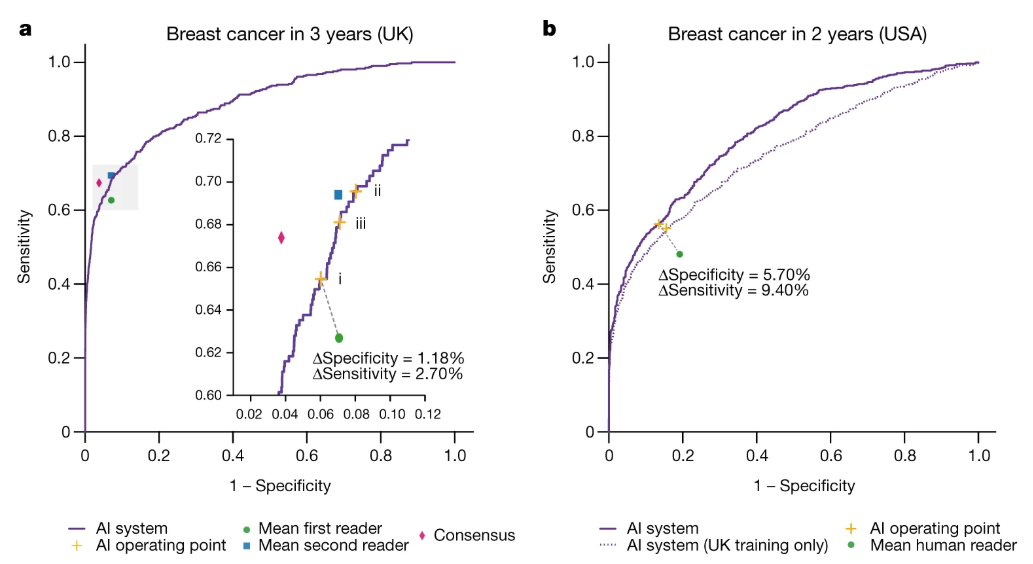
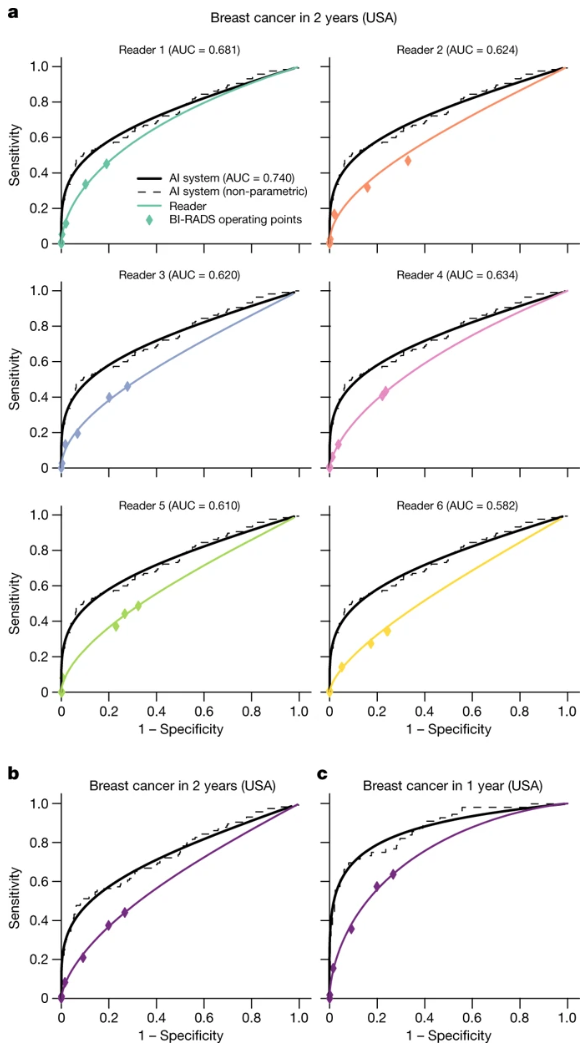
- 跟临床医生的判断进行比较
- 左边是在UK测试集上的效果
- 右边是在USA测试集上的效果,模型训练时是否包含了UK数据集(实线:包含,虚线:不包含)
对这个工作褒贬不一:
- 之前有发表过类似的工作,更大的验证,更好的模型效果(但是没有引起这么高的关注)
- 这个工作的代码没有公布。文章结尾只说了详细描述了如何复现,但是很多tool依赖于谷歌自己的框架。
- 过分夸大AI的效果,可以辅助医疗,但是远未达到完胜的程度。
参考
- Nature发布AI检测乳腺癌最新成果,由谷歌、DeepMind联合开发,表现超过医生!
- Nature发表Google新型AI系统!乳腺癌筛查完胜人类专家
- 登上Nature却被打脸?LeCun对谷歌乳腺癌研究泼冷水:NYU早有更好结果
- 全球女性福音!DeepHealth深度学习模型检测乳腺癌完胜5名放射科医师
Read full-text »
基于三代测序数据预测m6A修饰位点
2019-10-22
目录
背景
- m6A修饰具有非常重要的功能
- 目前主要依赖于m6A-seq进行测定:受限于抗体,只有部分种类的修饰类型被测定到
- 使用三代测序,利用读段通过纳米孔产生的电流变化进行鉴定
- 电流变化需要比较电势图谱且重新map
- 开发基于三代测序数据进行m6A位点鉴定的方法
体外合成并测定
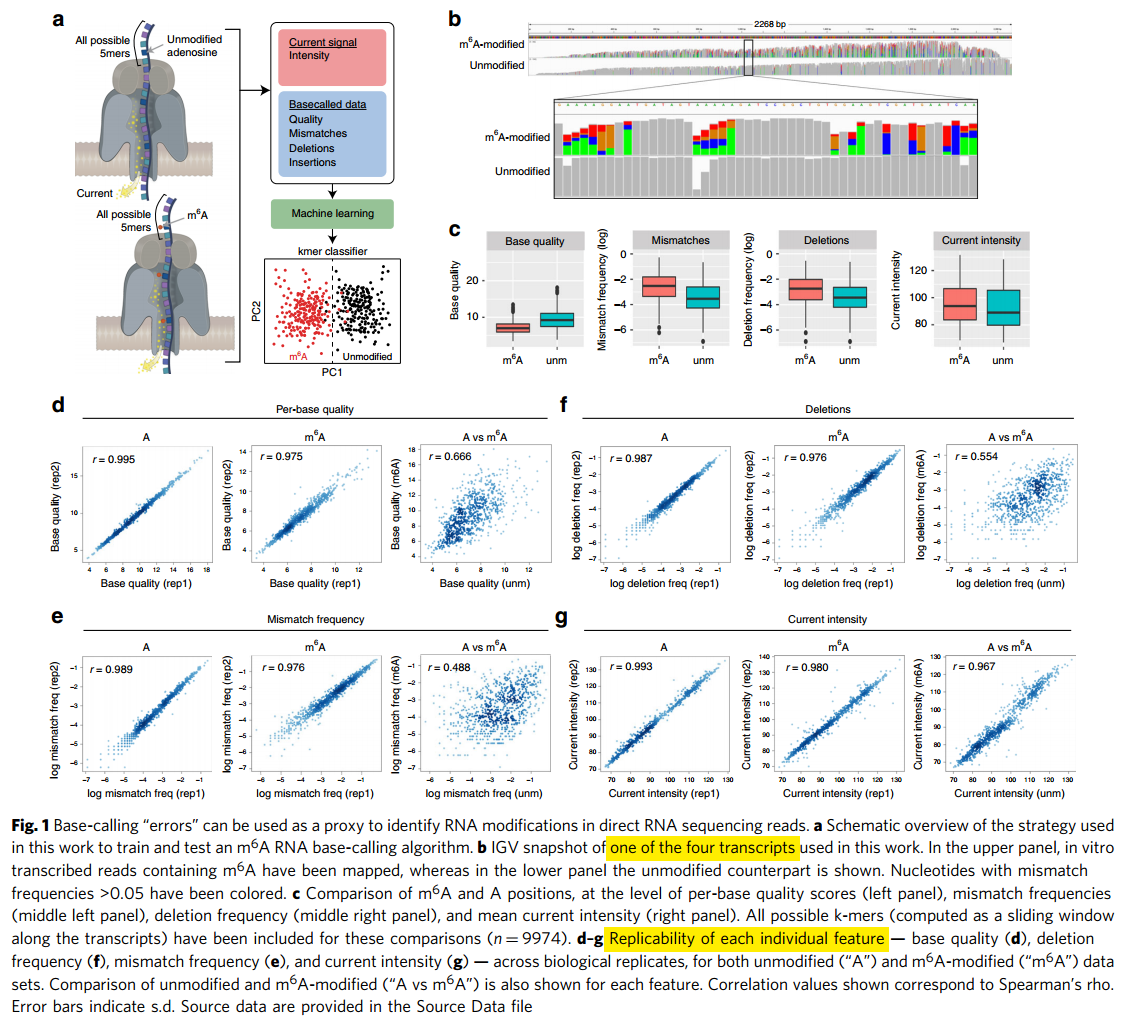
图解:首先是做了体外合成的实验
- a)体外合成的实验示意图。对于5bp长度的所有序列,每个碱基4个可能性,4^5=2^10=1024。对于合成的序列,分别测定有m6A修饰和没有修饰的序列,及此时电势(current)的大小。获得了对应条件下的特征:电势、碱基质量、错配频率、碱基删除和插入等,然后把这些特征进行机器学期模型的训练(这里是SVM)。
- 为什么选择5bp?m6A常规的motif序列是RRACH是5bp的。
- 做法:使用curlcake软件预测生成了1条10kb长的序列(包含了所有可能的1024个5mer,平均每个5mer出现10次),这里还考虑了预测的二级结构,使得二级结构最小。然后切成了四段,每段2000+长度,然后合成了这四条序列。
- b)其中一条合成序列的例子。在两个组中的track图,可以看到,在m6A修饰的组中,很多地方出现了突变(但是突变方向即突变后的碱基不固定),在对照组(相同序列但是没有m6A修饰的)就没有出现突变。
- c)在m6A组和对照组比较不同的指标的分布。具有区分性,且符合m6A修饰带来的测序质量更低、突变频率更高。
- d-g)不同指标在重复之间的相关性。这里没有列举出insertion,是因为这个指标在不同的rep之间重复性不好,因而不好作为m6A修饰预测时的特征。
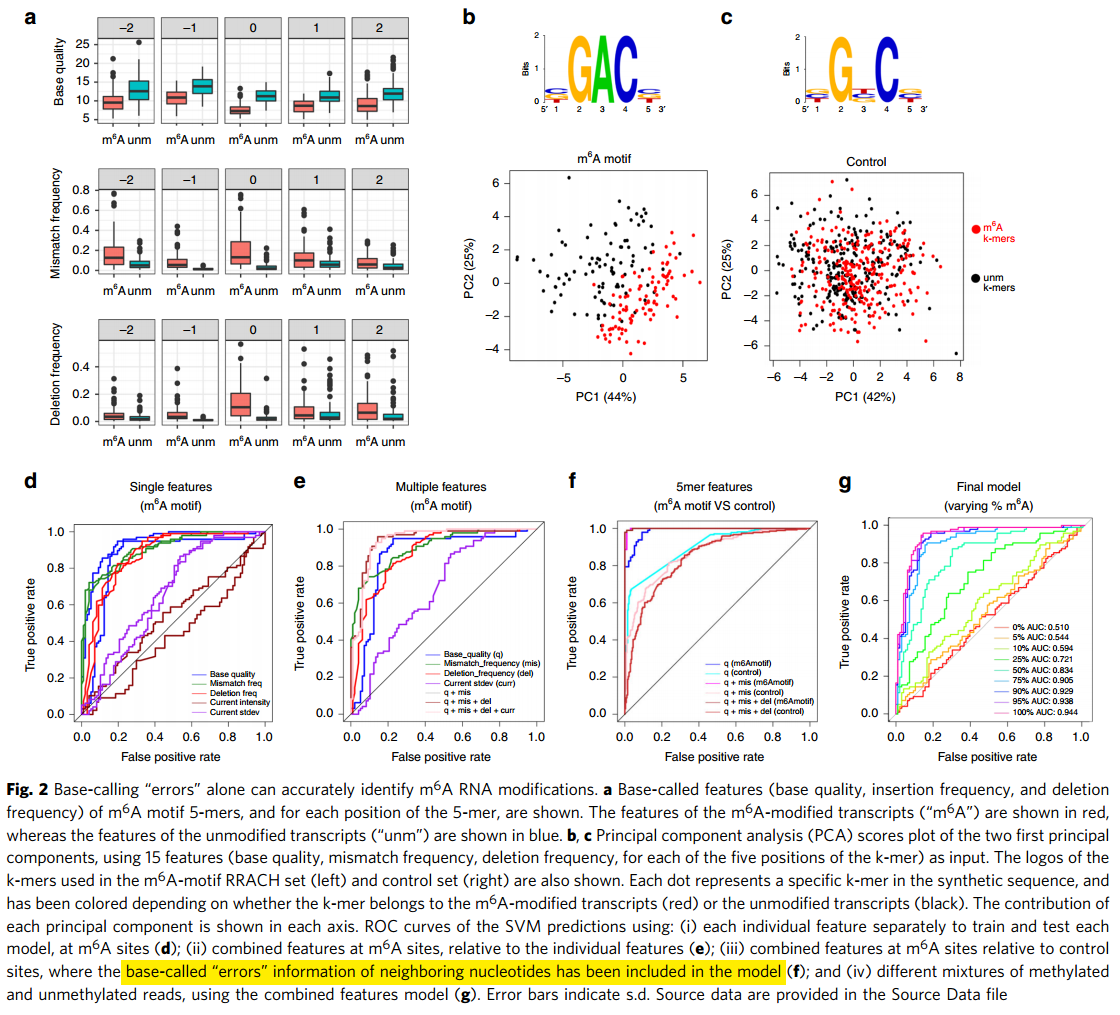
基于测序得到的特征构建预测器
图解:
- a)每个碱基位置的特征分布,5bp x 3特征。上面图1是展示的所有可能的5mer的分布,这里展示的是m6A motif 5mer的分布,也是符合的,且每个碱基位点都是符合的。
- b-c)根据motif的feature是否可以区分m6A修饰的和没有修饰的?比如图b,有两套数据,一套是来源于含有m6A的合成序列,一个是来源于不含有m6A序列,但是都挑出具有m6A motif(RRACH)的5mer。现在根据3x5=15个特征进行PCA聚类,分成两类,发现分成的两类和他们的来源对应的很好,说明这些特征是具有很好的m6A区分性的(相同序列,但是特征不同,就可以判断m6A的修饰存在与否)。同理,挑出其他的非m6Amotif 5mer,做PCA,此时分不开,说明这些特征是特异的区分m6A的,而不是任何的都能区分开的。
- d)每个特征单独训练,是否能很好的预测m6A修饰?
- 70-86%的准确性。
- current的两个特征效果最差:43-65%准确性
- 训练集正样本:属于RRACH的5mer且来源于m6A合成序列,负样本:属于RRACH的5mer且来源于没有m6A修饰的合成序列。
- 这里为什么每个是两条线?两次的结果?那差异有点大啊
- e)使用不同的特征组合看效果,整体效果都好很多:88-91%准确性
- f)邻近的碱基特征使用进来,能提高预测的准确性:97-99%,但此时的假阳性也增高了,因此不应该使用其邻近位点的特征
- g)一定比例的修饰read和非修饰read混合,模型效果还行,即使25%的甲基化比例,能达到0.72的AUC。使用combined feature model预测。
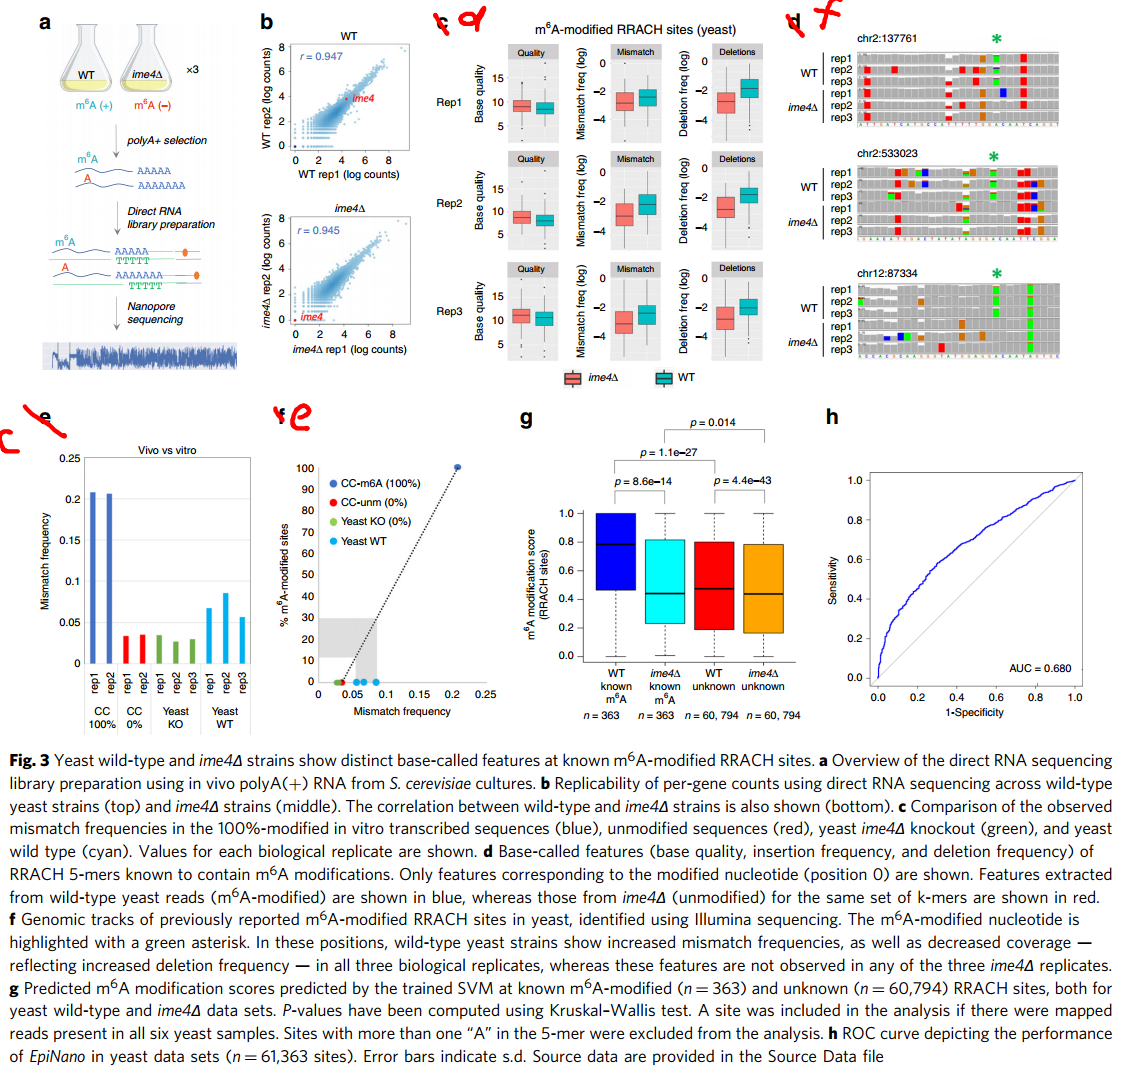
预测体内的m6A修饰
图解:这个图index和legend没有对应上。
- a)测定yeast数据。WT vs ime4 KO,后者就不能进行m6A修饰,相当于前面的control测定。分别测定,得到两个条件下的碱基特征值。
- b)read count在基因水平的重复之间相似性,同时把ime4的表达量label出来了。
- c)先看在以前鉴定的m6A位点上的特征分布。这里比较的是错配频率,可以看到,KO组比WT组低,KO组和之前invitro CC0%很接近,但是这里的WT组比100%CC也低了1倍。
- d)这是比较在以前鉴定的m6A位点上的几个特征在不同重复之间的分布,重复性很好,且符合修饰位点碱基质量更低、突变频率更高的特性。
- e)这里通过线性估计,在WT时,大概12-30%的m6A修饰,这个和之前的一个工作做得估计很接近。
- f)这是show的例子,但是有点懵!取了三个位点(之前其他工作已经鉴定过的),是在WT里面有明显突变的,但是ime4 KO没有。其他位点颜色呢?这样看:对于没有突变的位点,其整个bar是灰色的;如果有至少1个突变,则bar会显示各个碱基的比例。所有比如最右侧A,整个bar看起来是绿色的A,说明大部分是没有突变的,但是是存在其他突变碱基的。
- g)在WT和ime4 KO共有的RRACH位点是61163个,其中已知是m6A的有363个,未知的是609=794个。通过invitro得到的模型,预测这里invivo WT和ime4 KO数据里面m6A位点的score,然后看分布。
- WT known vs unknown:相同细胞系,已知和未知的,已知的预测得到分数更高,说明预测的很好
- ime4 KO known vs unknown:相同细胞系,已知和未知的,已知的预测得到分数接近,本身这些应该就是很接近的(都是没有m6A修饰的),说明预测的很好
- WT unknown vs ime4 KO unknown:有差异,说明存在潜在的新的m6A位点? h)在invivo数据达到0.68 AUC。
代码
相关的代码已经放在 EpiNano@github 上面了,可以参考。
参考
- Talk @London Calling 2019
- Eva Maria Novoa - Accurate detection of m6A RNA modifications in native RNA sequences using third-generation sequencing
- Accurate detection of m6A RNA modifications in native RNA sequences
Read full-text »
使用迁移学习对scRNA数据降噪
2019-09-01
目录
背景
- scRNA数据本身具有噪声及稀疏性
- 低表达量的转录本不能被很准确的定量
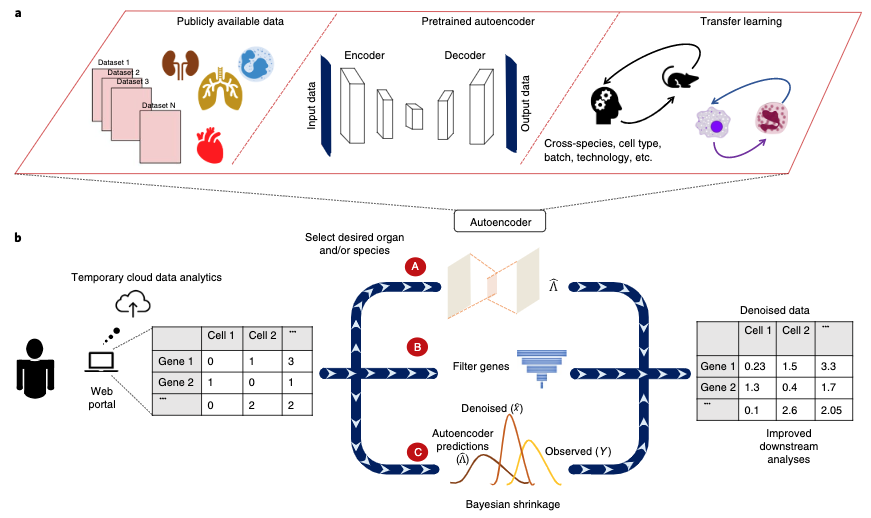
- 最近Nature method发表了一个方法SAVERX,通过对公共数据进行深度学习建模(autoencoder),然后使用迁移学习对靶标数据进行降噪
- 这里是对所有的表达量的数据的一个重新估计,不只是低丰度的或者没有值的,所以其功能不是imputation
模型
- 对于想要进行降噪处理的数据,分为3步进行
- (A)选择与靶标数据对应的数据,比如不同的物种、细胞系,通过autoencoder学习一个降噪的模型
- (B)通过cross-validation去除掉不能够预测的基因
- (C)使用贝叶斯模型估计最终的去噪声后的值
效果评估
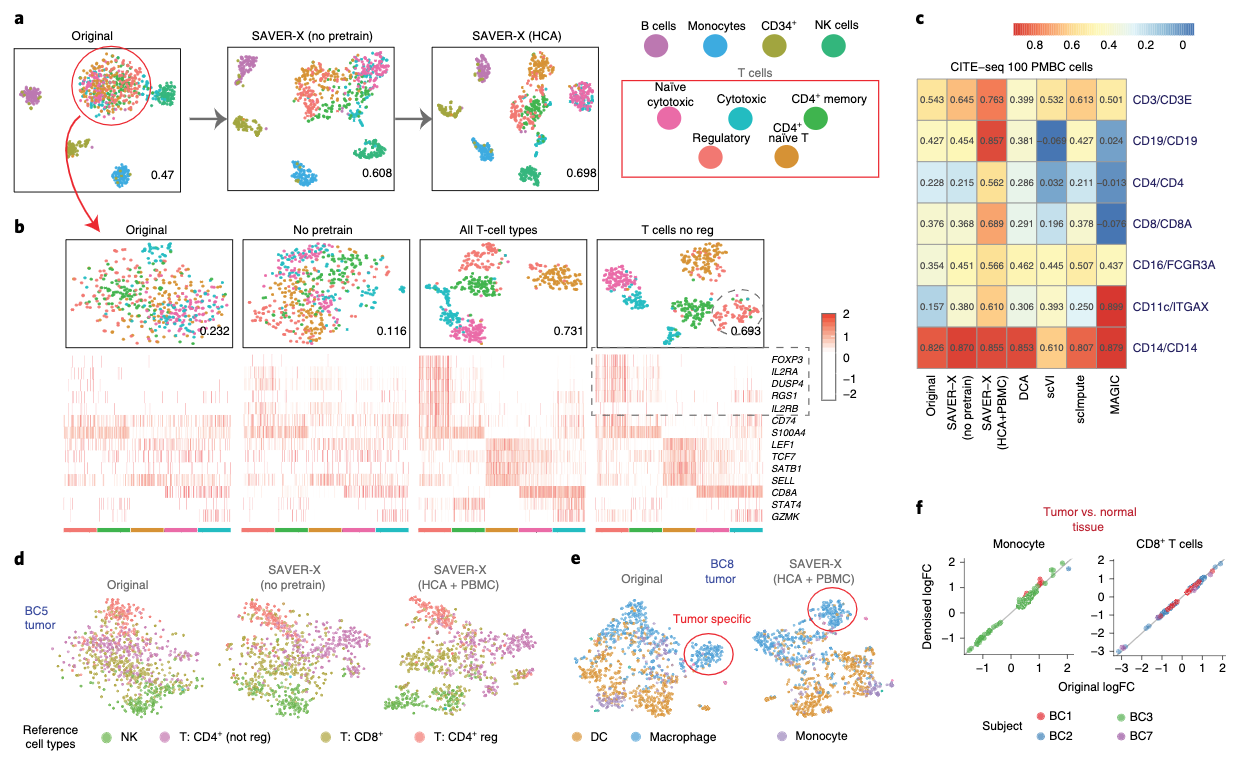
细胞系层次:先是在免疫细胞中进行了效果评估
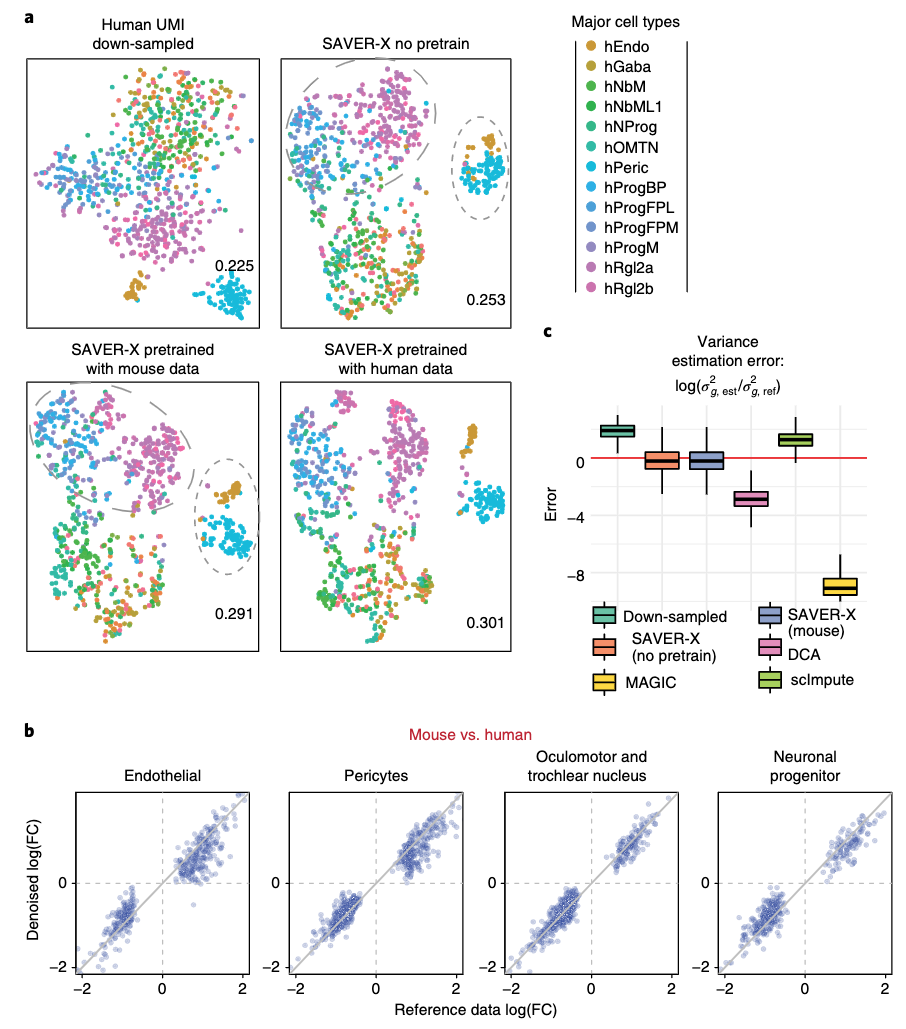
- 可以看到,使用了迁移学习的经验知识后,聚类效果是更好的,也就是分的更开(图a)
- 一些marker基因也是的(图b)
物种层次:人和鼠的迁移
- 从(a)可以看出,使用了已知数据学得的模型之后,聚类的效果更好了,不管是相同的物种的,还是其他物种的
Read full-text »
深度学习助力RNA可变剪切的预测
2019-06-30
目录
背景
- 可变剪切事件的检测需要很好的测序丰度
- 现在有大量的公共RNAseq数据集,是可以提供可变剪切的信息的
- 对于低coverage的样本,其可变剪切事件通常是检测不出来的。有效的检测可变剪切事件,以及不同样本间的差异,没有特别好的方法
模型
- DARTS:Deep-learning Augmented RNAseq analysis of Transcript Splicing
- 模型:
- 包含两个部分:
- DNN:基于序列特征和RBP的表达量特征,学习差异可变剪切的潜在模型。该模型作为大规模数据集的先验知识用于新样本的推断。
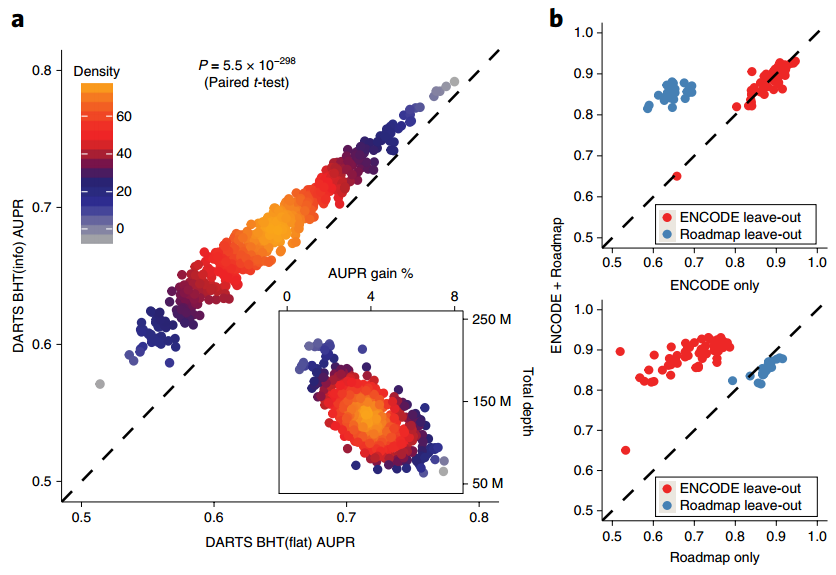
- BHT:贝叶斯假设检验模块。这里包含了两个,一个是BHT(flat),是之前他们的预测剪切事件的工具(如rMATS)的升级版,这里主要用来对于大规模的公共数据集(如ENCODE、Roadmap)进行分析,得到其剪切事件的结果,构建一个具有label的数据集用于DNN训练。还有一个模块是BHT(info),把要分析的新的样本作为样本特征,DNN的预测作为先验知识,对新样本的可变剪切进行分析。
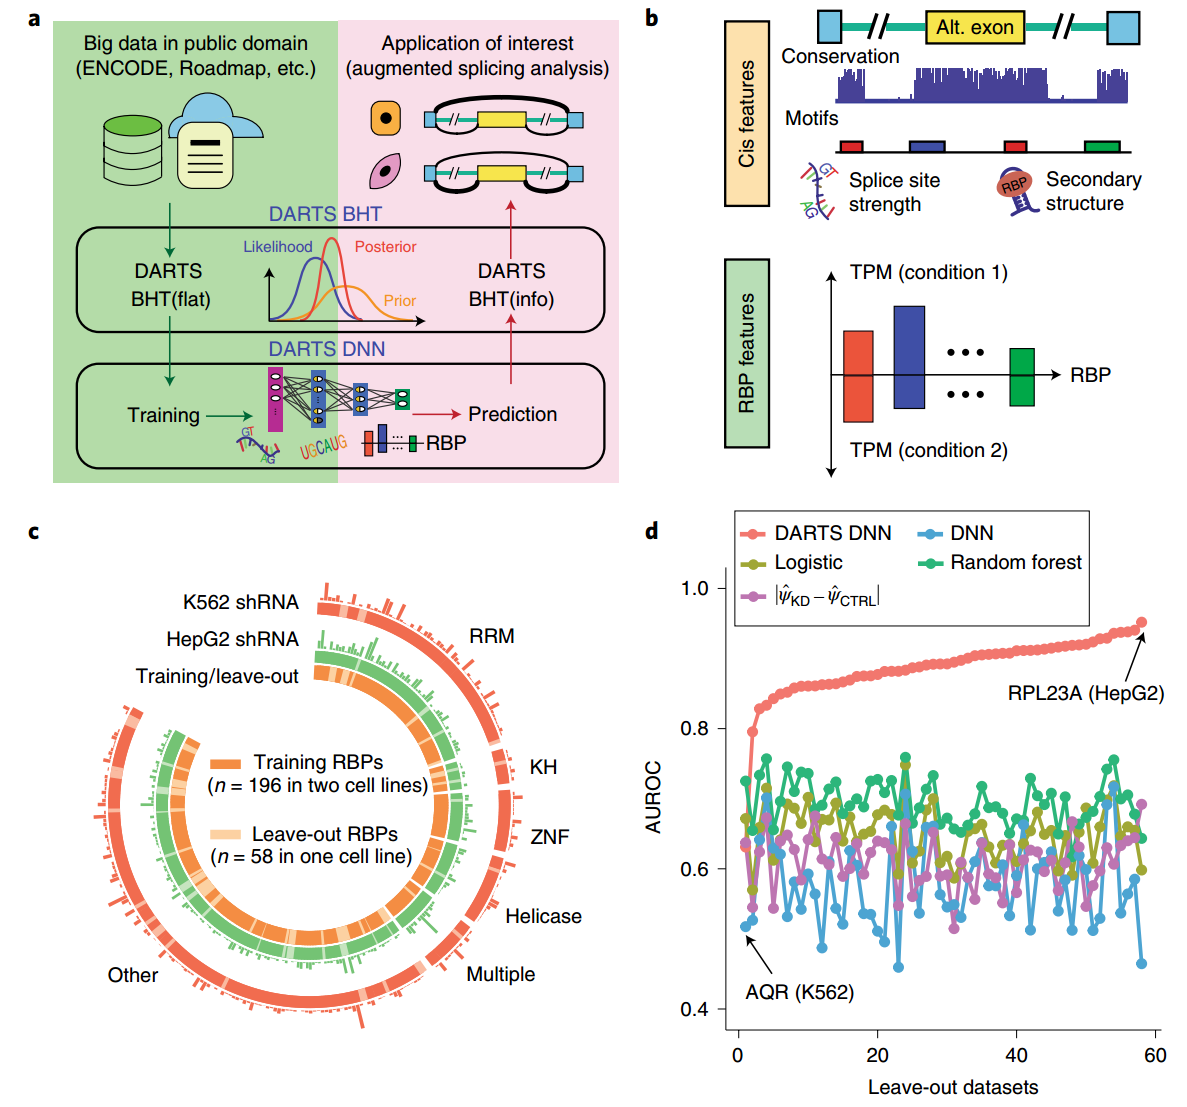
- a)模型的基本框架
- b)在DNN模型中,用到的特征,包括序列特征(cis),和RBP表达量的特征(trans)
- c)DNN训练时,使用的数据集。这里关注的是差异可变剪切,所以用的都是shRNA KD vs control的样本对,两个不同的细胞系(K562+HepG2)
- d)模型效果的比较。图中的DNN是在单个数据集上训练的,DARTS-DNN是随着横轴增大,在对应数目上的数据集上训练的。还测试另外的模型:逻辑回归,随机森林,还有一个直接预测PSI然后取两个条件的差值的方式。综合来看,DARTS-DNN效果是最好的,但是需要在多个数据集上进行训练。
效果评估
应用测试
- 应用1:EMT过程
- 7个时间点,都和第0天比较,看差异可变剪切的变化
-
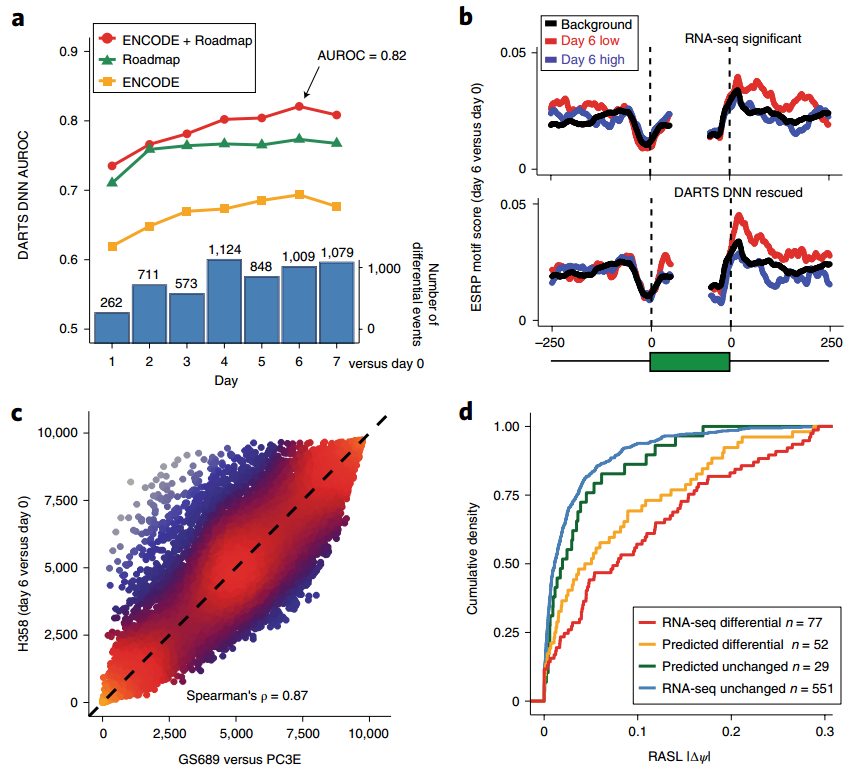
DNN训练来源不同,可以分为不同的模型,可以看到整合的来源最后预测的效果是最好的(图a)
- DARTS-DNN rescue
-
使用两个模型:BHT(flat)、DARTS-DNN,比较第6天和第0天得到差异可变剪切,再看在exon-intron junction区域的motif的富集(图b)
- 使用两个不同的系统去看EMT过程
- 但是分别得到的效果是高度正相关的,说明模型的鲁棒性(图c)
- 应用2:RASL-seq低表达量转录本
- 特异的,检测低表达的转录本的差异可变剪切事件
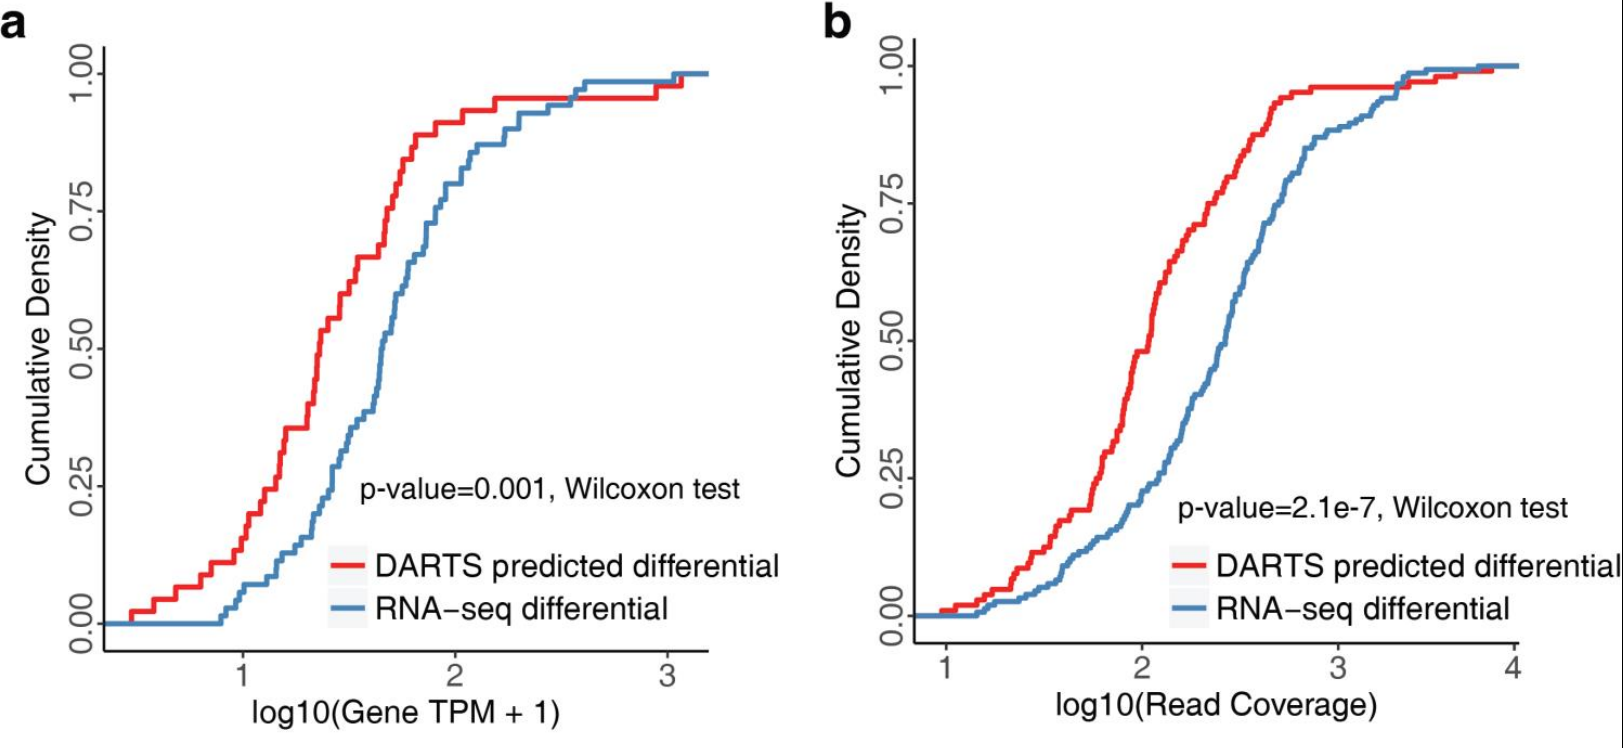
- 对于图d,这么来看。首先用BHT(flat)直接去预测,得到了差异剪切(RNA-seq differential)的和不变的(RNA-seq unchanged),累计曲线显示前者比后者的score大很多,符合预期。接下来用DARTS-DNN辅助预测,能够预测到一些新的,就是图中的预测的差异剪切(predicted differential)和不变的(predicted unchanged),可以看到这两个的趋势跟上面的是一致的,也就是差异的score比不变的大很多。单独看对应类型的(比如RNA-seq differential vs predicted differential),其曲线也是很接近的。在补充材料里面,其实看了这两个类型的转录本的表达量水平,发现新增预测到的其实表达量是更低的(如下图的ab,分别看的是表达量水平和read coverage)。由此说明,对于低表达量的转录本,DARTS也是可以很好的检测到差异可变剪切事件的。
代码
相关的代码已经放在 Xinglab/DARTS 上面了,可以参考。
- Darts_DNN@github
- Darts_BHT@github
- Darts_BHT&DNN@readoc
- Trained models and related files@sourceforge:有很多文件需要从这里下载,包含四个不同的模型:SE(skipped exons),RI(retained introns),A5SS(alternative 5’ splice sites),A3SS(alternative 3’ splice sites)。根据自己要预测的事件类型,选取对应的已训练的模型参数和文件。不同类型事件的序列特征数目不同,RBP表达特征数目是相同的。
DNN predict commad:
➜  bin git:(master) ✗ python Darts_DNN predict -h
usage: Darts_DNN predict [-h] -i INPUT -o OUTPUT [-t {SE,A5SS,A3SS,RI}]
                         [-e EXPR [EXPR ...]] [-m MODEL]

optional arguments:
  -h, --help            show this help message and exit
  -i INPUT              Input feature file (*.h5) or Darts_BHT output (*.txt)
  -o OUTPUT             Output filename
  -t {SE,A5SS,A3SS,RI}  Optional, default SE: specify the alternative splicing
                        event type. SE: skipped exons, A3SS: alternative 3
                        splice sites, A5SS: alternative 5 splice sites, RI:
                        retained introns
  -e EXPR [EXPR ...]    Optional, required if input is Darts_BHT output;
                        Folder path for Kallisto expression files; e.g '-e
                        Ctrl_rep1,Ctrl_rep2 KD_rep1,KD_rep2'
  -m MODEL              Optional, default using current version model in user
                        home directory: Filepath for a specific model
                        parameter file
DNN prediction:
# 需要先下载model文件:master.dl.sourceforge.net/project/rna-darts/resources/DNN/v0.1.0/trainedParam/A5SS-trainedParam-EncodeRoadmap.h5

Darts_DNN predict -i darts_bht.flat.txt -e RBP_tpm.txt -o pred.txt -t A5SS
darts_bht.flat.txt:
➜  test_data git:(master) ✗ head darts_bht.flat.txt
ID      I1      S1      I2      S2      inc_len skp_len mu.mle  delta.mle       post_pr
chr1:-:10002681:10002840:10002738:10002840:9996576:9996685      581     0       462     0       155     99      1       0       0
chr1:-:100176361:100176505:100176389:100176505:100174753:100174815      28      0       49      2       126     99      1       -0.0493827160493827     0.248
chr1:-:109556441:109556547:109556462:109556547:109553537:109554340      2       37      0       81      119     99      0.0430341230167355      -0.0430341230167355     0.188
chr1:-:11009680:11009871:11009758:11009871:11007699:11008901    11      2       49      4       176     99      0.755725190839695       0.117542135892979       0.329333333333333
chr1:-:11137386:11137500:11137421:11137500:11136898:11137005    80      750     64      738     133     99      0.0735580941766509      -0.0129207126090368     0
chr1:-:113247674:113247790:113247721:113247790:113246265:113246428      159     1862    127     1958    145     99      0.0550902772187827      -0.0126831240261882     0
chr1:-:1139413:1139616:1139434:1139616:1139223:1139348  980     106     24      2       119     99      0.884944451538756       0.0240073464719553      0.128666666666667
chr1:-:115166127:115166264:115166180:115166264:115165607:115165720      17      0       32      1       151     99      1       -0.0454956312142212     0.287333333333333
chr1:-:11736865:11737005:11736904:11737005:11736102:11736197    22      1532    26      1544    137     99      0.0102705812451076      0.00175172587953396     0
RBP_tpm.txt:
➜  test_data git:(master) ✗ head RBP_tpm.txt
        thymus  adipose
RPS11   2678.83013      2531.887535
ERAL1   14.350975       13.709394
DDX27   18.2573 14.02368
DEK     32.463558       14.520312
PSMA6   102.332592      77.089475
TRIM56  4.519675        6.14762566667
TRIM71  0.082009        0.0153936666667
UPF2    7.150812        5.23628033333
FARS2   6.332831        7.291382
参考
- How Does a New Computational Method Transform Public Big Data Into Knowledge of Transcript Splicing
- New computational tool harnesses big data, deep learning to reveal dark matter of the transcriptome
- 用深度学习预测可变剪切
- 邢毅团队利用深度学习强化RNA可变剪接分析的准确性
Read full-text »
Excel常见用法
2019-06-13
mac excel 常见用法
指定单元格求和
参考这里,在单元格输入=SUM(,然后选择需要求和的连续单元格,再按回车键即可
快捷键
- 选择列:
ctl + shift + 上下,只选中内容,不包含空白处;ctl + shift + 左右选择多列 - 选择全部内容:选择左上单元格,
ctl + shift + 右+下即可 - 跳至表格最上或者最下:选中某一列有内容的单元格,然后
Ctrl+shift+上/下;如果不选择有内容的地方,可能到整个表格最空白尾端 - 复制:选择性粘贴里面有仅值,转置(转置推荐transpose公式)
- 相对引用:当引用“=a1”时,是相对引用,下拉填充会变成”=b2”“=c3”
- 绝对引用:
$是绝对引用的符号,当引用“=$a$1”时,是绝对引用,下拉填充也是“=$a$1”
Read full-text »
Word常见用法
2019-05-27
mac word 常见用法
取消超链接
选中或全选,然后按:
command(⌘)+ shift(⇧)+ fn + F9
显示或者取消段落标记
命令:⌘ + 8
更改所有的英文字符为指定字体
参考怎样更改word中所有英文字体:按住ctrl+a全选文字,然后右键点击,选择“字体”,在西文字体栏目设置想要的字体,比如Times New Roman。可以看到,所有英文字体格式已经改变,但是中文字体没有。
插入、删除或更改分节符
参考office官网:
- 插入:
- 1)单击新节的开始位置
- 2)单击“页面布局”>“分隔符”,然后单击所需分节符类型。
设置每章不同的页眉
- 选择“布局”=》“分隔符”=》“下一页”,当前页面与上页已经端开。
- 双击页眉区域,编辑页眉,输入你想要输入的文字。
Read full-text »
Basic operations on matrix
2019-05-24
使用numpy解析线性方程式
例子:
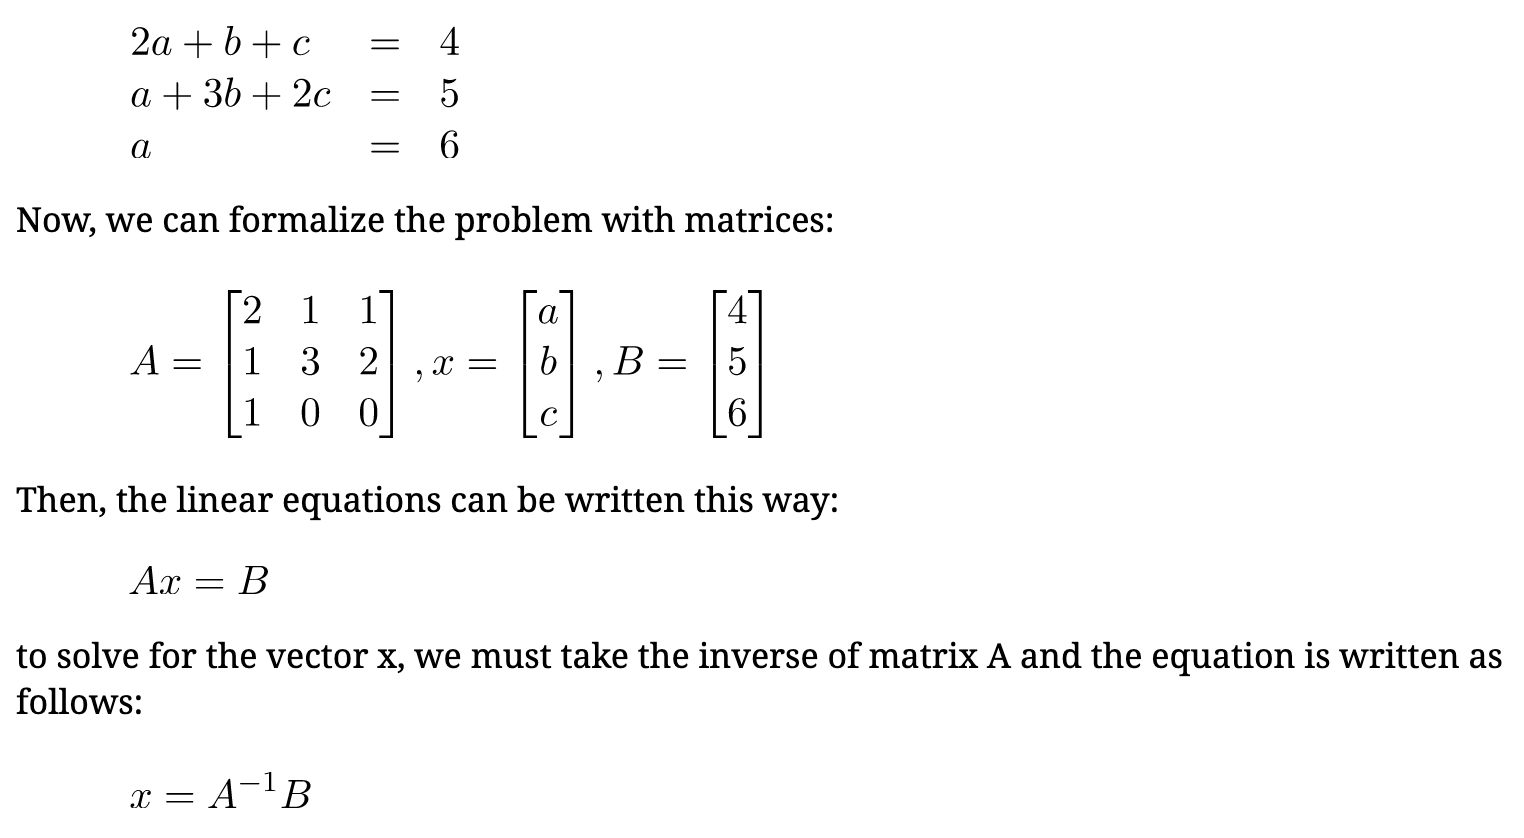
import numpy as np

A = np.array([[2, 1, 1], [1, 3, 2], [1, 0, 0]])

B = np.array([4, 5, 6])

# linalg.solve is the function of NumPy to solve a system of linear scalar equations
print ("Solutions:\n",np.linalg.solve(A, B ) )

Solutions:
[  6.  15. -23.]
Read full-text »
LSTM
2019-05-15
目录
- 目录
- RNN
- RNN不能解决长期依赖问题
- LSTM:长短期记忆网络
- LSTM步骤
- LSTM的变种
- pytorch实现单向LSTM
- pytorch实现双向LSTM
- 例子:使用LSTM对语句中的单词进行词性标注
- MNIST数据集上LSTM和CNN的效果对比
- 参考
RNN
- 背景:传统神经网络不具有记忆功能
- 记忆:比如人的思考是基于记忆的知识的
- 方案:RNN
- 将信息持久化
- 可以解决网络的记忆功能
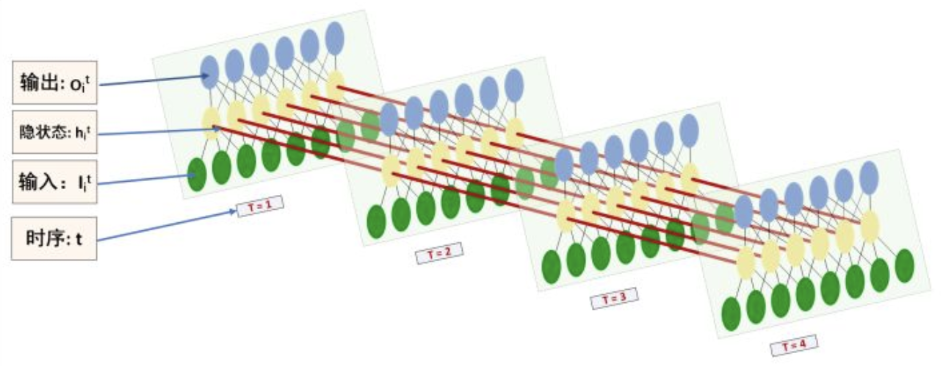
-
RNN可以看做是同一个网络的多个副本,每一份都将信息传递到下一个副本
- RNN环式结构展开为链式:

- 链式结构展示了RNN与序列和列表的密切关系
- 语音识别、语言建模、翻译、图片标题取的很好效果
RNN不能解决长期依赖问题
- RNN核心:将以前的信息连接到当前任务中
- 缺点:
- 不能保留更远的上下文信息
- 存在梯度消失和梯度爆炸的问题。当每层的权重W小于1时,误差传到最开始的层,结果接近于0,梯度消失;当每层的权重W大于1时,误差传到最开始的层,结果变得无穷大,梯度爆炸。
- 简单例子:
- 输入:“the clouds are in the xxx”
- 预测:xxx
- RNN:可以训练得很好预测出来,根据上下文,很容易
- 特点:当前位置与相关信息所在位置之间的距离相对较小
- 复杂例子:
- 输入:“I grew up in France… I speak fluent xxx”
- 预测:xxx
- RNN:可以训练得很好预测出来,根据上下文,不能很好的预测出来
- 特点:相关信息和需要该信息的位置之间的距离可能非常的远,此时需要更多的上下文信息才能很好的预测
- 随着距离的增大,RNN对于将这些信息连接起来无能为力
LSTM:长短期记忆网络
- LSTM:long short term memory networks
- 可学习到长期依赖关系
- 目前有很多改进的版本
- 在许多问题上效果很好
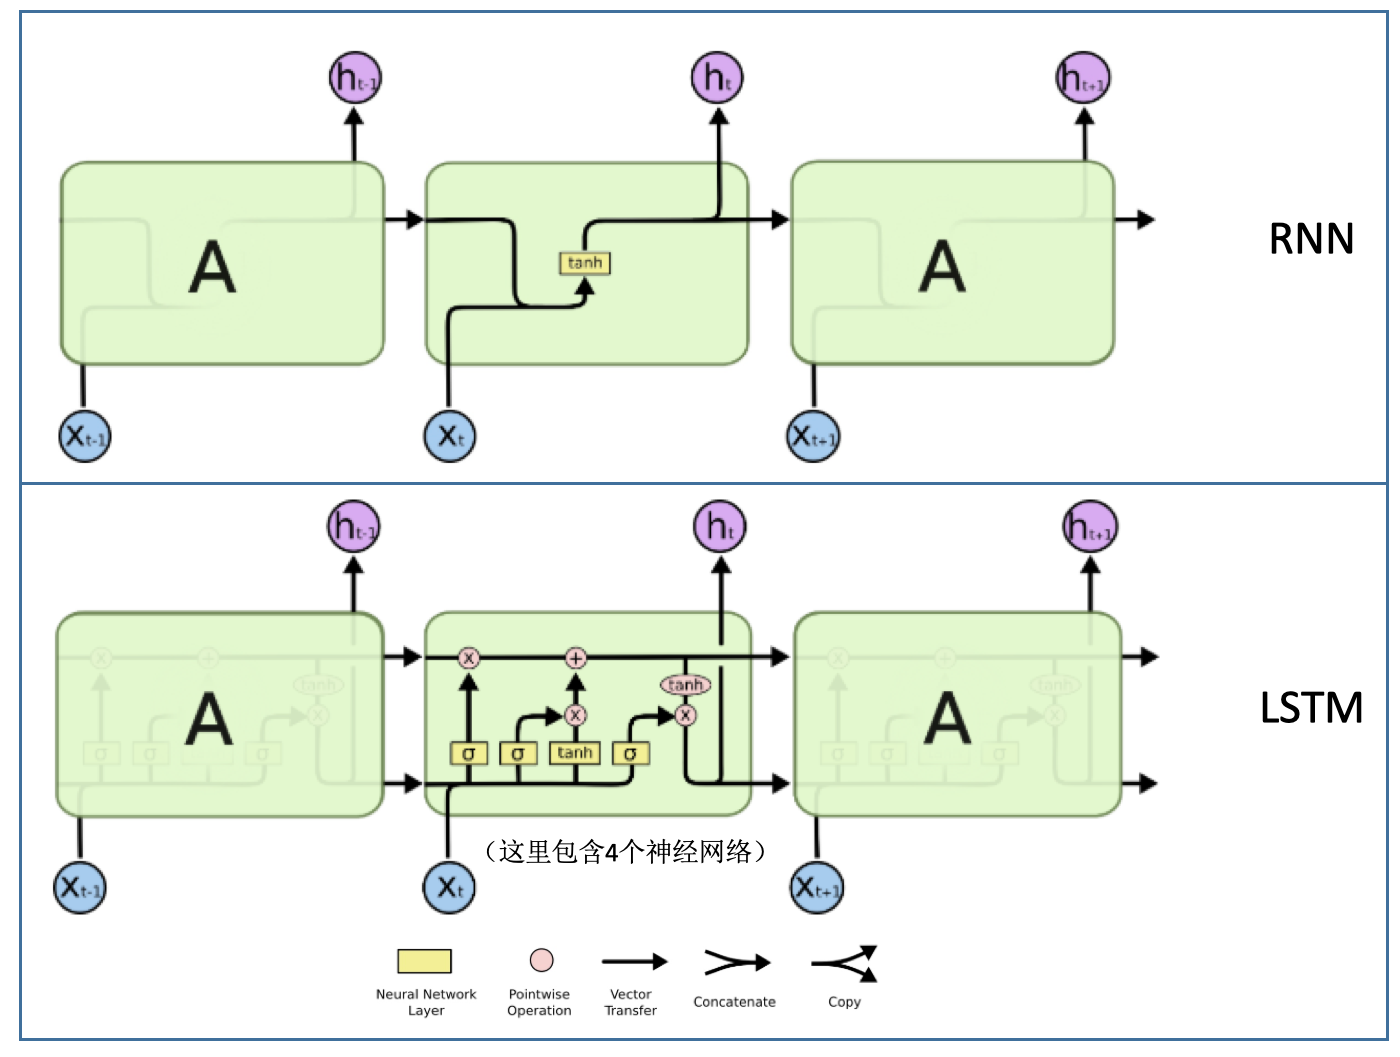
- RNN vs LSTM结构:
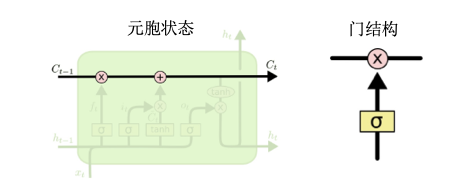
- 核心:元胞状态
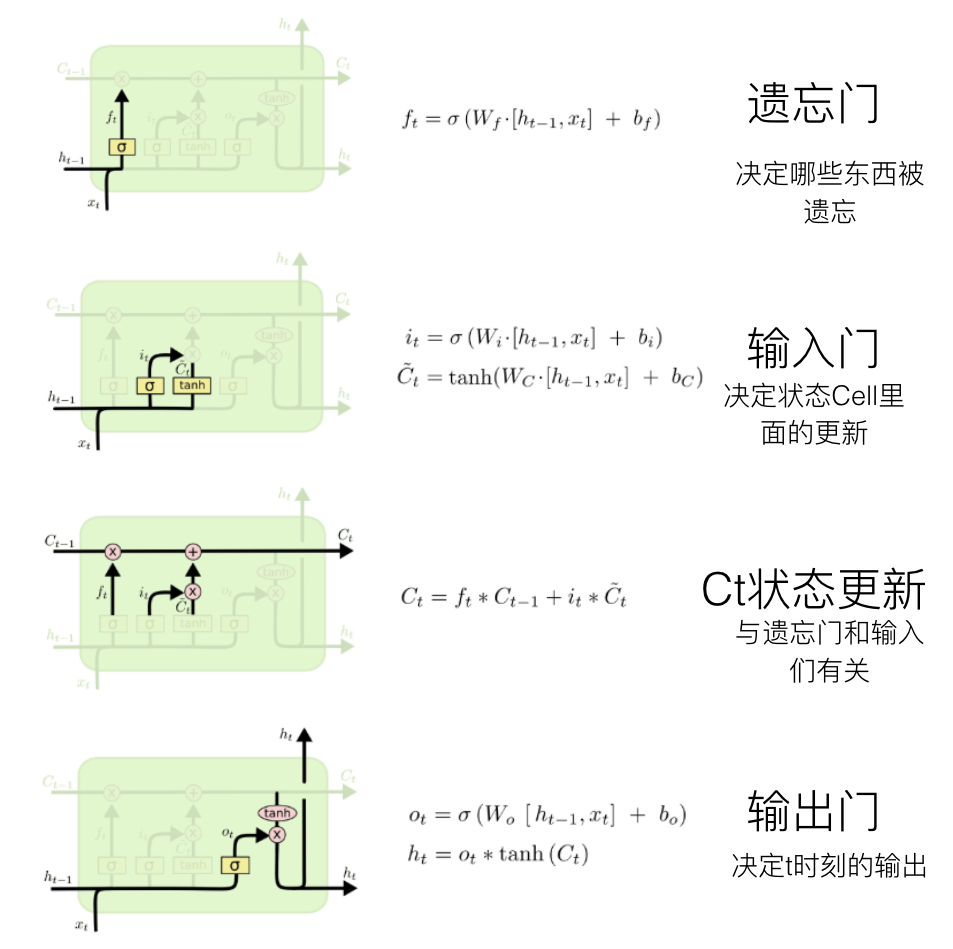
LSTM步骤
LSTM的变种
- GRU模型:Gated Recurrent Unit
- 将遗忘门和输入门合并成为单一的“更新门(Update Gate)”
- 将元胞状态(Cell State)和隐状态(Hidden State)合并
- 比标准的LSTM模型更简化
- 越来越流行

pytorch实现单向LSTM
使用单向LSTM:
nn = nn.LSTM(input_size=10, hidden_size=20, num_layers=2)#(input_size,hidden_size,num_layers)
input = torch.randn(5, 3, 10)#(seq_len, batch, input_size)
h0 = torch.randn(2, 3, 20) #(num_layers,batch,output_size)
c0 = torch.randn(2, 3, 20) #(num_layers,batch,output_size)
output, (hn, cn) = rnn(input, (h0, c0))

output.shape #(seq_len, batch, output_size)
torch.Size([5, 3, 20])
hn.shape #(num_layers, batch, output_size)
torch.Size([2, 3, 20])
cn.shape #(num_layers, batch, output_size)
torch.Size([2, 3, 20])
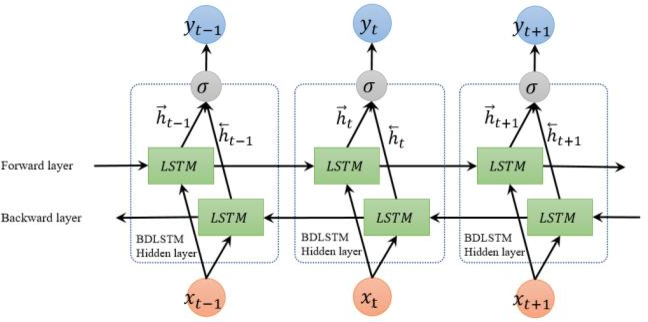
pytorch实现双向LSTM
rnn = nn.LSTM(input_size=10, hidden_size=20, num_layers=2,bidirectional=True)#(input_size,hidden_size,num_layers)
input = torch.randn(5, 3, 10)#(seq_len, batch, input_size)
h0 = torch.randn(4, 3, 20) #(num_layers,batch,output_size)
c0 = torch.randn(4, 3, 20) #(num_layers,batch,output_size)
output, (hn, cn) = rnn(input, (h0, c0))

output.shape #(seq_len, batch, output_size*2)
torch.Size([5, 3, 40])
hn.shape #(num_layers*2, batch, output_size)
torch.Size([4, 3, 20])
cn.shape #(num_layers*2, batch, output_size)
torch.Size([4, 3, 20])
例子:使用LSTM对语句中的单词进行词性标注
每个单词可以有多个词性,在不同的语境中,其词性是不同的,所以语义分析的一个点就是对任意一句话进行每个单词的词性标注。因为这个是上下文强相关的,所以很适合LSTM模型。
- 输入:一句话,转换后的特征:每个单词在词典中的index值
- 输出:一个矩阵,每个单词所属词性类别的概率,比如一句话总共10个单词,总共有3个词性类别,那么生成的就是一个10x3的矩阵。然后用softmax可以取最大概率值的作为每个词的最后词性标注。
# https://www.pytorchtutorial.com/pytorch-sequence-model-and-lstm-networks/

import torch
import torch.autograd as autograd # torch中自动计算梯度模块
import torch.nn as nn             # 神经网络模块
import torch.nn.functional as F   # 神经网络模块中的常用功能
import torch.optim as optim       # 模型优化器模块

torch.manual_seed(1)

######################
### 定义训练数据
training_data = [
    ("The dog ate the apple".split(), ["DET", "NN", "V", "DET", "NN"]),
    ("Everybody read that book".split(), ["NN", "V", "DET", "NN"])
]

######################
### 创建词典:单词词典用于特征生成;词性词典用于label生成
# 创建索引字典(这里是根据训练数据创建的,一般的应该是有一个大而全的词典)
word_to_ix = {} # 单词的索引字典
for sent, tags in training_data:
    for word in sent:
        if word not in word_to_ix:
            word_to_ix[word] = len(word_to_ix)
print(word_to_ix)

# 创建词性的词典
tag_to_ix = {"DET": 0, "NN": 1, "V": 2} # 手工设定词性标签数据字典

# 根据序列和对应的词典,生成对应序列在词典中的index
# sentence+单词词典 =》sentence顺序每个单词的index
# tags+词性词典 =》每个词的词性对应的index
def prepare_sequence(seq, to_ix):
    idxs = [to_ix[w] for w in seq]
    tensor = torch.LongTensor(idxs)
    return autograd.Variable(tensor)

######################
### 定义LSTM网络
class LSTMTagger(nn.Module):

    def __init__(self, embedding_dim, hidden_dim, vocab_size, tagset_size):
        super(LSTMTagger, self).__init__()
        self.hidden_dim = hidden_dim

        self.word_embeddings = nn.Embedding(vocab_size, embedding_dim)

        self.lstm = nn.LSTM(embedding_dim, hidden_dim)

        self.hidden2tag = nn.Linear(hidden_dim, tagset_size)
        self.hidden = self.init_hidden()

    def init_hidden(self):
        return (autograd.Variable(torch.zeros(1, 1, self.hidden_dim)),
                autograd.Variable(torch.zeros(1, 1, self.hidden_dim)))

    def forward(self, sentence):
        embeds = self.word_embeddings(sentence)
        lstm_out, self.hidden = self.lstm(
            embeds.view(len(sentence), 1, -1), self.hidden)
        tag_space = self.hidden2tag(lstm_out.view(len(sentence), -1))
        tag_scores = F.log_softmax(tag_space)
        return tag_scores

######################
### 定义一个具体的LSTM网络:主要是对网络参数进行传值
model = LSTMTagger(2, 3, len(word_to_ix), len(tag_to_ix))
# 定义损失函数
loss_function = nn.NLLLoss()
# 定义优化器
optimizer = optim.SGD(model.parameters(), lr=0.1)

######################
### 这里是还没有使用训练数据进行模型训练的结果
# inputs = prepare_sequence(training_data[0][0], word_to_ix)
# tag_scores = model(inputs)
# print(training_data[0][0])
# print(inputs)
# print(tag_scores)
# ['The', 'dog', 'ate', 'the', 'apple']
# tensor([0, 1, 2, 3, 4])
# tensor([[-1.6456, -1.0384, -0.7917],
#         [-1.6287, -1.1794, -0.7004],
#         [-1.6278, -1.2331, -0.6689],
#         [-1.6497, -1.1290, -0.7245],
#         [-1.6244, -1.2177, -0.6791]], grad_fn=<LogSoftmaxBackward>)

######################
### 使用训练数据进行模型训练
for epoch in range(300): # 我们要训练300次,可以根据任务量的大小酌情修改次数。
    print("ecpo:",epoch)
    for sentence, tags in training_data:
        # 清除网络先前的梯度值,梯度值是Pytorch的变量才有的数据,Pytorch张量没有
        model.zero_grad()
        # 重新初始化隐藏层数据,避免受之前运行代码的干扰
        model.hidden = model.init_hidden()
        # 准备网络可以接受的的输入数据和真实标签数据,这是一个监督式学习
        # 这里的模型的输入x就是sentence_in,转换后就是句子里每个词在词典里面的index
        sentence_in = prepare_sequence(sentence, word_to_ix)
        targets = prepare_sequence(tags, tag_to_ix)
        # 运行我们的模型,直接将模型名作为方法名看待即可
        tag_scores = model(sentence_in)
        # 计算损失,反向传递梯度及更新模型参数
        loss = loss_function(tag_scores, targets)
        loss.backward()
        optimizer.step()

######################
### 检验模型效果:这里用的是训练数据,只为了演示
inputs = prepare_sequence(training_data[0][0], word_to_ix)
tag_scores = model(inputs)
print(tag_scores)
# tensor([[-0.9031, -0.5412, -4.3697],
#         [-2.3633, -0.1098, -4.6217],
#         [-2.7825, -3.1968, -0.1085],
#         [-0.6320, -0.8947, -2.8180],
#         [-2.3956, -0.1101, -4.3304]], grad_fn=<LogSoftmaxBackward>)
MNIST数据集上LSTM和CNN的效果对比
使用RNN LSTM也可以对图片进行分类:
- 输入:图片(28x28),转换后的特征,28个连续的序列,每一个是28维的一个向量?
代码:
# CNN:https://github.com/pytorch/examples/blob/master/mnist/main.py
# RNN LSTM:https://github.com/yunjey/pytorch-tutorial/blob/master/tutorials/02-intermediate/recurrent_neural_network/main.py

from __future__ import print_function
import argparse
import torch
import torch.nn as nn
import torch.nn.functional as F
import torch.optim as optim
from torchvision import datasets, transforms


device = torch.device('cuda' if torch.cuda.is_available() else 'cpu')

class Net(nn.Module):
    def __init__(self):
        super(Net, self).__init__()
        self.conv1 = nn.Conv2d(1, 20, 5, 1)
        self.conv2 = nn.Conv2d(20, 50, 5, 1)
        self.fc1 = nn.Linear(4*4*50, 500)
        self.fc2 = nn.Linear(500, 10)

    def forward(self, x):
        x = F.relu(self.conv1(x))
        x = F.max_pool2d(x, 2, 2)
        x = F.relu(self.conv2(x))
        x = F.max_pool2d(x, 2, 2)
        x = x.view(-1, 4*4*50)
        x = F.relu(self.fc1(x))
        x = self.fc2(x)
        return F.log_softmax(x, dim=1)

class RNN(nn.Module):
    def __init__(self, input_size, hidden_size, num_layers, num_classes):
        super(RNN, self).__init__()
        self.hidden_size = hidden_size
        self.num_layers = num_layers
        self.lstm = nn.LSTM(input_size, hidden_size, num_layers, batch_first=True)
        self.fc = nn.Linear(hidden_size, num_classes)

    def forward(self, x):
        # Set initial hidden and cell states
        h0 = torch.zeros(self.num_layers, x.size(0), self.hidden_size).to(device)
        c0 = torch.zeros(self.num_layers, x.size(0), self.hidden_size).to(device)

        # Forward propagate LSTM
        out, _ = self.lstm(x, (h0, c0))  # out: tensor of shape (batch_size, seq_length, hidden_size)

        # Decode the hidden state of the last time step
        out = self.fc(out[:, -1, :])
        return out

# model = RNN(input_size, hidden_size, num_layers, num_classes).to(device)

def train(args, model, device, train_loader, optimizer, epoch):
    model.train()
    for batch_idx, (data, target) in enumerate(train_loader):
        data, target = data.to(device), target.to(device)
        optimizer.zero_grad()
        output = model(data)
        loss = F.nll_loss(output, target)
        loss.backward()
        optimizer.step()
        if batch_idx % args.log_interval == 0:
            print('Train Epoch: {} [{}/{} ({:.0f}%)]\tLoss: {:.6f}'.format(
                epoch, batch_idx * len(data), len(train_loader.dataset),
                100. * batch_idx / len(train_loader), loss.item()))

def train_LSTM(args, model, device, train_loader, optimizer, epoch, sequence_length, input_size):
    model.train()
    criterion = nn.CrossEntropyLoss()
    for batch_idx, (data, target) in enumerate(train_loader):
        data = data.reshape(-1, sequence_length, input_size).to(device)
        target = target.to(device)
        optimizer.zero_grad()
        output = model(data)
        # loss = F.nll_loss(output, target) # if use nll_loss for LSTM, will be negative number
        loss = criterion(output, target)
        loss.backward()
        optimizer.step()
        if batch_idx % args.log_interval == 0:
            print('Train Epoch: {} [{}/{} ({:.0f}%)]\tLoss: {:.6f}'.format(
                epoch, batch_idx * len(data), len(train_loader.dataset),
                100. * batch_idx / len(train_loader), loss.item()))

def test(args, model, device, test_loader):
    model.eval()
    test_loss = 0
    correct = 0
    with torch.no_grad():
        for data, target in test_loader:
            data, target = data.to(device), target.to(device)
            output = model(data)
            test_loss += F.nll_loss(output, target, reduction='sum').item() # sum up batch loss
            pred = output.argmax(dim=1, keepdim=True) # get the index of the max log-probability
            correct += pred.eq(target.view_as(pred)).sum().item()

    test_loss /= len(test_loader.dataset)

    print('\nTest set: Average loss: {:.4f}, Accuracy: {}/{} ({:.0f}%)\n'.format(
        test_loss, correct, len(test_loader.dataset),
        100. * correct / len(test_loader.dataset)))

def test_LSTM(args, model, device, test_loader, sequence_length, input_size):
    model.eval()
    test_loss = 0
    correct = 0
    criterion = nn.CrossEntropyLoss()
    with torch.no_grad():
        for data, target in test_loader:
            data = data.reshape(-1, sequence_length, input_size).to(device)
            target = target.to(device)
            output = model(data)
            # test_loss += F.nll_loss(output, target, reduction='sum').item() # sum up batch loss
            test_loss += criterion(output, target)
            pred = output.argmax(dim=1, keepdim=True) # get the index of the max log-probability
            correct += pred.eq(target.view_as(pred)).sum().item()

    test_loss /= len(test_loader.dataset)

    print('\nTest set: Average loss: {:.4f}, Accuracy: {}/{} ({:.0f}%)\n'.format(
        test_loss, correct, len(test_loader.dataset),
        100. * correct / len(test_loader.dataset)))

def main():
    # Training settings
    parser = argparse.ArgumentParser(description='PyTorch MNIST Example')
    parser.add_argument('--batch-size', type=int, default=64, metavar='N',
                        help='input batch size for training (default: 64)')
    parser.add_argument('--test-batch-size', type=int, default=1000, metavar='N',
                        help='input batch size for testing (default: 1000)')
    parser.add_argument('--epochs', type=int, default=10, metavar='N',
                        help='number of epochs to train (default: 10)')
    parser.add_argument('--lr', type=float, default=0.01, metavar='LR',
                        help='learning rate (default: 0.01)')
    parser.add_argument('--momentum', type=float, default=0.5, metavar='M',
                        help='SGD momentum (default: 0.5)')
    parser.add_argument('--no-cuda', action='store_true', default=False,
                        help='disables CUDA training')
    parser.add_argument('--seed', type=int, default=1, metavar='S',
                        help='random seed (default: 1)')
    parser.add_argument('--log-interval', type=int, default=10, metavar='N',
                        help='how many batches to wait before logging training status')

    parser.add_argument('--save-model', action='store_true', default=False,
                        help='For Saving the current Model')
    args = parser.parse_args()
    use_cuda = not args.no_cuda and torch.cuda.is_available()

    torch.manual_seed(args.seed)

#     device = torch.device("cuda" if use_cuda else "cpu")
    device = torch.device('cuda' if torch.cuda.is_available() else 'cpu')

    kwargs = {'num_workers': 1, 'pin_memory': True} if use_cuda else {}
    train_loader = torch.utils.data.DataLoader(
        datasets.MNIST('../../data', train=True, download=True,
                       transform=transforms.Compose([
                           transforms.ToTensor(),
                           transforms.Normalize((0.1307,), (0.3081,))
                       ])),
        batch_size=args.batch_size, shuffle=True, **kwargs)
    test_loader = torch.utils.data.DataLoader(
        datasets.MNIST('../../data', train=False, transform=transforms.Compose([
                           transforms.ToTensor(),
                           transforms.Normalize((0.1307,), (0.3081,))
                       ])),
        batch_size=args.test_batch_size, shuffle=True, **kwargs)


    # CNN
#     model = Net().to(device)
#     optimizer = optim.SGD(model.parameters(), lr=args.lr, momentum=args.momentum)
#     for epoch in range(1, args.epochs + 1):
#         train(args, model, device, train_loader, optimizer, epoch)
#         test(args, model, device, test_loader)

    # RNN LSTM
    sequence_length = 28
    input_size = 28
    hidden_size = 128
    num_layers = 2
    num_classes = 10
    model = RNN(input_size=input_size, hidden_size=hidden_size, num_layers=num_layers, num_classes=num_classes).to(device) # RNN LSTM
#     optimizer = optim.SGD(model.parameters(), lr=args.lr, momentum=args.momentum)
    # SGD works not well for LSTM
    optimizer = torch.optim.Adam(model.parameters(), lr=args.lr)
    for epoch in range(1, args.epochs + 1):
        train_LSTM(args, model, device, train_loader, optimizer, epoch, sequence_length, input_size)
        test_LSTM(args, model, device, test_loader, sequence_length, input_size)

    if (args.save_model):
        torch.save(model.state_dict(),"mnist_cnn.pt")

if __name__ == '__main__':
    main()
效果,这里只是测试一下,所以设置了epoch=2,使用更大的值时,效果应该都分别有提升。
# CNN
➜  LSTM git:(master) ✗ CUDA_VISIBLE_DEVICES=3 python mnist.py
Train Epoch: 1 [0/60000 (0%)]   Loss: 2.300039
Train Epoch: 1 [640/60000 (1%)] Loss: 2.213470
Train Epoch: 1 [1280/60000 (2%)]        Loss: 2.170460
Train Epoch: 1 [1920/60000 (3%)]        Loss: 2.076699
...
Train Epoch: 1 [57600/60000 (96%)]      Loss: 0.117136
Train Epoch: 1 [58240/60000 (97%)]      Loss: 0.191664
Train Epoch: 1 [58880/60000 (98%)]      Loss: 0.204842
Train Epoch: 1 [59520/60000 (99%)]      Loss: 0.064107

Test set: Average loss: 0.1015, Accuracy: 9661/10000 (97%)

Train Epoch: 2 [0/60000 (0%)]   Loss: 0.145626
Train Epoch: 2 [640/60000 (1%)] Loss: 0.119849
Train Epoch: 2 [1280/60000 (2%)]        Loss: 0.101394
Train Epoch: 2 [1920/60000 (3%)]        Loss: 0.068628
...
Train Epoch: 2 [57600/60000 (96%)]      Loss: 0.037703
Train Epoch: 2 [58240/60000 (97%)]      Loss: 0.166170
Train Epoch: 2 [58880/60000 (98%)]      Loss: 0.035417
Train Epoch: 2 [59520/60000 (99%)]      Loss: 0.069601
Test set: Average loss: 0.0610, Accuracy: 9829/10000 (98%)

# RNN LSTM
➜  LSTM git:(master) ✗ CUDA_VISIBLE_DEVICES=2 python mnist.py
Train Epoch: 1 [0/60000 (0%)]   Loss: -0.016249
Train Epoch: 1 [640/60000 (1%)] Loss: -0.056388
Train Epoch: 1 [1280/60000 (2%)]        Loss: -0.091170
Train Epoch: 1 [1920/60000 (3%)]        Loss: -0.088119
...
Train Epoch: 1 [57600/60000 (96%)]      Loss: -161.295212
Train Epoch: 1 [58240/60000 (97%)]      Loss: -165.509781
Train Epoch: 1 [58880/60000 (98%)]      Loss: -168.507706
Train Epoch: 1 [59520/60000 (99%)]      Loss: -168.760498

Test set: Average loss: -171.4964, Accuracy: 1135/10000 (11%)

Train Epoch: 2 [0/60000 (0%)]   Loss: -172.674515
Train Epoch: 2 [640/60000 (1%)] Loss: -172.516800
Train Epoch: 2 [1280/60000 (2%)]        Loss: -179.091690
Train Epoch: 2 [1920/60000 (3%)]        Loss: -181.107941
...
Train Epoch: 2 [57600/60000 (96%)]      Loss: -406.059845
Train Epoch: 2 [58240/60000 (97%)]      Loss: -407.615234
Train Epoch: 2 [58880/60000 (98%)]      Loss: -407.243866
Train Epoch: 2 [59520/60000 (99%)]      Loss: -412.519165

Test set: Average loss: -414.2386, Accuracy: 1135/10000 (11%)
可以看到,上面的loss为负值,说明程序出现了问题,原因是使用的优化器不够好,我们可以选用Adam优化器,而不是SGD。
➜  LSTM git:(master) ✗ CUDA_VISIBLE_DEVICES=2 python mnist.py --batch-size 100 --test-batch-size 100 --lr 0.01 --epochs 2
Train Epoch: 1 [0/60000 (0%)]   Loss: 2.306968
Train Epoch: 1 [1000/60000 (2%)]        Loss: 2.027250
Train Epoch: 1 [2000/60000 (3%)]        Loss: 1.387051
Train Epoch: 1 [3000/60000 (5%)]        Loss: 1.275983
Train Epoch: 1 [4000/60000 (7%)]        Loss: 1.040894
...
Train Epoch: 1 [56000/60000 (93%)]      Loss: 0.130190
Train Epoch: 1 [57000/60000 (95%)]      Loss: 0.231418
Train Epoch: 1 [58000/60000 (97%)]      Loss: 0.111383
Train Epoch: 1 [59000/60000 (98%)]      Loss: 0.119482

Test set: Average loss: 0.0011, Accuracy: 9673/10000 (97%)

Train Epoch: 2 [0/60000 (0%)]   Loss: 0.136026
Train Epoch: 2 [1000/60000 (2%)]        Loss: 0.137714
Train Epoch: 2 [2000/60000 (3%)]        Loss: 0.075271
Train Epoch: 2 [3000/60000 (5%)]        Loss: 0.187317
Train Epoch: 2 [4000/60000 (7%)]        Loss: 0.048653
...
Train Epoch: 2 [56000/60000 (93%)]      Loss: 0.072240
Train Epoch: 2 [57000/60000 (95%)]      Loss: 0.142520
Train Epoch: 2 [58000/60000 (97%)]      Loss: 0.048884
Train Epoch: 2 [59000/60000 (98%)]      Loss: 0.139993

Test set: Average loss: 0.0009, Accuracy: 9732/10000 (97%)
直接执行参考脚本效果如下:
# RNN LSTM:https://github.com/yunjey/pytorch-tutorial/blob/master/tutorials/02-intermediate/recurrent_neural_network/main.py
➜  LSTM git:(master) ✗ CUDA_VISIBLE_DEVICES=2 python main.py
Epoch [1/2], Step [100/600], Loss: 0.5705
Epoch [1/2], Step [200/600], Loss: 0.3457
Epoch [1/2], Step [300/600], Loss: 0.1618
Epoch [1/2], Step [400/600], Loss: 0.1454
Epoch [1/2], Step [500/600], Loss: 0.1483
Epoch [1/2], Step [600/600], Loss: 0.1474
Epoch [2/2], Step [100/600], Loss: 0.0638
Epoch [2/2], Step [200/600], Loss: 0.0776
Epoch [2/2], Step [300/600], Loss: 0.0269
Epoch [2/2], Step [400/600], Loss: 0.0607
Epoch [2/2], Step [500/600], Loss: 0.0225
Epoch [2/2], Step [600/600], Loss: 0.1379
Test Accuracy of the model on the 10000 test images: 97.1 %
参考
Read full-text »
Latest articles
Links
- ZhangLab , RISE database , THU life , THU info
- Data analysis: pandas , numpy , scipy
- ML/DL: sklearn , sklearn(中文) , pytorch
- Visualization: seaborn , matplotlib , gallery
- Github: me
