目录
概述
循环神经网络(Recurrent neural network,RNN):a class of artificial neural network where connections between nodes form a directed graph along a temporal sequence (from wiki)。
概念
为什么需要RNN?
- 卷积神经网络或者人工神经网络,都基于假设:元素(样本)之间是相互独立的,输入输出也是独立的。
- 现实场景很多是不一定的?比如根据上下文预测后续的单词,股票价格的走势预测等,都是有影响的。
- 更好的处理序列问题,拥有记忆的能力,这样模型的输出就取决于【当前的输入】和【记忆】。
网络结构
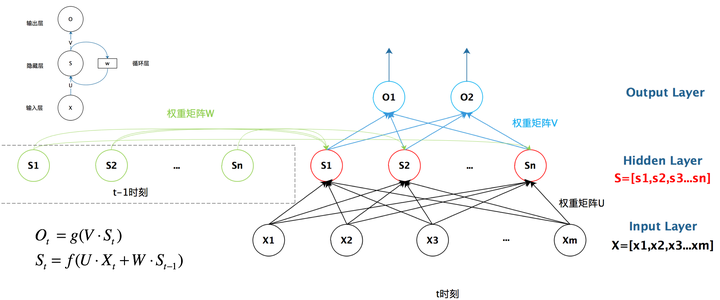
结构类似于传统的神经网络,包括输入层、隐藏层和输出层,只是这里的隐藏层的值是取决于输入和上一次的隐藏层的值:
- 参数\(X_t\):t时刻的输入
- 参数\(O_t\):t时刻的输出
- 参数\(S_t\):t时刻的记忆(t时刻隐藏层的值?)
- 参数\(U\):输入层到隐藏层的权重矩阵
- 参数\(V\):隐藏层到输出层的权重矩阵
- 参数\(W\):隐藏层上一次的值到这一次的输入时的权重矩阵
- 【注意1】:从这里看出,类似于卷积神经网络,权重矩阵U、V、W都是共享的,极大的降低了所需训练的参数,减小了计算量。
- 【注意2】:\(S_t\)不能捕捉t时间点之前所有时间点的信息。

上面的结构展开是按照时间线展开的,下面这个是按照网络展开的:
损失函数
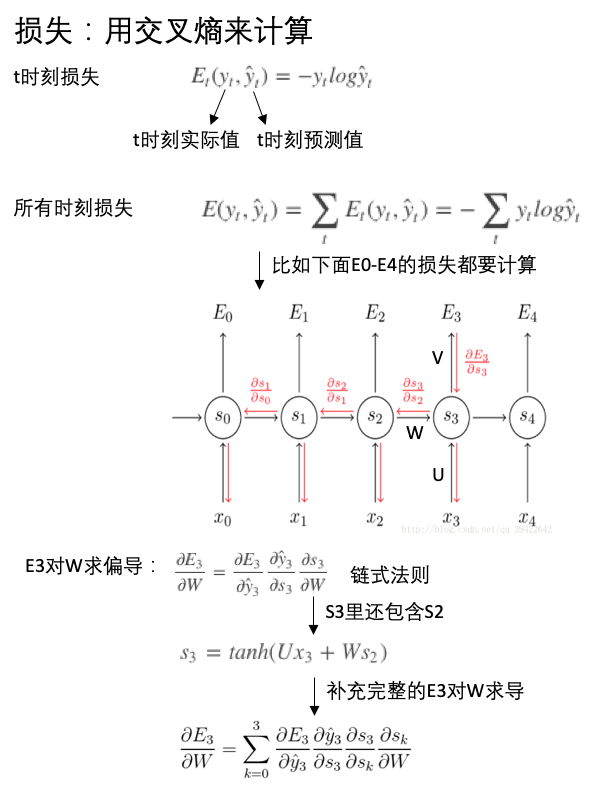
有了预测的结果,当然需要跟真实值进行对比,以确定损失值,从而更新参数(U,V,W)优化模型。下面就是RNN中的损失函数表示,这里采用的是交叉熵:
上面关于E3对W的偏导数在这里有详细的公式,可以参考一下。
我们一般采用反向传播算法(BP)求解最优参数,但是在RNN里采用的是BPTT(back-propagation through time),它和反向传播算法的区别,也就是RNN和其他网络的区别,即RNN是具有记忆的,所以求导的时候也是依赖于之前的时间节点的。
注意:BPTT基本原理类似于BP,BP是按照层来反向传播,BPTT按照时间进行反向传播。
示例:根据字符预测相加的数值
比如,输入: “535+61” 输出: “596”
# https://keras.io/examples/addition_rnn/

from __future__ import print_function
from keras.models import Sequential
from keras import layers
import numpy as np
from six.moves import range


class CharacterTable(object):
    """Given a set of characters:
    + Encode them to a one-hot integer representation
    + Decode the one-hot or integer representation to their character output
    + Decode a vector of probabilities to their character output
    """
    def __init__(self, chars):
        """Initialize character table.

        # Arguments
            chars: Characters that can appear in the input.
        """
        self.chars = sorted(set(chars))
        self.char_indices = dict((c, i) for i, c in enumerate(self.chars))
        self.indices_char = dict((i, c) for i, c in enumerate(self.chars))

    def encode(self, C, num_rows):
        """One-hot encode given string C.

        # Arguments
            C: string, to be encoded.
            num_rows: Number of rows in the returned one-hot encoding. This is
                used to keep the # of rows for each data the same.
        """
        x = np.zeros((num_rows, len(self.chars)))
        for i, c in enumerate(C):
            x[i, self.char_indices[c]] = 1
        return x

    def decode(self, x, calc_argmax=True):
        """Decode the given vector or 2D array to their character output.

        # Arguments
            x: A vector or a 2D array of probabilities or one-hot representations;
                or a vector of character indices (used with `calc_argmax=False`).
            calc_argmax: Whether to find the character index with maximum
                probability, defaults to `True`.
        """
        if calc_argmax:
            x = x.argmax(axis=-1)
        return ''.join(self.indices_char[x] for x in x)


class colors:
    ok = '\033[92m'
    fail = '\033[91m'
    close = '\033[0m'

# Parameters for the model and dataset.
TRAINING_SIZE = 50000
DIGITS = 3
REVERSE = True

# Maximum length of input is 'int + int' (e.g., '345+678'). Maximum length of
# int is DIGITS.
MAXLEN = DIGITS + 1 + DIGITS

# All the numbers, plus sign and space for padding.
chars = '0123456789+ '
ctable = CharacterTable(chars)

questions = []
expected = []
seen = set()
print('Generating data...')
while len(questions) < TRAINING_SIZE:
    f = lambda: int(''.join(np.random.choice(list('0123456789'))
                    for i in range(np.random.randint(1, DIGITS + 1))))
    a, b = f(), f()
    # Skip any addition questions we've already seen
    # Also skip any such that x+Y == Y+x (hence the sorting).
    key = tuple(sorted((a, b)))
    if key in seen:
        continue
    seen.add(key)
    # Pad the data with spaces such that it is always MAXLEN.
    q = '{}+{}'.format(a, b)
    query = q + ' ' * (MAXLEN - len(q))
    ans = str(a + b)
    # Answers can be of maximum size DIGITS + 1.
    ans += ' ' * (DIGITS + 1 - len(ans))
    if REVERSE:
        # Reverse the query, e.g., '12+345  ' becomes '  543+21'. (Note the
        # space used for padding.)
        query = query[::-1]
    questions.append(query)
    expected.append(ans)
print('Total addition questions:', len(questions))

print('Vectorization...')
x = np.zeros((len(questions), MAXLEN, len(chars)), dtype=np.bool)
y = np.zeros((len(questions), DIGITS + 1, len(chars)), dtype=np.bool)
for i, sentence in enumerate(questions):
    x[i] = ctable.encode(sentence, MAXLEN)
for i, sentence in enumerate(expected):
    y[i] = ctable.encode(sentence, DIGITS + 1)

# Shuffle (x, y) in unison as the later parts of x will almost all be larger
# digits.
indices = np.arange(len(y))
np.random.shuffle(indices)
x = x[indices]
y = y[indices]

# Explicitly set apart 10% for validation data that we never train over.
split_at = len(x) - len(x) // 10
(x_train, x_val) = x[:split_at], x[split_at:]
(y_train, y_val) = y[:split_at], y[split_at:]

print('Training Data:')
print(x_train.shape)
print(y_train.shape)

print('Validation Data:')
print(x_val.shape)
print(y_val.shape)

# Try replacing GRU, or SimpleRNN.
RNN = layers.LSTM
HIDDEN_SIZE = 128
BATCH_SIZE = 128
LAYERS = 1

print('Build model...')
model = Sequential()
model.add(RNN(HIDDEN_SIZE, input_shape=(MAXLEN, len(chars))))
model.add(layers.RepeatVector(DIGITS + 1))
for _ in range(LAYERS):
    model.add(RNN(HIDDEN_SIZE, return_sequences=True))

# Apply a dense layer to the every temporal slice of an input. For each of step
# of the output sequence, decide which character should be chosen.
model.add(layers.TimeDistributed(layers.Dense(len(chars), activation='softmax')))
model.compile(loss='categorical_crossentropy',
              optimizer='adam',
              metrics=['accuracy'])
model.summary()

# Train the model each generation and show predictions against the validation
# dataset.
for iteration in range(1, 200):
    print()
    print('-' * 50)
    print('Iteration', iteration)
    model.fit(x_train, y_train,
              batch_size=BATCH_SIZE,
              epochs=1,
              validation_data=(x_val, y_val))
    # Select 10 samples from the validation set at random so we can visualize
    # errors.
    for i in range(10):
        ind = np.random.randint(0, len(x_val))
        rowx, rowy = x_val[np.array([ind])], y_val[np.array([ind])]
        preds = model.predict_classes(rowx, verbose=0)
        q = ctable.decode(rowx[0])
        correct = ctable.decode(rowy[0])
        guess = ctable.decode(preds[0], calc_argmax=False)
        print('Q', q[::-1] if REVERSE else q, end=' ')
        print('T', correct, end=' ')
        if correct == guess:
            print(colors.ok + '☑' + colors.close, end=' ')
        else:
            print(colors.fail + '☒' + colors.close, end=' ')
        print(guess)
pytorch 参数
Pytorch模型的参数
- 模型构造参数:限定网络的结构,决定了模型持久化后的大小。
- RNN:输入维度、隐层维度、输出维度、层数
- CNN:卷积层、池化层。不关心输入维度,只涉及卷积核大小、步长等。
- 输入和输出的构造参数:一般和模型训练有关,决定了模型的训练效果
- batch大小
- RNN:seq大小、h0/c0的初始化
- CNN:chanel大小
- 输入维度、输出维度
线性函数
- 形式:
torch.nn.Linear(in_features, out_features, bias=True) - 参数:
in_features:输入样本的特征大小out_features:输出样本的特征大小
- 模型输入:(N,*,in_features),N是样本数(更多是batch_size大小),
*是其他维度的数目 - 模型输出:(N,*,out_features)
import torch
import torch.nn as nn
from torch.autograd import Variable as V
line =  nn.Linear(2, 4)  # 输入2维,输出4维
print(line)
print(line.weight) # 参数是随机初始化的,维度为out_dim * in_dim

input = torch.randn(128, 2)
output = line(input) # input:[batch_size, in_features]
print(output.size())
# torch.Size([128, 4])# 输出是4维的,总共还是128个样本
RNN函数
- 形式:
torch.nn.RNN(*args, **kwargs) - 参数列表:
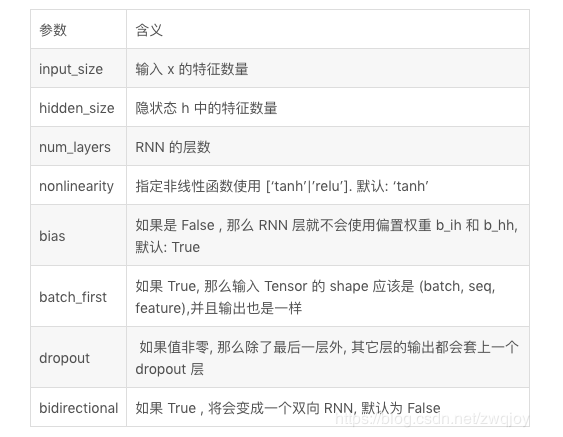
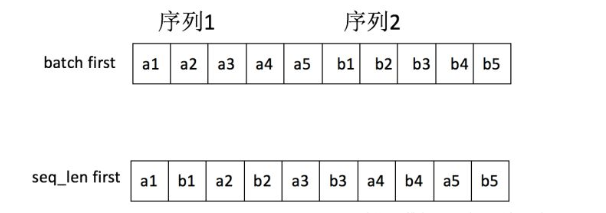
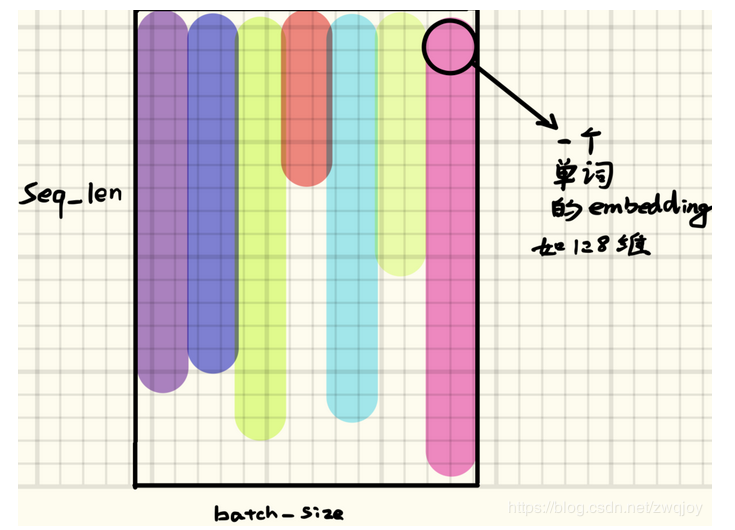
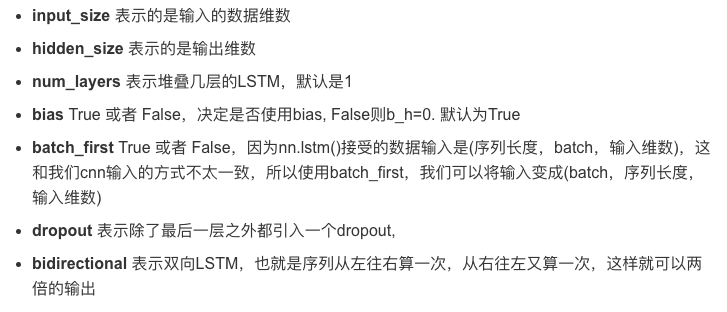
- 输入:(seq_len, N, input_size),通常把N放在第一维度,代表样本的数目,但是在RNN里面是放在第二维度。如果设置
batch_first=True,则N是放在第一维度。
# 构造RNN网络,x的维度5,隐层的维度10,网络的层数2
rnn_seq = nn.RNN(5, 10,2)
# 构造一个输入序列,长为 6,batch 是 3, 特征是 5
# 构造了3个样本,每个样本序列长度是6,序列中每个元素的特征数目是5
x = V(torch.randn(6, 3, 5))
>>> x
tensor([[[-0.6303,  0.9779, -2.9788,  1.7746,  0.5186],
         [-0.6486, -0.8001,  1.0648, -0.5147,  0.1695],
         [ 0.0697, -1.2403, -0.3395,  0.7208,  0.9226]],

        [[-0.8585, -0.6495, -0.5613, -1.5468,  1.1702],
         [ 0.3116, -0.4774, -1.9360, -0.3530,  0.7771],
         [ 0.7221,  1.4826,  0.1034,  1.3373,  0.5068]],

        [[ 0.3272,  1.6418, -1.4210, -0.8854,  0.4976],
         [ 0.1126, -0.6568, -0.2319, -0.1945,  0.2860],
         [ 0.1527, -0.9851, -0.2493,  1.1485,  0.5913]],

        [[-0.2823,  0.0412,  0.3264, -0.7845, -0.8641],
         [-0.8596, -0.6330,  1.1949,  0.9501, -0.1376],
         [ 0.7347, -0.2089, -1.6980, -1.6432,  0.5869]],

        [[-1.1452,  0.2247, -1.3203, -0.4788, -0.9955],
         [-0.1336,  0.3328,  1.5008, -0.4519, -0.2992],
         [ 0.7972,  0.1477,  0.0327,  1.6130,  1.2209]],

        [[ 0.4642,  0.1228, -1.3256,  0.2742, -0.7214],
         [ 1.1555, -0.9315,  0.0568, -0.6230, -0.0987],
         [ 0.4312, -0.4366, -0.5372, -1.9001, -0.0266]]])

#out,ht = rnn_seq(x, h0) # h0可以指定或者不指定
out,ht = rnn_seq(x)
# q1:这里out、ht的size是多少呢?
# out:6*3*10, 维度:[seq_len,batch_size,output_dim]
# ht:2*3*10,维度:[num_layers*num_directions,batch_size,hidden_size]
LSTM函数
# 输入维度 50,隐层100维,两层
lstm_seq = nn.LSTM(50, 100, num_layers=2)
# 输入序列seq= 10,batch =3,输入维度=50
lstm_input = torch.randn(10, 3, 50)
lstm_input

tensor([[[ 0.7113, -0.6847,  1.4853,  ..., -0.8756, -1.9232, -0.1402],
         [ 0.9571, -0.6360, -0.2472,  ...,  1.9730, -0.8825, -0.8389],
         [-0.9462, -0.1396,  0.0557,  ..., -2.5022,  1.8492,  1.5259]],

        [[-1.2622, -0.8042, -1.0090,  ..., -0.1735,  0.7217,  1.5215],
         [-1.5269, -0.1989, -1.0277,  ...,  1.0310,  0.7001, -0.5374],
         [ 0.1777, -0.4229, -1.1922,  ...,  1.6358, -0.0839, -0.7444]],

        [[-0.6011,  0.1122, -0.2326,  ..., -0.6505,  1.9869,  0.9557],
         [ 0.0596,  2.9035,  0.5162,  ..., -0.6960, -0.7850, -2.1553],
         [-0.1984,  1.2849, -2.3959,  ...,  0.0589,  0.9883, -0.2290]],

        ...,

        [[-1.8330,  0.1635,  0.1820,  ...,  0.9722, -0.2818,  0.3083],
         [-0.7244, -0.5714, -0.4720,  ...,  0.6063,  0.4485,  1.5583],
         [ 1.3423, -1.0815,  0.4764,  ...,  0.4708,  0.1401, -0.5570]],

        [[-1.4590, -1.4374,  0.2214,  ..., -1.4389,  1.5391,  0.0176],
         [-0.1976,  1.2557,  1.2941,  ...,  0.6628,  1.0961,  0.9819],
         [ 1.2183,  0.1928, -0.7744,  ...,  0.8454,  0.3897, -0.3856]],

        [[ 0.5113, -0.1593, -1.1133,  ...,  0.5676,  0.9161, -0.6854],
         [ 0.3067,  0.6218, -2.0851,  ..., -0.2881, -1.5274, -0.1741],
         [-0.0753, -0.8904,  0.1211,  ...,  0.6233,  1.1697,  1.0516]]])

out, (h, c) = lstm_seq(lstm_input) # 使用默认的全 0 隐藏状态
print(out.shape)
print(h.shape)
print(c.shape)
# out: (seq_len, batch_size, hidden_size*num_directions)
torch.Size([10, 3, 100])
# hn: (num_layers*num_directions, batch_size, hidden_size)
torch.Size([2, 3, 100])
# cn: (num_layers*num_directions, batch_size, hidden_size)
torch.Size([2, 3, 100])
参考
- 一文搞懂RNN(循环神经网络)基础篇
- 循环神经网络(RNN)原理通俗解释
- Fundamentals of Deep Learning – Introduction to Recurrent Neural Networks
- 从循环神经网络(RNN)到LSTM网络
- Pytorch中RNN/LSTM 模型小结
If you link this blog, please refer to this page, thanks!
Post link:https://tsinghua-gongjing.github.io/posts/RNN.html
Previous:
CNN
Latest articles
Links
- ZhangLab , RISE database , THU life , THU info
- Data analysis: pandas , numpy , scipy
- ML/DL: sklearn , sklearn(中文) , pytorch
- Visualization: seaborn , matplotlib , gallery
- Github: me
