连接使用远程(集群)jupyter notebook
主要是参考了这里,这个是用的ipython,当时jupyter notebook还没完善,基本原理和操作是一样的,包括现在很多人使用的jupyter-lab,下面是连接jupyter-lab的例子:
1、在客户端打开一个指定端口的server:
jupyter-lab --port 8007
[W 13:37:55.064 LabApp] WARNING: The notebook server is listening on all IP addresses and not using encryption. This is not recommended.
[I 13:37:55.378 LabApp] JupyterLab beta preview extension loaded from /Share/home/zhangqf5/anaconda2/lib/python2.7/site-packages/jupyterlab
[I 13:37:55.378 LabApp] JupyterLab application directory is /Share/home/zhangqf5/anaconda2/share/jupyter/lab
[I 13:37:55.389 LabApp] Serving notebooks from local directory: /Share/home/zhangqf5/gongjing/rare_cell
[I 13:37:55.389 LabApp] 0 active kernels
[I 13:37:55.389 LabApp] The Jupyter Notebook is running at:
[I 13:37:55.389 LabApp] http://[all ip addresses on your system]:8007/?token=442494e19571582585464518668825f6ae1e4d4c3bdfc070
[I 13:37:55.389 LabApp] Use Control-C to stop this server and shut down all kernels (twice to skip confirmation).
[C 13:37:55.391 LabApp]

    Copy/paste this URL into your browser when you connect for the first time,
    to login with a token:
        http://localhost:8007/?token=442494e19571582585464518668825f6ae1e4d4c3bdfc070
[I 13:42:16.820 LabApp] 302 GET / (::1) 0.47ms
[W 13:42:18.565 LabApp] Could not determine jupyterlab build status without nodejs
2、在本地使用ssh用指定端口登录:
ssh -Y username@remoteIP -L 8007:localhost:8007
3、在本地浏览器输入对应的地址:http://localhost:8007,有的时候需要指定一个token,所以可以直接复制完整第地址,比如这里的:
http://localhost:8007/?token=442494e19571582585464518668825f6ae1e4d4c3bdfc070
端口映射查看训练过程
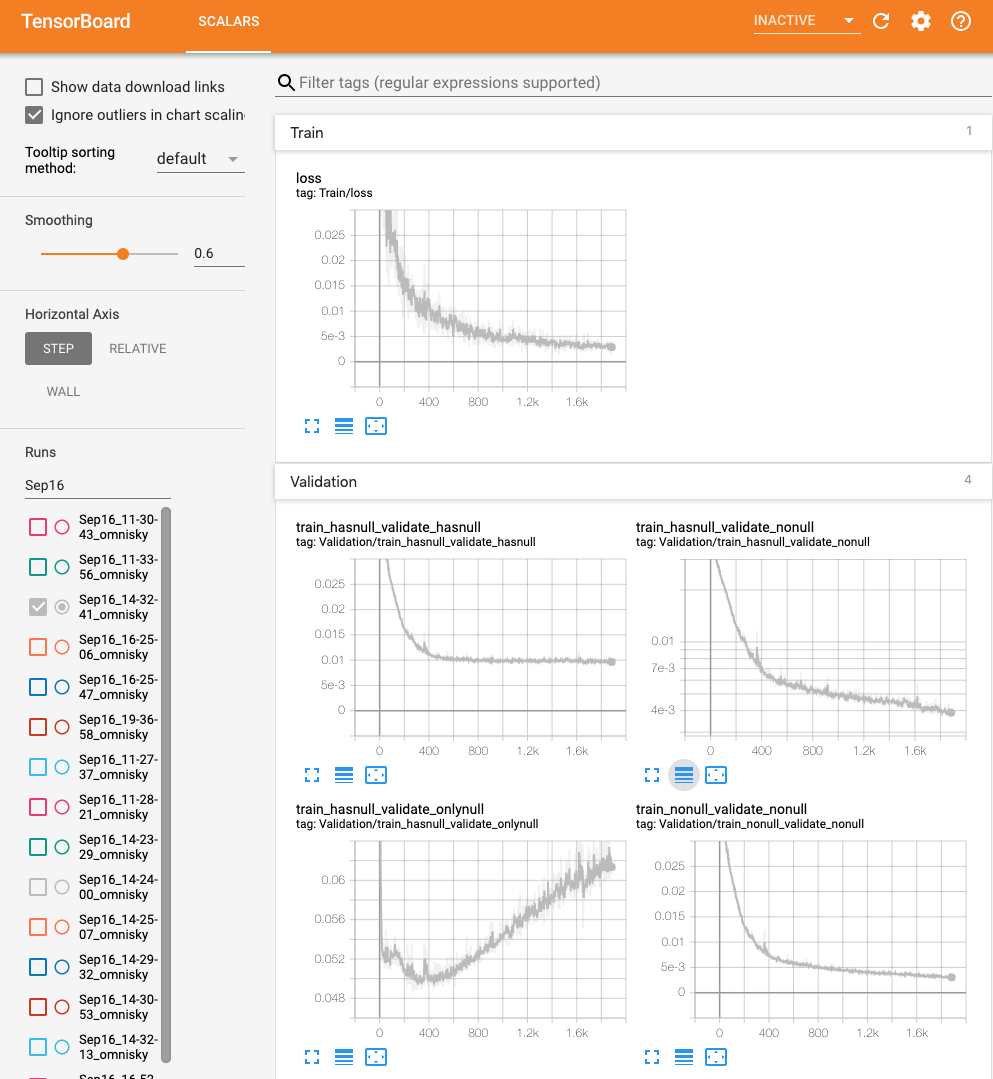
主要是参考利用多重映射从本地查看集群的tensorboard,这里使用的是TensorBoardx:
- 其中实线是smooth过后的值,背后的shaddow是原始的值,可以把鼠标放在上面,查看每个epoch上的loss值。
- 这里是定义了几个不太的loss值,所以有不同的变量曲线。
- 写的步骤:1)定义writer;2)每个epoch获取loss值;3)将loss值添加到变量
writer = SummaryWriter()

    min_loss,min_epoch,min_prediction = 100,0,0
    for epoch in range(1, args.epochs + 1):
        train_loss = train_LSTM(args, model, device, train_loader, optimizer, epoch, sequence_length, input_size)
        validate_loss,prediction_all = validate_LSTM(args, model, device, validate_loader, sequence_length, input_size)

        if validate_loss['train_nonull_validate_nonull'] < min_loss:
            min_loss = validate_loss['train_nonull_validate_nonull']
            min_epoch = epoch
            min_prediction = prediction_all

            with open(save_prediction, 'w') as SAVEFN:
                print("Write prediction: epoch:{}, loss:{}".format(min_epoch, min_loss))
                for i in min_prediction:
                    SAVEFN.write(','.join(map(str,i))+'\n')

            best_model = copy.deepcopy(model)

        writer.add_scalar('Train/loss', train_loss, epoch)
        writer.add_scalar('Validation/train_nonull_validate_nonull',
                          validate_loss['train_nonull_validate_nonull']*args.batch_size, epoch)
        writer.add_scalar('Validation/train_hasnull_validate_nonull',
                          validate_loss['train_hasnull_validate_nonull']*args.batch_size, epoch)
        writer.add_scalar('Validation/train_hasnull_validate_hasnull',
                          validate_loss['train_hasnull_validate_hasnull']*args.batch_size, epoch)
        writer.add_scalar('Validation/train_hasnull_validate_onlynull',
                          validate_loss['train_hasnull_validate_onlynull']*args.batch_size, epoch)

    writer.close()
If you link this blog, please refer to this page, thanks!
Post link:https://tsinghua-gongjing.github.io/posts/jupyter_server.html
Previous:
【4-4】特殊应用:人脸识别和神经风格转换
Next:
SQL速查表
Latest articles
Links
- ZhangLab , RISE database , THU life , THU info
- Data analysis: pandas , numpy , scipy
- ML/DL: sklearn , sklearn(中文) , pytorch
- Visualization: seaborn , matplotlib , gallery
- Github: me
