目录
概述
自编码(auto encoder):把输入数据进行一个压缩和解压缩的过程,对高维数据的一个低维表示,同时最大限度的保留原始数据信息。
1、框架(包含3个部分):

- Encoding Architecture :包含一些列的层,层里的节点数目是减少的,最后得到一个隐藏特征的表示。
- Latent View Repersentation : 隐藏特征的视图,最小的特征空间,保留原始的数据信息。
- Decoding Architecture : 编码结构的镜像,包含一些列的层,层里的节点数目是减少的,通过对隐藏特征空间的变换,恢复到(近似)原始的数据。
2、例子:这里通过一个二维线性分布的数据点,进行编码转换到一维,从而实现自编码过程,可以参考一下。
3、优缺点:
- 大数据降维
-
解决非线性问题
- 训练是计算消耗大
- 解释性差
- 低层的数学模型较复杂
- 容易过拟合
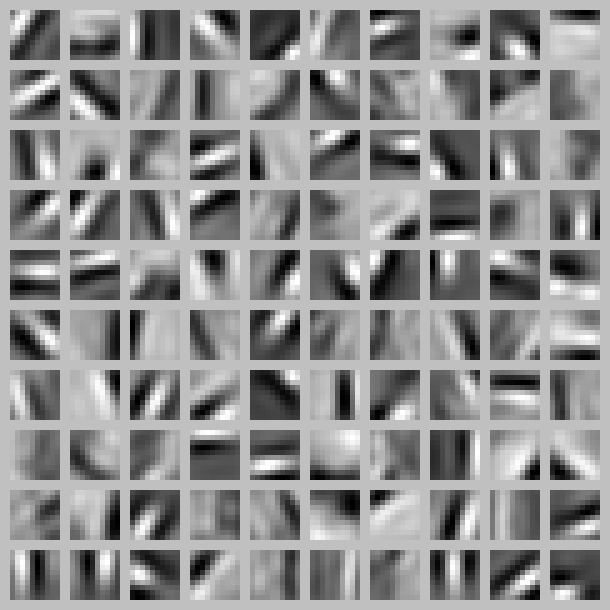
4、可视化:通过可视化,可以看到不同的神经元是学习到图像不同的位置和角度的特征。下图是100个神经元的隐藏层可视化:

实现
keras版本
这里有个简单的实现版本。使用keras构建了一个自编码解码器,其有四个编码层,分别把图像特征从原始的784(28x28)维降至128、64、10、2维,然后进行解码。同时,提取了仅编码后的结果(2维)进行可视化(相当于看编码的效果好不好)。
import numpy as np
np.random.seed(1337)  # for reproducibility

from keras.datasets import mnist
from keras.models import Model
from keras.layers import Dense, Input
import matplotlib.pyplot as plt

# download the mnist to the path '~/.keras/datasets/' if it is the first time to be called
# X shape (60,000 28x28), y shape (10,000, )
(x_train, _), (x_test, y_test) = mnist.load_data()

# data pre-processing
x_train = x_train.astype('float32') / 255. - 0.5       # minmax_normalized
x_test = x_test.astype('float32') / 255. - 0.5         # minmax_normalized
x_train = x_train.reshape((x_train.shape[0], -1))
x_test = x_test.reshape((x_test.shape[0], -1))
print(x_train.shape)
print(x_test.shape)

"""
(60000, 784)
(10000, 784)
"""

# in order to plot in a 2D figure
encoding_dim = 2

# this is our input placeholder
# define input layer
input_img = Input(shape=(784,))

# encoder layers
encoded = Dense(128, activation='relu')(input_img)
encoded = Dense(64, activation='relu')(encoded)
encoded = Dense(10, activation='relu')(encoded)
encoder_output = Dense(encoding_dim)(encoded)

# decoder layers
decoded = Dense(10, activation='relu')(encoder_output)
decoded = Dense(64, activation='relu')(decoded)
decoded = Dense(128, activation='relu')(decoded)
decoded = Dense(784, activation='tanh')(decoded)

# construct the autoencoder model
autoencoder = Model(input=input_img, output=decoded)

# construct the encoder model for plotting
# 这里的encoder就是整个AE的一部分,不需要在重新compile和fit,可直接提取
encoder = Model(input=input_img, output=encoder_output)

# compile autoencoder
autoencoder.compile(optimizer='adam', loss='mse')

# training
autoencoder.fit(x_train, x_train,
                nb_epoch=20,
                batch_size=256,
                shuffle=True)

# plotting
# dot color by y_test (label, already known)
encoded_imgs = encoder.predict(x_test)
plt.scatter(encoded_imgs[:, 0], encoded_imgs[:, 1], c=y_test)
plt.colorbar()
plt.show()
pytorch版本
这里给出了一个pytorch的版本,编码部分是4个网络层,最后降至3维,因为要想在3维空间进行可视化。
import torch
import torch.nn as nn
import torch.utils.data as Data
import torchvision

# 超参数
EPOCH = 10
BATCH_SIZE = 64
LR = 0.005
DOWNLOAD_MNIST = True   # 下过数据的话, 就可以设置成 False
N_TEST_IMG = 5          # 到时候显示 5张图片看效果, 如上图一

# Mnist digits dataset
train_data = torchvision.datasets.MNIST(
    root='./mnist/',
    train=True,                                     # this is training data
    transform=torchvision.transforms.ToTensor(),    # Converts a PIL.Image or numpy.ndarray to
                                                    # torch.FloatTensor of shape (C x H x W) and normalize in the range [0.0, 1.0]
    download=DOWNLOAD_MNIST,                        # download it if you don't have it
)

class AutoEncoder(nn.Module):
    def __init__(self):
        super(AutoEncoder, self).__init__()

        # 压缩
        self.encoder = nn.Sequential(
            nn.Linear(28*28, 128),
            nn.Tanh(), # 这里使用的是tanh作为激活函数,不是relu函数
            nn.Linear(128, 64),
            nn.Tanh(),
            nn.Linear(64, 12),
            nn.Tanh(),
            nn.Linear(12, 3),   # 压缩成3个特征, 进行 3D 图像可视化
        )
        # 解压
        self.decoder = nn.Sequential(
            nn.Linear(3, 12),
            nn.Tanh(),
            nn.Linear(12, 64),
            nn.Tanh(),
            nn.Linear(64, 128),
            nn.Tanh(),
            nn.Linear(128, 28*28),
            nn.Sigmoid(),       # 激励函数让输出值在 (0, 1)
        )

    def forward(self, x):
        encoded = self.encoder(x)
        decoded = self.decoder(encoded)
        return encoded, decoded

autoencoder = AutoEncoder()

optimizer = torch.optim.Adam(autoencoder.parameters(), lr=LR)
loss_func = nn.MSELoss()

for epoch in range(EPOCH):
    for step, (x, b_label) in enumerate(train_loader):
        b_x = x.view(-1, 28*28)   # batch x, shape (batch, 28*28)
        b_y = x.view(-1, 28*28)   # batch y, shape (batch, 28*28)

        encoded, decoded = autoencoder(b_x)

        loss = loss_func(decoded, b_y)      # mean square error
        optimizer.zero_grad()               # clear gradients for this training step
        loss.backward()                     # backpropagation, compute gradients
        optimizer.step()                    # apply gradients
tensorflow版本
# Parameter
learning_rate = 0.01
training_epochs = 5 # 五组训练
batch_size = 256
display_step = 1
examples_to_show = 10

# Network Parameters
n_input = 784  # MNIST data input (img shape: 28*28)

# hidden layer settings
n_hidden_1 = 256 # 1st layer num features
n_hidden_2 = 128 # 2nd layer num features
weights = {
	'encoder_h1':tf.Variable(tf.random_normal([n_input,n_hidden_1])),
	'encoder_h2': tf.Variable(tf.random_normal([n_hidden_1,n_hidden_2])),
	'decoder_h1': tf.Variable(tf.random_normal([n_hidden_2,n_hidden_1])),
	'decoder_h2': tf.Variable(tf.random_normal([n_hidden_1, n_input])),
	}
biases = {
	'encoder_b1': tf.Variable(tf.random_normal([n_hidden_1])),
	'encoder_b2': tf.Variable(tf.random_normal([n_hidden_2])),
	'decoder_b1': tf.Variable(tf.random_normal([n_hidden_1])),
	'decoder_b2': tf.Variable(tf.random_normal([n_input])),
	}

# Building the encoder
def encoder(x):
    # Encoder Hidden layer with sigmoid activation #1
    layer_1 = tf.nn.sigmoid(tf.add(tf.matmul(x, weights['encoder_h1']),
                                   biases['encoder_b1']))
    # Decoder Hidden layer with sigmoid activation #2
    layer_2 = tf.nn.sigmoid(tf.add(tf.matmul(layer_1, weights['encoder_h2']),
                                   biases['encoder_b2']))
    return layer_2

# Building the decoder
def decoder(x):
    # Encoder Hidden layer with sigmoid activation #1
    layer_1 = tf.nn.sigmoid(tf.add(tf.matmul(x, weights['decoder_h1']),
                                   biases['decoder_b1']))
    # Decoder Hidden layer with sigmoid activation #2
    layer_2 = tf.nn.sigmoid(tf.add(tf.matmul(layer_1, weights['decoder_h2']),
                                   biases['decoder_b2']))
    return layer_2

# Construct model
encoder_op = encoder(X) 			# 128 Features
decoder_op = decoder(encoder_op)	# 784 Features

# Prediction
y_pred = decoder_op	# After
# Targets (Labels) are the input data.
y_true = X			# Before

# Define loss and optimizer, minimize the squared error
cost = tf.reduce_mean(tf.pow(y_true - y_pred, 2))
optimizer = tf.train.AdamOptimizer(learning_rate).minimize(cost)

# Launch the graph
with tf.Session() as sess:
    # tf 马上就要废弃tf.initialize_all_variables()这种写法
    # 替换成下面:
    sess.run(tf.global_variables_initializer())
    total_batch = int(mnist.train.num_examples/batch_size)
    # Training cycle
    for epoch in range(training_epochs):
        # Loop over all batches
        for i in range(total_batch):
            batch_xs, batch_ys = mnist.train.next_batch(batch_size)  # max(x) = 1, min(x) = 0
            # Run optimization op (backprop) and cost op (to get loss value)
            _, c = sess.run([optimizer, cost], feed_dict={X: batch_xs})
        # Display logs per epoch step
        if epoch % display_step == 0:
            print("Epoch:", '%04d' % (epoch+1),
                  "cost=", "{:.9f}".format(c))

    print("Optimization Finished!")

    # # Applying encode and decode over test set
    encode_decode = sess.run(
        y_pred, feed_dict={X: mnist.test.images[:examples_to_show]})
    # Compare original images with their reconstructions
    f, a = plt.subplots(2, 10, figsize=(10, 2))
    for i in range(examples_to_show):
        a[0][i].imshow(np.reshape(mnist.test.images[i], (28, 28)))
        a[1][i].imshow(np.reshape(encode_decode[i], (28, 28)))
    plt.show()
参考
- An Introduction to Neural Networks and Autoencoders
- PCA & Autoencoders: Algorithms Everyone Can Understand
- How Autoencoders work - Understanding the math and implementation
- Autoencoder 自编码
- AutoEncoder (自编码/非监督学习)
If you link this blog, please refer to this page, thanks!
Post link:https://tsinghua-gongjing.github.io/posts/autoencoder.html
Previous:
【5-3】序列模型和注意力机制
Next:
深度学习调参技巧
Latest articles
Links
- ZhangLab , RISE database , THU life , THU info
- Data analysis: pandas , numpy , scipy
- ML/DL: sklearn , sklearn(中文) , pytorch
- Visualization: seaborn , matplotlib , gallery
- Github: me