Install of Git and usage
2018-02-08
历史
什么是Git:
Git is a free and open source distributed version control system designed to handle everything from small to very large projects with speed and efficiency.
谁写了这个免费的开源软件:
Linus在1991年创建了开源的Linux;
Linus在2005年花了两周时间自己用C写了一个分布式版本控制系统;
2008年,GitHub网站上线。
安装
在mac上用homebrew命令直接安装
配置(自己的电脑上的库都使用,或者不太的库使用不同的配置):
$ git config --global user.name "Your Name"
$ git config --global user.email "email@example.com"
命令
创建仓库,添加文件,提交
$ mkdir learngit
$ cd learngit
$ git init
Initialized empty Git repository in /Users/michael/learngit/.git/

$ git add readme.txt

$ git commit -m "wrote a readme file"
[master (root-commit) cb926e7] wrote a readme file
 1 file changed, 2 insertions(+)
 create mode 100644 readme.txt

# 一次添加多个文件后,再提交
$ git add file1.txt
$ git add file2.txt file3.txt
$ git commit -m "add 3 files."
仓库状态查询
# 修改上面的readme文件后

$ git status
# On branch master
# Changes not staged for commit:
#   (use "git add <file>..." to update what will be committed)
#   (use "git checkout -- <file>..." to discard changes in working directory)
#
#    modified:   readme.txt
#
no changes added to commit (use "git add" and/or "git commit -a")

# 表明:readme.txt被修改过了,但还没有准备提交的修改

# 修改的具体内容

$ git diff readme.txt
diff --git a/readme.txt b/readme.txt
index 46d49bf..9247db6 100644
--- a/readme.txt
+++ b/readme.txt
@@ -1,2 +1,2 @@
-Git is a version control system.
+Git is a distributed version control system.
 Git is free software.

# diff的输出和linux的diff命令一样

# 准备提交
$ git add readme.txt

$ git status
# On branch master
# Changes to be committed:
#   (use "git reset HEAD <file>..." to unstage)
#
#       modified:   readme.txt
#

$ git commit -m "add distributed"
[master ea34578] add distributed
 1 file changed, 1 insertion(+), 1 deletion(-)

# 查看提交后的状态
$ git status
# On branch master
nothing to commit (working directory clean)
查看commit日志
# 按照时间顺序,列举出最近的10个commit
gongjing@hekekedeiMac ~/Dropbox/Tsinghua-gongjing.github.io (git)-[master] % git log
commit 78fcc24813d8ef5b7cde2cb81470ac9e12e58393
Author: Tsinghua-gongjing <gongj15@mails.tsinghua.edu.cn>
Date:   Thu Feb 8 16:44:27 2018 +0800

    add blog git

commit 9aec7c9da7607d805fd25a1bd544669a1e3d210f
Author: Tsinghua-gongjing <gongj15@mails.tsinghua.edu.cn>
Date:   Thu Feb 8 15:45:12 2018 +0800

    add visulization collections

commit e0a711baaee4a8eee76320cbf0e97949e8cb682d
Author: Tsinghua-gongjing <gongj15@mails.tsinghua.edu.cn>
Date:   Thu Feb 8 13:14:06 2018 +0800

    add python blogs

# 只显示commit的message信息,其他的不输出
gongjing@hekekedeiMac ~/Dropbox/Tsinghua-gongjing.github.io (git)-[master] % git log --pretty=oneline
78fcc24813d8ef5b7cde2cb81470ac9e12e58393 add blog git
9aec7c9da7607d805fd25a1bd544669a1e3d210f add visulization collections
e0a711baaee4a8eee76320cbf0e97949e8cb682d add python blogs
49269b5c7eecb61e576e60106d77bce1db89045f test table format
19dc28d723e6fdf4a9a67c6c86003bc8939bdea8 set comment
21a38c17722712d50448c6de4901d1ffa895aa54 set comment
e9d562309f5abdad39ce42ea04344df2f16c3ccf set comment
4899527ab459cde41220e88b34cad40de179251b test
b12f39df607be5800f99caaef43c37036390b650 test
6ad51d0f988d68e78797fef0a484ff23f5e52e7e test disqus.html
恢复以往版本
# 上一个版本就是HEAD^,上上一个版本就是HEAD^^,当然往上100个版本写100个^比较容易数不过来,所以写成HEAD~100。
$ git reset --hard HEAD^
HEAD is now at ea34578 add distributed

# 现在再查看log,最新的日志不见了,只有上个版本及之前的
$ git log
commit ea34578d5496d7dd233c827ed32a8cd576c5ee85
Author: Michael Liao <askxuefeng@gmail.com>
Date:   Tue Aug 20 14:53:12 2013 +0800

    add distributed

commit cb926e7ea50ad11b8f9e909c05226233bf755030
Author: Michael Liao <askxuefeng@gmail.com>
Date:   Mon Aug 19 17:51:55 2013 +0800

    wrote a readme file

# 直接指定commit的版本号,这里写了前几位(3628164),然后可以恢复到对应的版本。
# 版本恢复,速度快,指针操作
$ git reset --hard 3628164
HEAD is now at 3628164 append GPL

# reflog 记录自己的每一次操作及对应的版本号,可以直接恢复到之前的任何版本
$ git reflog
ea34578 HEAD@{0}: reset: moving to HEAD^
3628164 HEAD@{1}: commit: append GPL
ea34578 HEAD@{2}: commit: add distributed
cb926e7 HEAD@{3}: commit (initial): wrote a readme file
撤销commit使用git reset --soft HEAD^,慎重使用hard模式
之前遇到了一个情况是:
- 想提交修改的文件,包含一些数据大文件
- 执行了`add`,`commit`操作,然后准备`push`,但是不成功,因为文件太大了
- 当前的状态就显示有好几个`commit`,但是没有`push`,所以后面再`add commit`时出错,会先把之前的给`push`到远程
- 为了撤销`commit`,我执行了`git reset --hard HEAD~2`,结果就是本地的文件也恢复到了两个版本以前,因为使用的是`hard`模式
- 为了恢复被删除的文件,先通过`git reflog`查看所有的head号,如下:
[zhangqf7@ZIO01 .git]$ git reflog
57c0e95 HEAD@{0}: reset: moving to HEAD~2
237b1ff HEAD@{1}: commit: syn
d556f75 HEAD@{2}: commit: syn
57c0e95 HEAD@{3}: commit: syn
a2a9919 HEAD@{4}: commit: .
4e8c1ae HEAD@{5}: commit: add iclip_compare_with_human.py
919612e HEAD@{6}: commit: add iclip
4cafbac HEAD@{7}: clone: from https://github.com/Tsinghua-gongjing/zebrafish_structure
- 知道哪个版本是包含自己想要的信息的,我的是`d556f75`
- 使用`git reset –hard d556f75`即恢复到这个版本,此时的文件也是被恢复的
工作原理
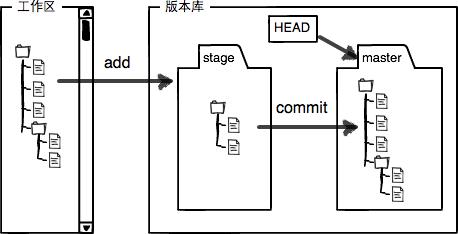
我们修改的文件,或者新增加的文件,通过git add命令是先提交到本地的缓存区(Stage),然后通过commit命令才是提交到具体的分支(比如默认构建的分支master)上,更新到最新的文件状态。
另外,git管理的是修改,而不是文件本身。这一页的教程很好的说明了这个例子。主要是做了这么个实验:修改文件 -》git add -》修改文件 -》 git commit。 最后只执行添加了第一次的修改,因为第二次的还没有添加到缓存区。(Git是跟踪修改的,每次修改,如果不add到暂存区,那就不会加入到commit中。)
撤销修改
# 改乱了工作区某个文件的内容,想直接丢弃工作区的修改,该没有git add
git checkout -- file

# 改乱了工作区某个文件的内容,还添加到了暂存区时,想丢弃修改
git reset HEAD file
git checkout -- file
删除文件
# 用linux的命令删除,同步
$ remove test.txt
$ git add .
$ git commit -m "delete test"

# 用git rm删除,直接同步
$ git rm test.txt
rm 'test.txt'
$ git commit -m "remove test.txt"
[master d17efd8] remove test.txt
 1 file changed, 1 deletion(-)
 delete mode 100644 test.txt

# 恢复刚才删除的文件(checkout是撤销修改,删除操作也是一种修改)
$ git checkout -- test.txt
关联一个远程库
先有本地库,后有远程库的时候,如何关联远程库
# 关联
git remote add origin git@github.com:user_name/repo-name.git

# 推送。第一次用u参数,同步且建立关联
git push -u origin master

# 以后的推送
git push origin master
克隆远程库
Git支持多种协议,包括https,但通过ssh支持的原生git协议速度最快。
# clone remote repo
$ git clone git@github.com:michaelliao/gitskills.git
Cloning into 'gitskills'...
创建与合并分支
这里有一系列的图,来形象的说明分支相关的概念和操作
# -b 创建并切换到一个新的分支
$ git checkout -b dev
Switched to a new branch 'dev'

# 查看所有的分支, * 表示当前正在使用的分支
$ git branch
* dev
  master

# 在branch分支完成add操作
$ git add readme.txt
$ git commit -m "branch test"
[dev fec145a] branch test
 1 file changed, 1 insertion(+)

# 切换分支
$ git checkout master
Switched to branch 'master'

# 合并指定分支到当前所在分支
$ git merge dev
Updating d17efd8..fec145a
Fast-forward
 readme.txt |    1 +
 1 file changed, 1 insertion(+)

# 删除分支
$ git branch -d dev
Deleted branch dev (was fec145a).
多人协作
查看远程
$ git remote
origin

# 查看远程库的详细信息
gongjing@hekekedeiMac ~/Dropbox/test (git)-[master] % git remote -v
origin	https://github.com/Tsinghua-gongjing/test.git (fetch)
origin	https://github.com/Tsinghua-gongjing/test.git (push)
推送分支
# origin(远程分支名称), master(本地分支名称)
$ git push origin master
抓取、合并分支
# 当本地和远程的不一致的时候,比如在远程网页界面修改过代码(远程分支比你的本地更新),此时本地的修改不能直接推送
$ git push origin dev
To git@github.com:michaelliao/learngit.git
 ! [rejected]        dev -> dev (non-fast-forward)
error: failed to push some refs to 'git@github.com:michaelliao/learngit.git'
hint: Updates were rejected because the tip of your current branch is behind
hint: its remote counterpart. Merge the remote changes (e.g. 'git pull')
hint: before pushing again.
hint: See the 'Note about fast-forwards' in 'git push --help' for details.

# 需要先抓取下来,再进行本地修改的推送
$ git pull
$ git add
$ git push
标签
# 本来commit id是一窜无意义的字符窜,所以可以打上标签;默认标签是打在最新提交的commit上的
$ git tag v1.0

# 对之前的某个commit进行打标签,6224937就是commit id
$ git tag v0.9 6224937

$ git show v0.9

# 删除标签
$ git tag -d v0.1
Deleted tag 'v0.1' (was e078af9)

# 推送某个标签到远程
$ git push origin v1.0
Total 0 (delta 0), reused 0 (delta 0)
To git@github.com:michaelliao/learngit.git
 * [new tag]         v1.0 -> v1.0

# 把所有的标签都推送
$ git push origin --tags
参加开源项目:pull-request
先把想参与的项目Fork到自己的仓库,然后从自己的仓库clone下来,修改提交;再向源发一个pull request(不一定会被接收)。
搭建git服务器
这里是教如何自己搭建一个git服务器的,其实git相当于也是一个软件,可以在各个地方安装。
注意
- 当初始化一个项目时,如果只是先添加空文件夹,然后提交,是不能正常推送的,因为此时没有文件的添加或者修改(虽然有新建文件夹)。
clone一个仓库,只有初始化的一个README.MD文件
gongjing@hekekedeiMac ~/Dropbox % git clone https://github.com/Tsinghua-gongjing/blog_codes.git
Cloning into 'blog_codes'...
remote: Counting objects: 3, done.
remote: Total 3 (delta 0), reused 0 (delta 0), pack-reused 0
Unpacking objects: 100% (3/3), done.
Checking connectivity... done.

gongjing@hekekedeiMac ~/Dropbox/blog_codes (git)-[master] % ll
total 4.0K
-rw-r--r-- 1 gongjing staff 46 Feb 10 00:20 README.md
新建三个文件夹,里面没有文件,直接提交,说已经是最新的,没有更新。
gongjing@hekekedeiMac ~/Dropbox/blog_codes (git)-[master] % mkdir data scripts notebooks

gongjing@hekekedeiMac ~/Dropbox/blog_codes (git)-[master] % lazygit "add 3 basic dirs"
On branch master
Your branch is up-to-date with 'origin/master'.
nothing to commit, working directory clean
Everything up-to-date
在script文件夹下面新建文件,且编辑,可正常提交
gongjing@hekekedeiMac ~/Dropbox/blog_codes (git)-[master] % cd scripts
gongjing@hekekedeiMac ~/Dropbox/blog_codes/scripts (git)-[master] % touch test.py

gongjing@hekekedeiMac ~/Dropbox/blog_codes (git)-[master] % lazygit "add test.py in scripts"
[master 2158936] add test.py in scripts
 1 file changed, 1 insertion(+)
 create mode 100644 scripts/test.py
Counting objects: 4, done.
Delta compression using up to 4 threads.
Compressing objects: 100% (2/2), done.
Writing objects: 100% (4/4), 354 bytes | 0 bytes/s, done.
Total 4 (delta 0), reused 0 (delta 0)
To https://github.com/Tsinghua-gongjing/blog_codes.git
   da377b7..2158936  master -> master
修改repo的名称,参考这里
- 直接在github页面上setting栏目进行修改;
- 修改本地repo的远程连接(本地的名称不会改变)
# check remote links
$ git remote -v
origin  git@github.com:someuser/someproject.git
# set repo links with new name
$ git remote set-url origin git@github.com:someuser/newprojectname.git

# use http directly
$ git remote set-url origin https://github.com/Tsinghua-gongjing/zebrafish_structure.git
在集群上管理自己的repo
Clone the created repo into cluster:
[zhangqf5@loginview02]$ git clone https://github.com/Tsinghua-gongjing/xxx.git
Cloning into 'xxx'...
remote: Enumerating objects: 3, done.
remote: Counting objects: 100% (3/3), done.
remote: Total 3 (delta 0), reused 0 (delta 0), pack-reused 0
Unpacking objects: 100% (3/3), done.
Checking connectivity... done.
Check current config, and set both my user name and emails:
Note: set user name and email for the repo only instead of global mode as explained here
[zhangqf5@loginview02]$ git config --list
http.sslverify=false
core.repositoryformatversion=0
core.filemode=true
core.bare=false
core.logallrefupdates=true
remote.origin.url=https://github.com/Tsinghua-gongjing/xxx.git
remote.origin.fetch=+refs/heads/*:refs/remotes/origin/*
branch.master.remote=origin
branch.master.merge=refs/heads/master

[zhangqf5@loginview02]$ git config user.name "Tsinghua-gongjing"
[zhangqf5@loginview02]$ git config user.email "gongj15@mails.tsinghua.edu.cn"

[zhangqf5@loginview02]$ git config --list
http.sslverify=false
core.repositoryformatversion=0
core.filemode=true
core.bare=false
core.logallrefupdates=true
remote.origin.url=https://github.com/Tsinghua-gongjing/xxx.git
remote.origin.fetch=+refs/heads/*:refs/remotes/origin/*
branch.master.remote=origin
branch.master.merge=refs/heads/master
user.name=Tsinghua-gongjing
user.email=gongj15@mails.tsinghua.edu.cn
To avoid type password every commit, the config should be revised (as here), add the credential:
[zhangqf5@loginview02]$ cat ./.git/config
[core]
        repositoryformatversion = 0
        filemode = true
        bare = false
        logallrefupdates = true
[remote "origin"]
        url = https://github.com/Tsinghua-gongjing/xxx.git
        fetch = +refs/heads/*:refs/remotes/origin/*
[branch "master"]
        remote = origin
        merge = refs/heads/master
[user]
        name = Tsinghua-gongjing
        email = gongj15@mails.tsinghua.edu.cn

[zhangqf5@loginview02]$ echo "[credential]" >> .git/config
[zhangqf5@loginview02]$ echo "    helper = store" >> .git/config
[zhangqf5@loginview02]$
[zhangqf5@loginview02]$ cat ./.git/config
[core]
        repositoryformatversion = 0
        filemode = true
        bare = false
        logallrefupdates = true
[remote "origin"]
        url = https://github.com/Tsinghua-gongjing/xxx.git
        fetch = +refs/heads/*:refs/remotes/origin/*
[branch "master"]
        remote = origin
        merge = refs/heads/master
[user]
        name = Tsinghua-gongjing
        email = gongj15@mails.tsinghua.edu.cn
[credential]
    helper = store
Now the modified text can be submitted directly:
[zhangqf5@loginview02]$ git add ./README.md
[zhangqf5@loginview02]$ git commit -m "Test1"
[master bffc146] Test1
 1 file changed, 3 insertions(+), 1 deletion(-)
[zhangqf5@loginview02]$
[zhangqf5@loginview02]$ git push origin master
Counting objects: 3, done.
Writing objects: 100% (3/3), 265 bytes | 0 bytes/s, done.
Total 3 (delta 0), reused 0 (delta 0)
To https://github.com/Tsinghua-gongjing/xxx.git
   74416aa..bffc146  master -> master
参考
Read full-text »
Volcano plot
2018-02-07
R version reference
Example data can be download from here and save as results.txt
$ head results.txt

Gene log2FoldChange pvalue padj
DOK6 0.51 1.861e-08 0.0003053
TBX5 -2.129 5.655e-08 0.0004191
SLC32A1 0.9003 7.664e-08 0.0004191
IFITM1 -1.687 3.735e-06 0.006809
NUP93 0.3659 3.373e-06 0.006809
Plot valcano:
# Make a basic volcano plot
with(res, plot(log2FoldChange, -log10(pvalue), pch=20, main="Volcano plot", xlim=c(-2.5,2)))

# Add colored points: red if padj<0.05, orange of log2FC>1, green if both)
with(subset(res, padj<.05 ), points(log2FoldChange, -log10(pvalue), pch=20, col="red"))
with(subset(res, abs(log2FoldChange)>1), points(log2FoldChange, -log10(pvalue), pch=20, col="orange"))
with(subset(res, padj<.05 & abs(log2FoldChange)>1), points(log2FoldChange, -log10(pvalue), pch=20, col="green"))

# Label points with the textxy function from the calibrate plot
library(calibrate)
with(subset(res, padj<.05 & abs(log2FoldChange)>1), textxy(log2FoldChange, -log10(pvalue), labs=Gene, cex=.8))
Read full-text »
Joint plot
2018-02-06
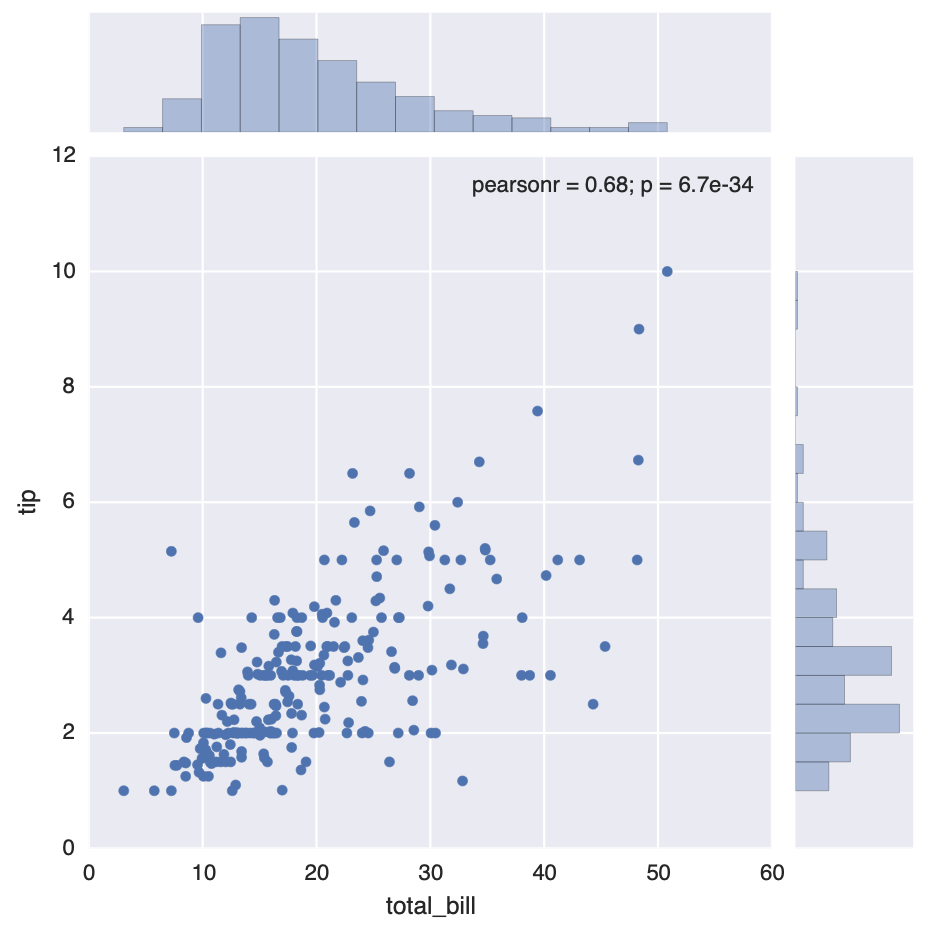
plot use sns.jointplot
tips = sns.load_dataset("tips")
g = sns.jointplot(x="total_bill", y="tip", data=tips)
Read full-text »
Use IGV to load .bed track file
2018-02-06
使用IGV加载bed文件
command line: igvtools
% ~/Downloads/IGVTools/igvtools help

Program: igvtools. IGV Version 2.3.98 (141)07/25/2017 12:12 AM

Usage: igvtools [command] [options] [input file/dir] [other arguments]

Command: version print the version number
	 sort    sort an alignment file by start position.
	 index   index an alignment file
	 toTDF    convert an input file (cn, gct, wig) to tiled data format (tdf)
	 count   compute coverage density for an alignment file
	 formatexp  center, scale, and log2 normalize an expression file
	 gui      Start the gui
	 help <command>     display this help message, or help on a specific command
	 See http://www.broadinstitute.org/software/igv/igvtools_commandline for more detailed help

Done
sort and index
在加载之前,先用igvtools建立索引文件,尤其是对于比较大的bed文件,这样能节省加载时所耗用的内存,否则在加载多个track时容易出现加载失败。
在建立inde之前,需要sort bed文件,有两种方式:
sort -k1,1 -k2,2n  in.bed > out.sort.bed (bedtools 推荐)
sort -k1,1 -k2,2n -o in.bed in.bed  # 直接sort原文件并保存
igvtools sort in.bed out.sort.bed
igvtools index sort.bed
load into IGV
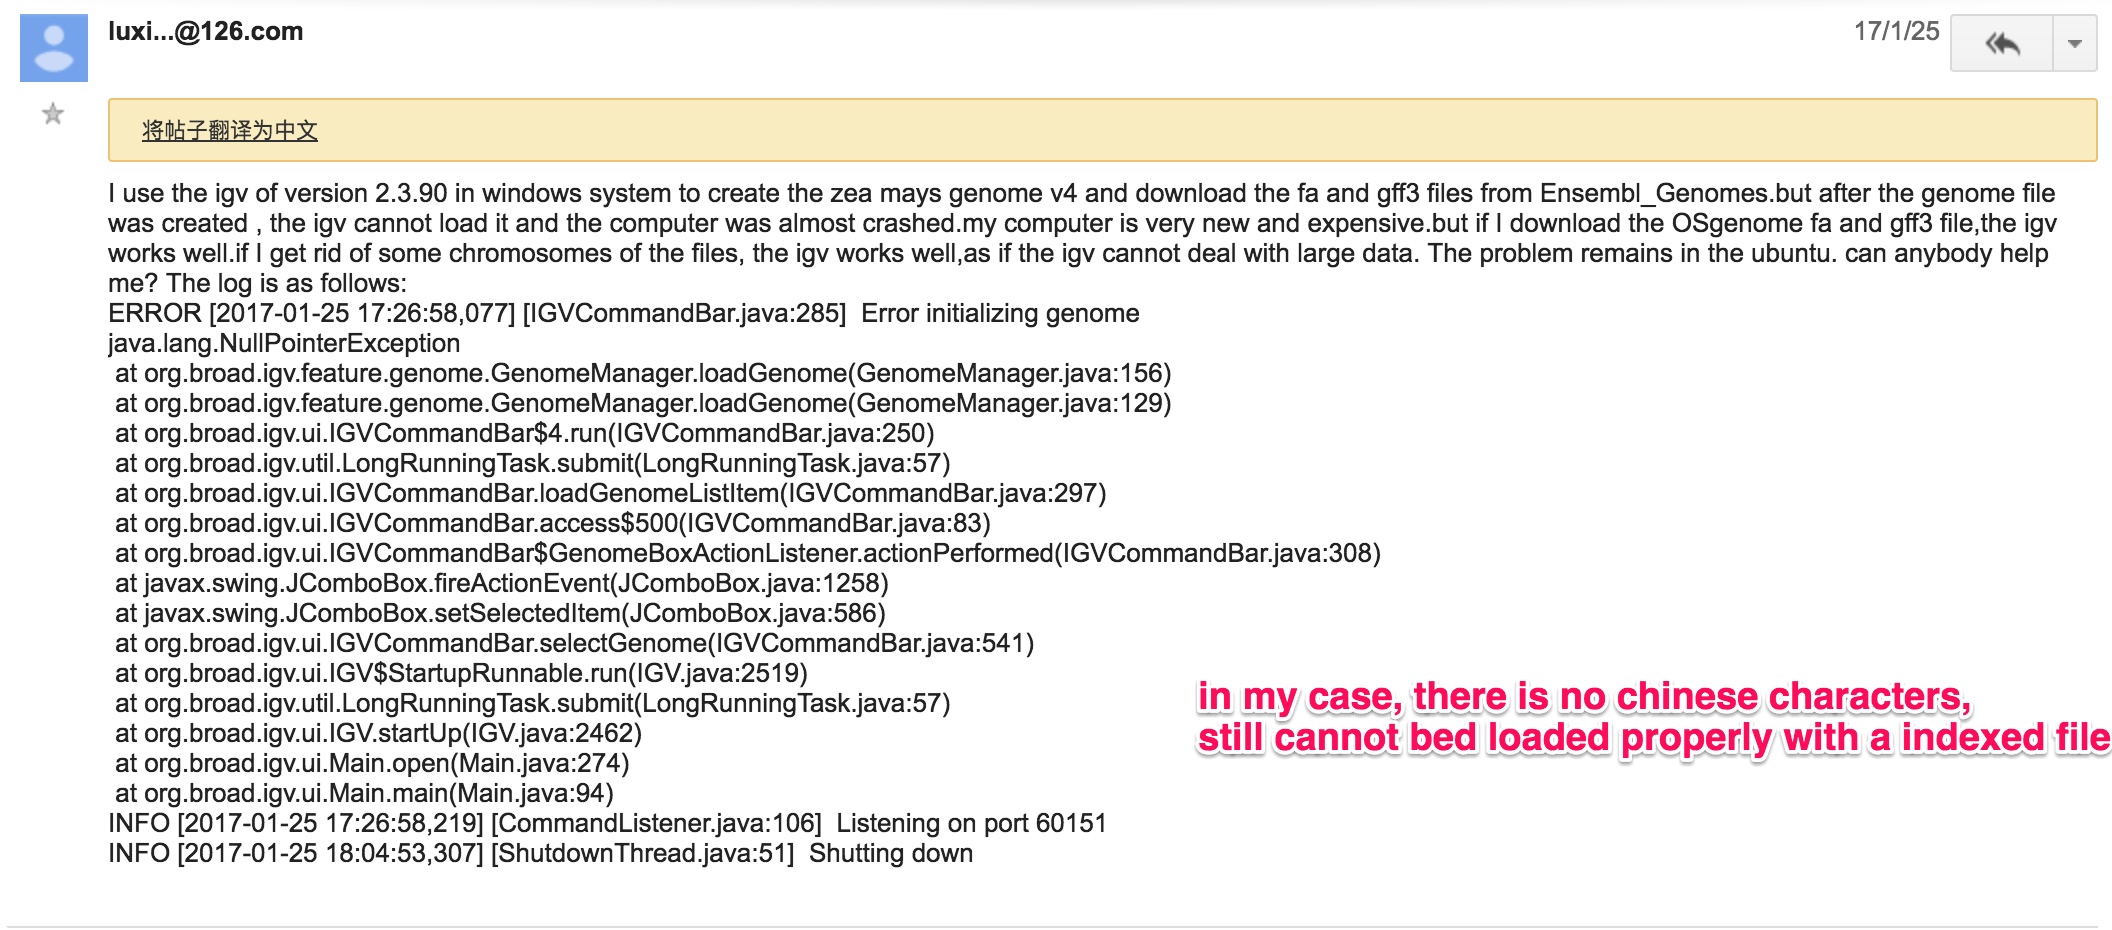
在直接load进去的时候,出现报错:
原因是:所建立的index文件的路径含有中文字符,而这貌似是不支持的,在google的igv-help的群组里面也有类似的问题如下:
load bed file with color
The .bed file should be defined like this, the 5 column should not be ., must specify a value.
track name="ItemRGBDemo" description="Item RGB demonstration" visibility=2 itemRgb="On"
chr1    629885  629939  IGF2BP3 1       +       629885  629939  255,250,200
chr1    629887  629940  IGF2BP1 1       +       629887  629940  170,110,40
chr1    629891  629928  NOP56   1       +       629891  629928  0,0,0
chr1    629891  629931  FBL     1       +       629891  629931  60,180,75
Read full-text »
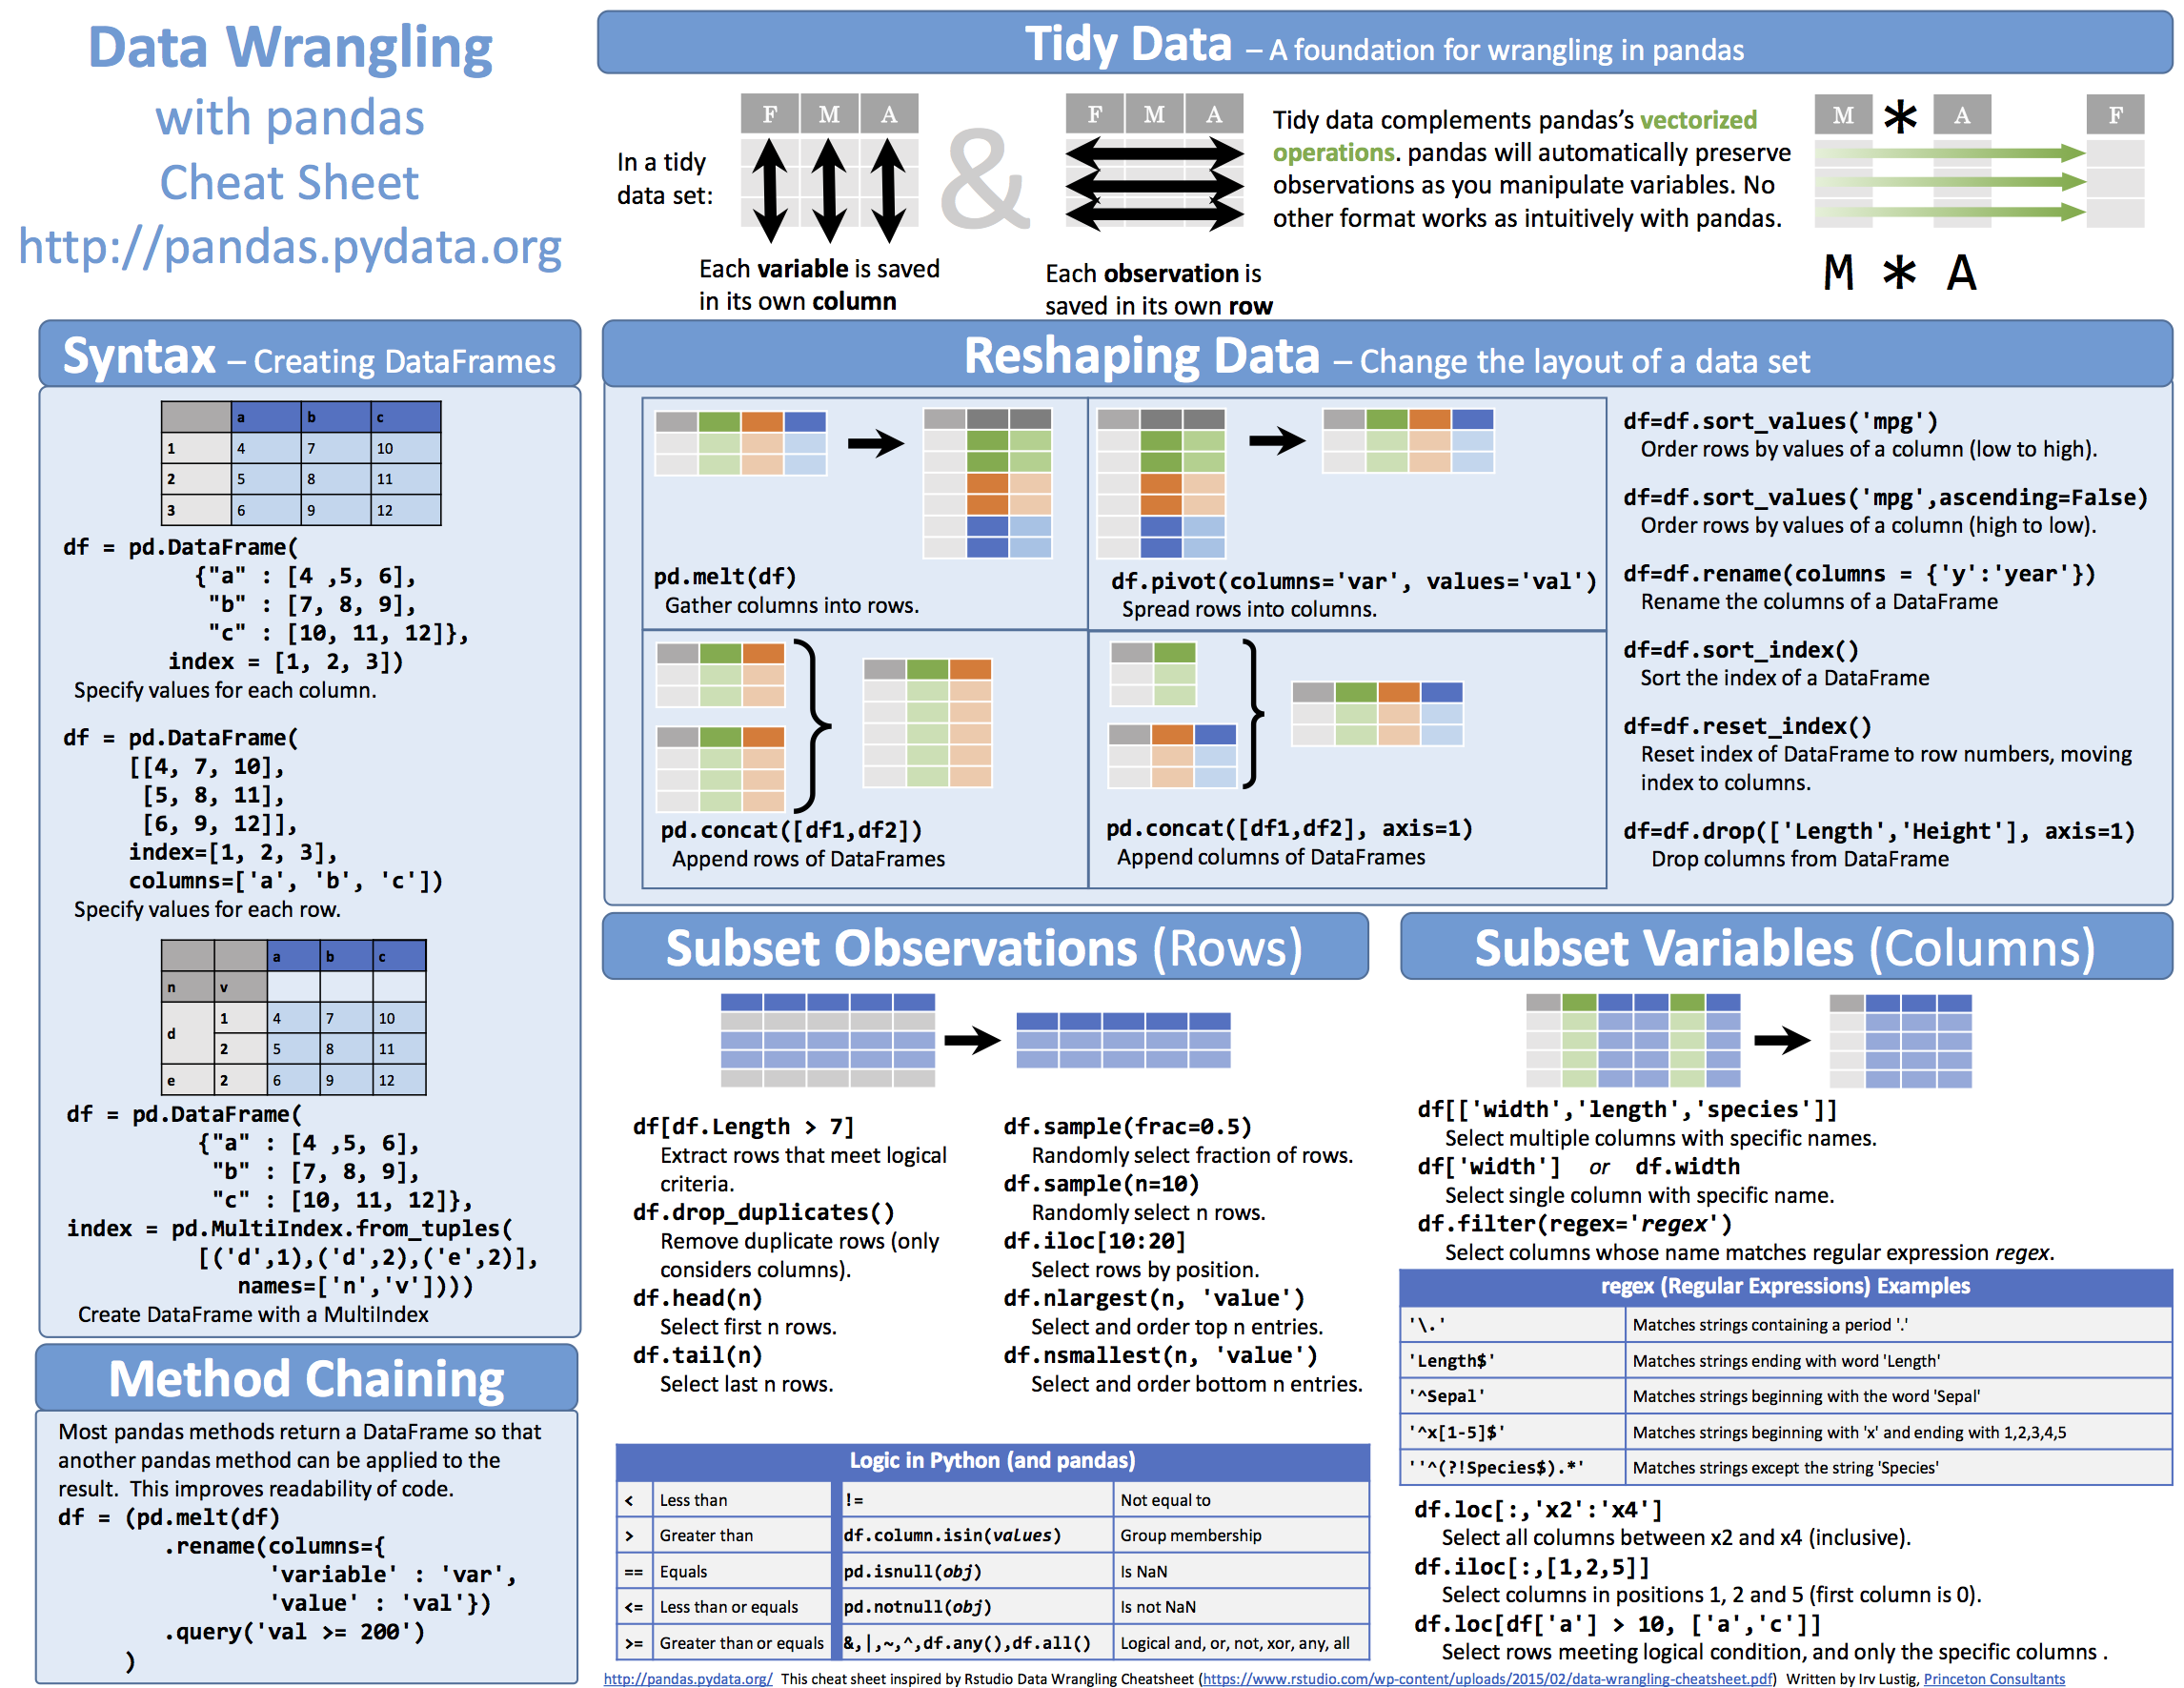
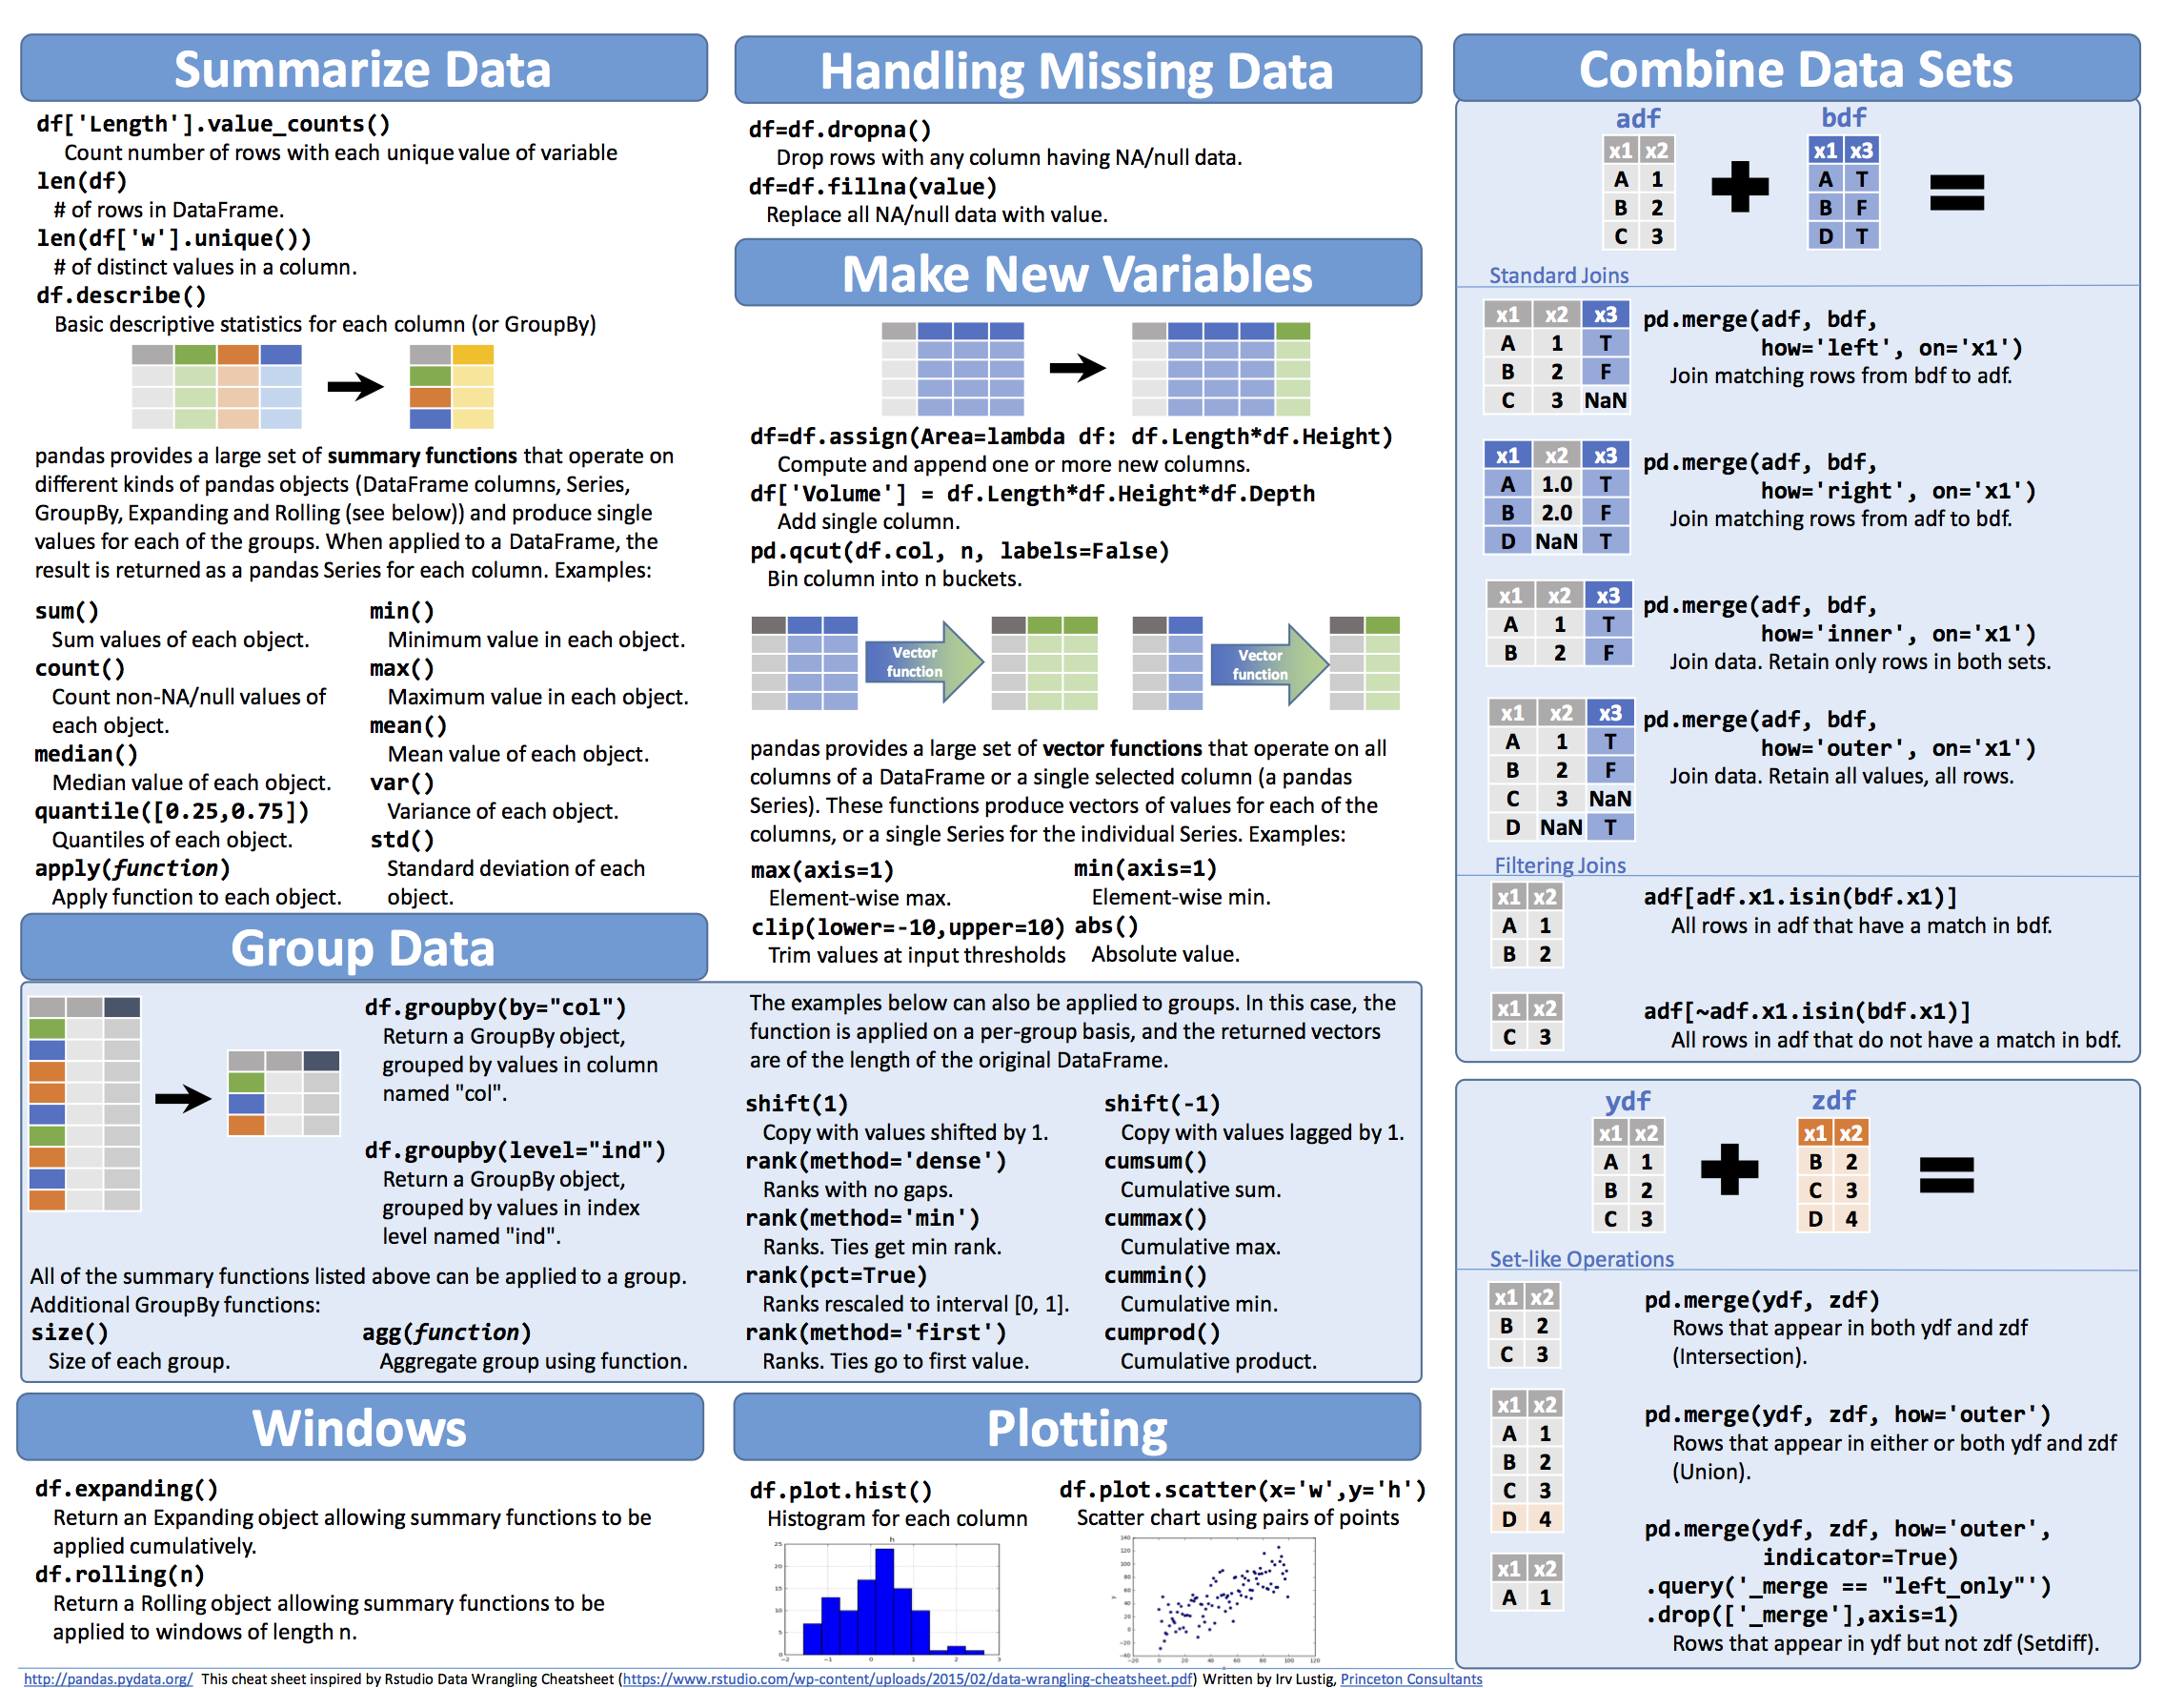
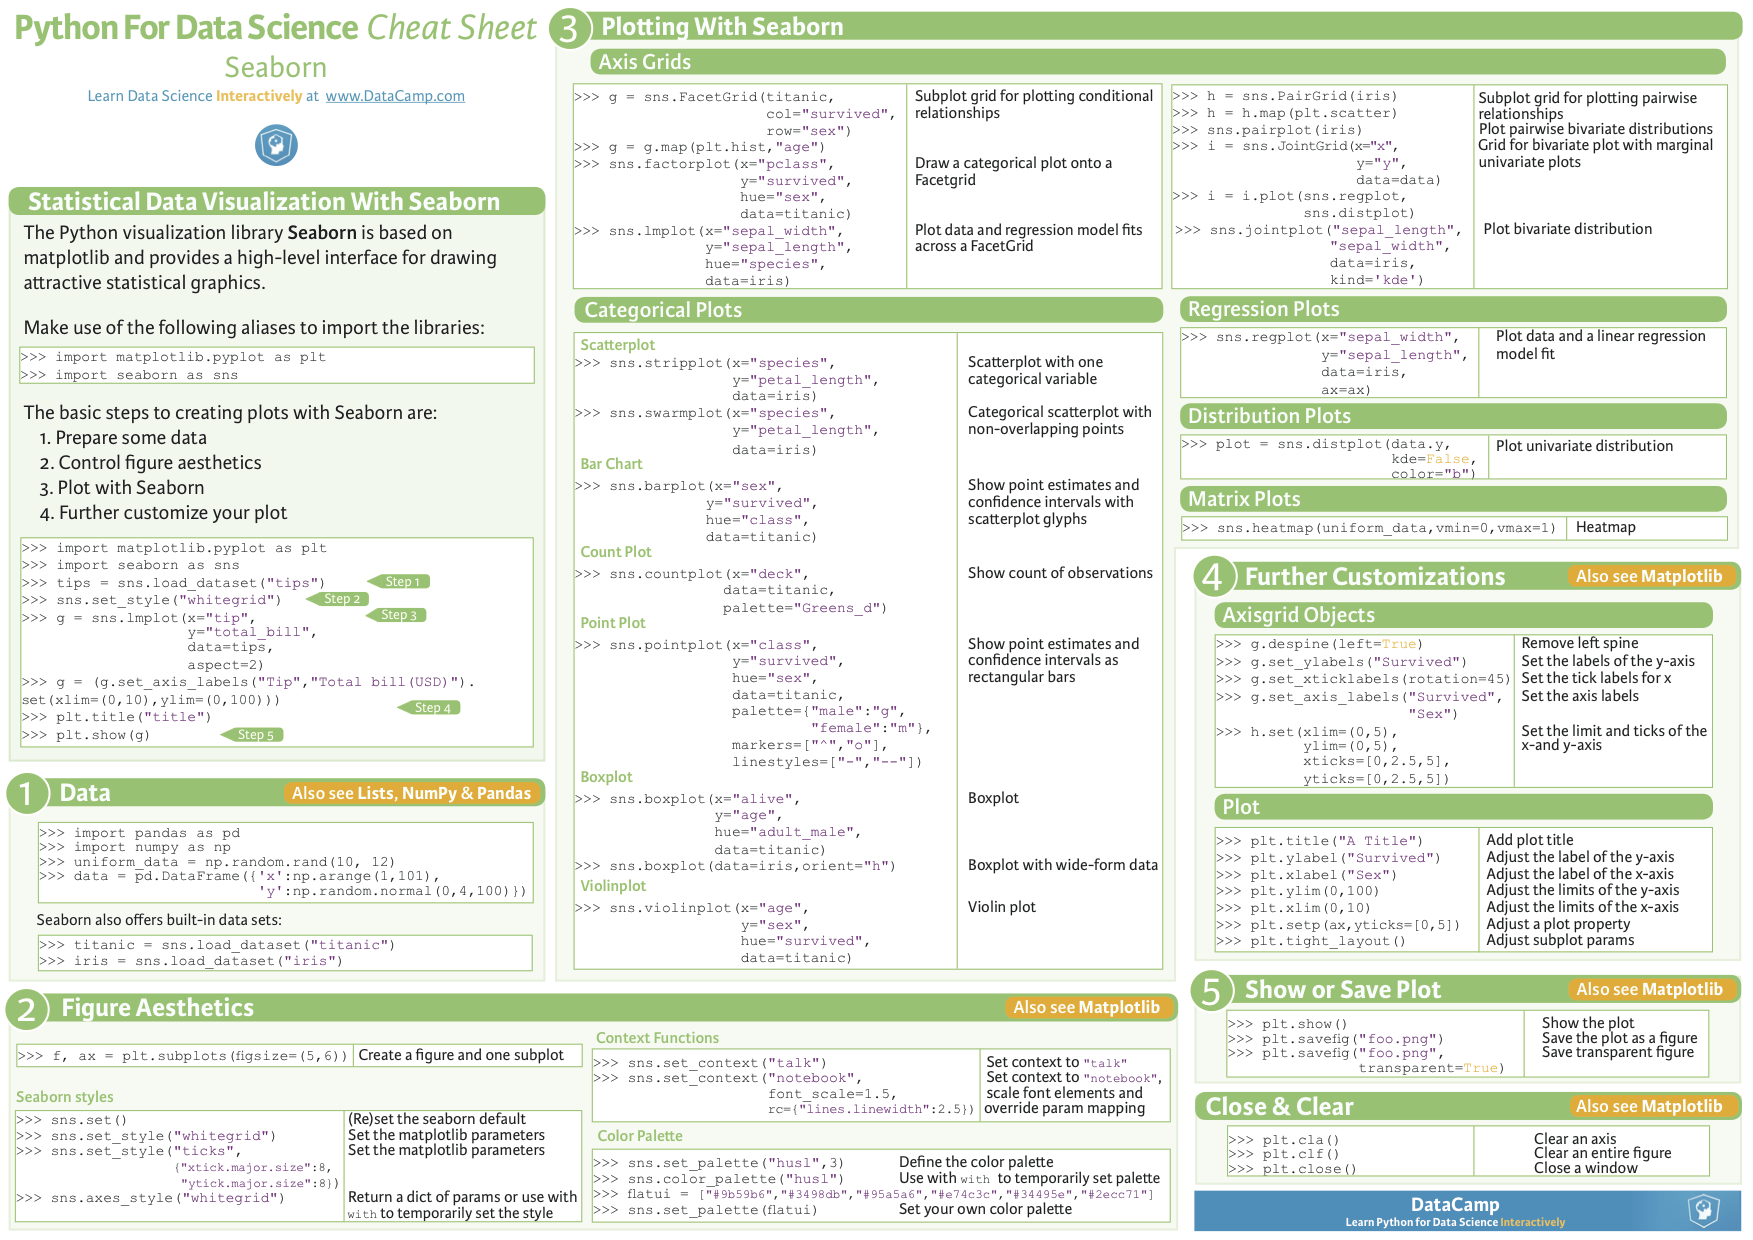
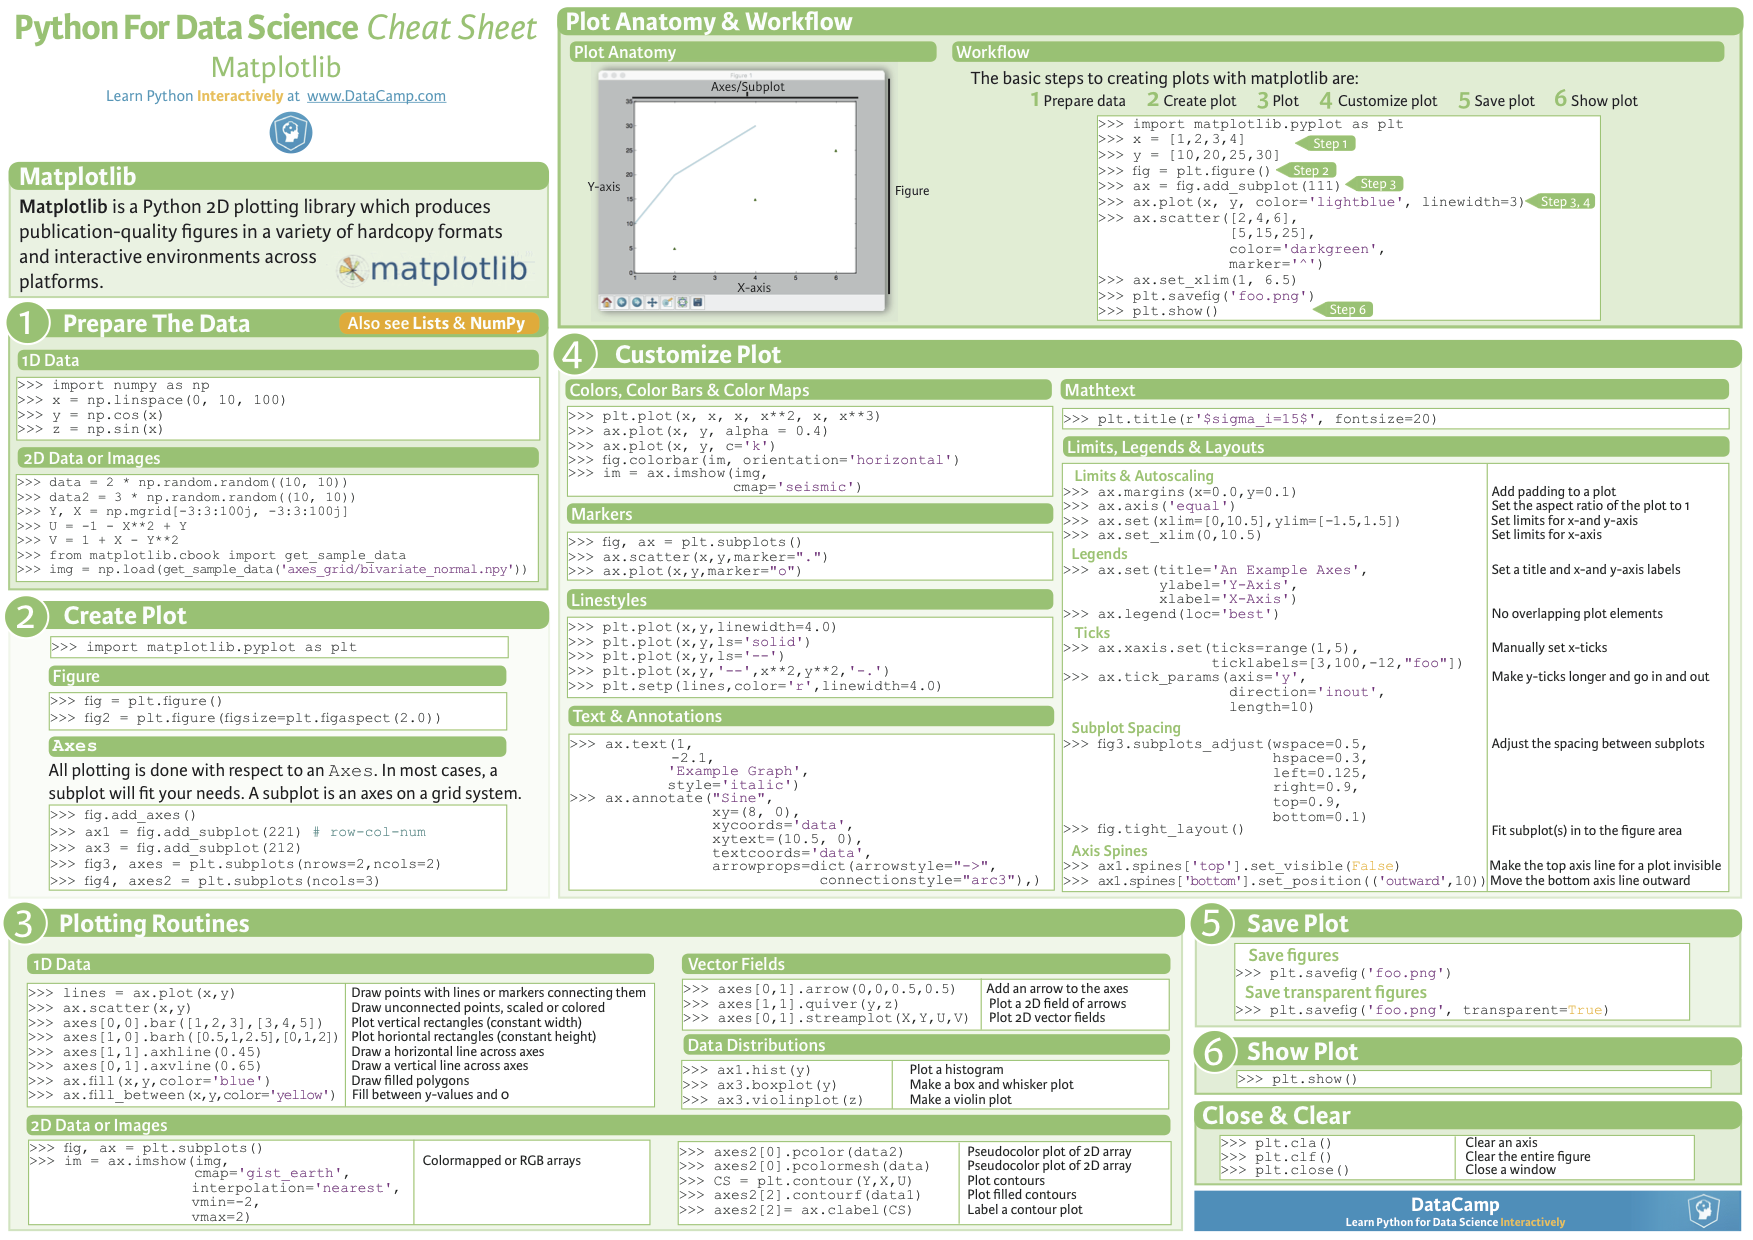
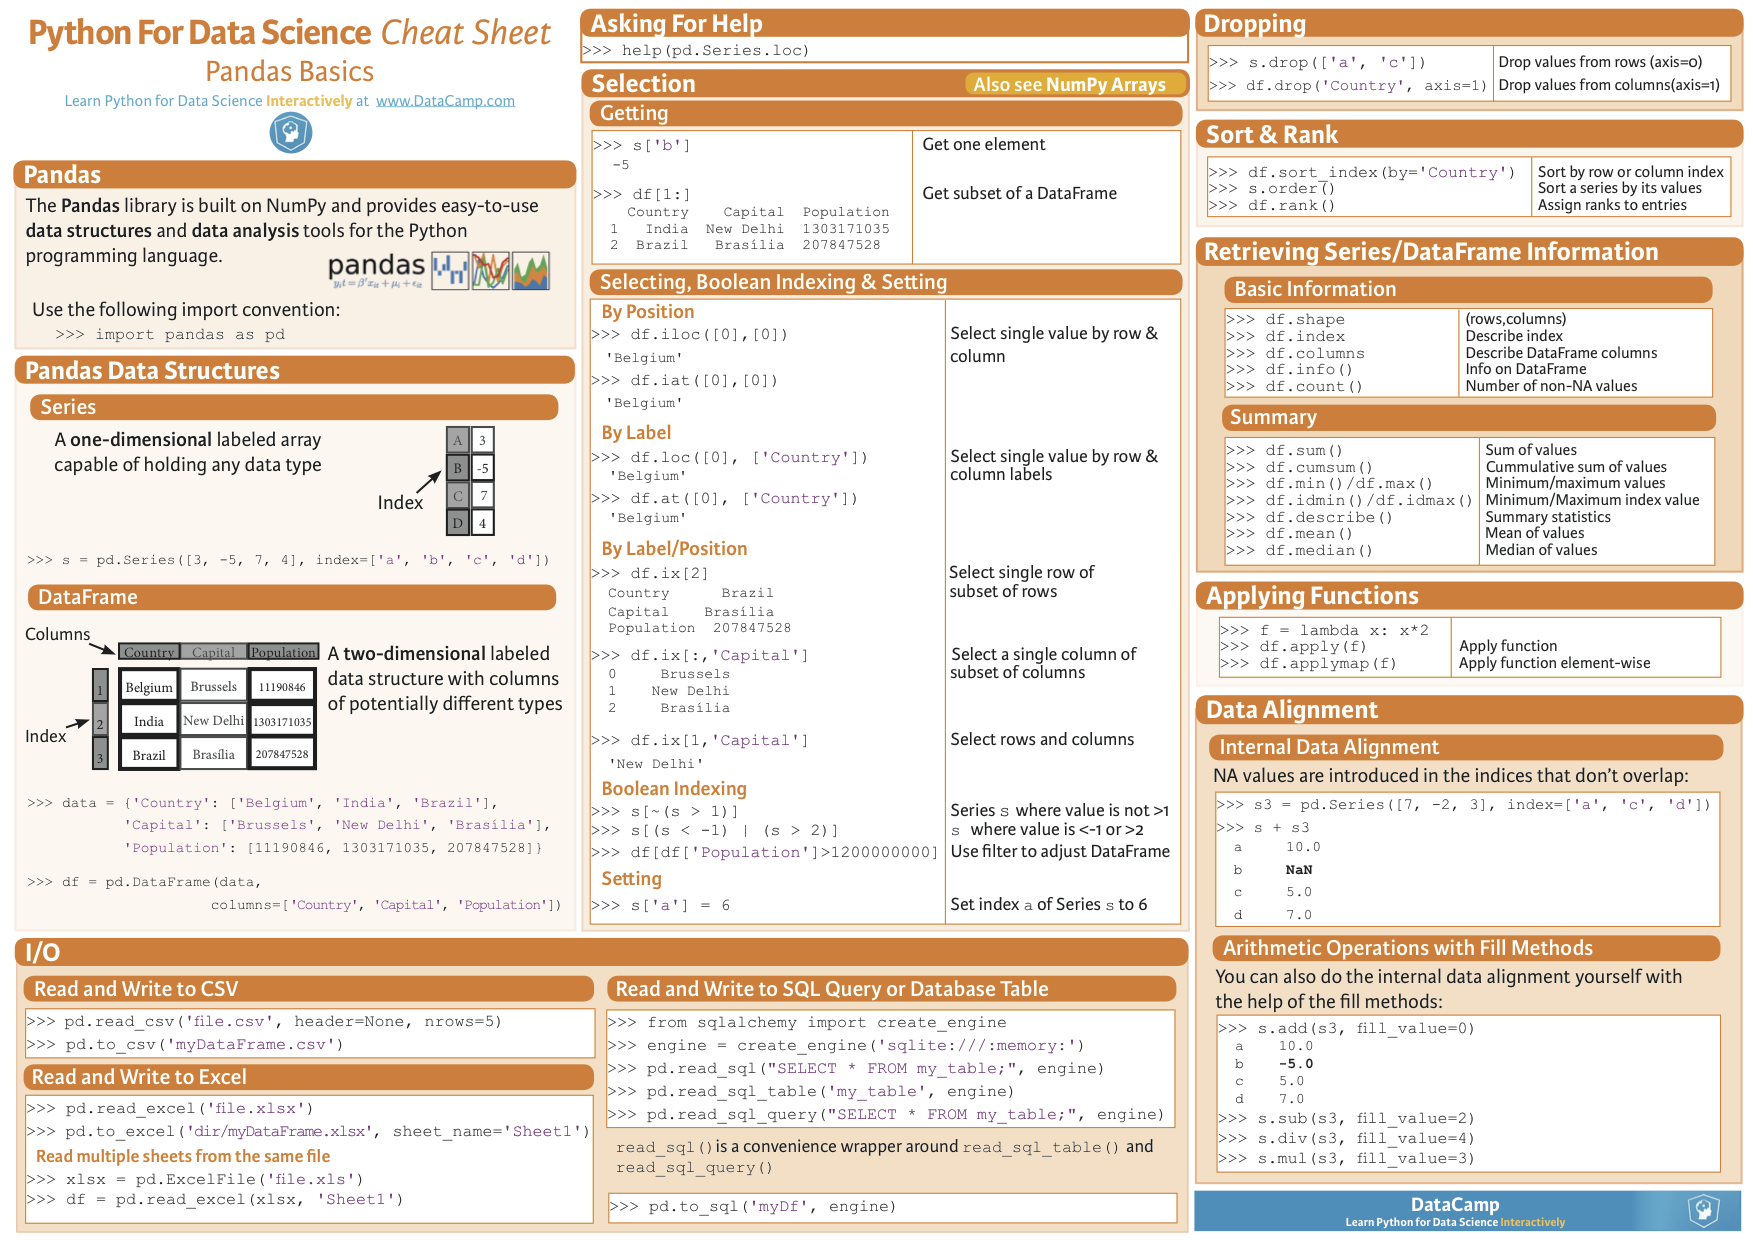
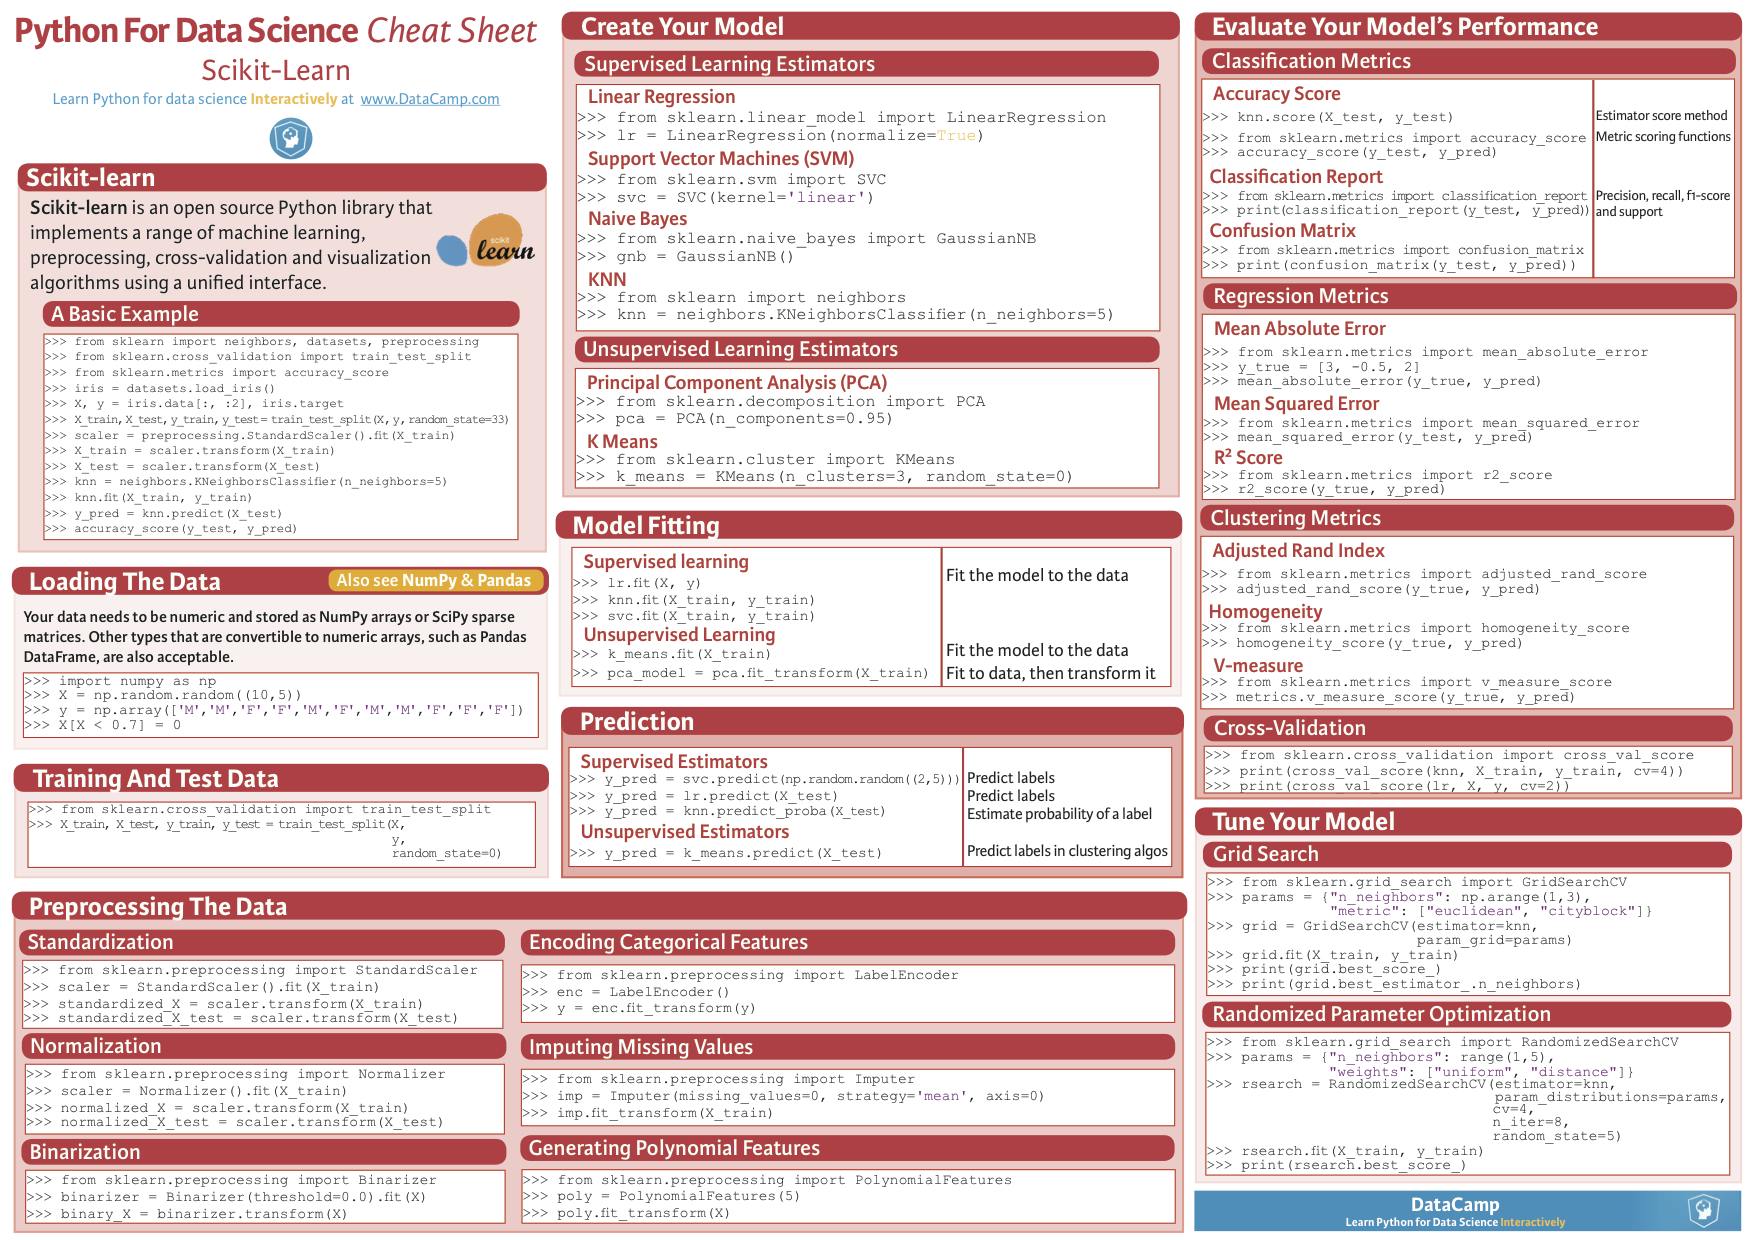
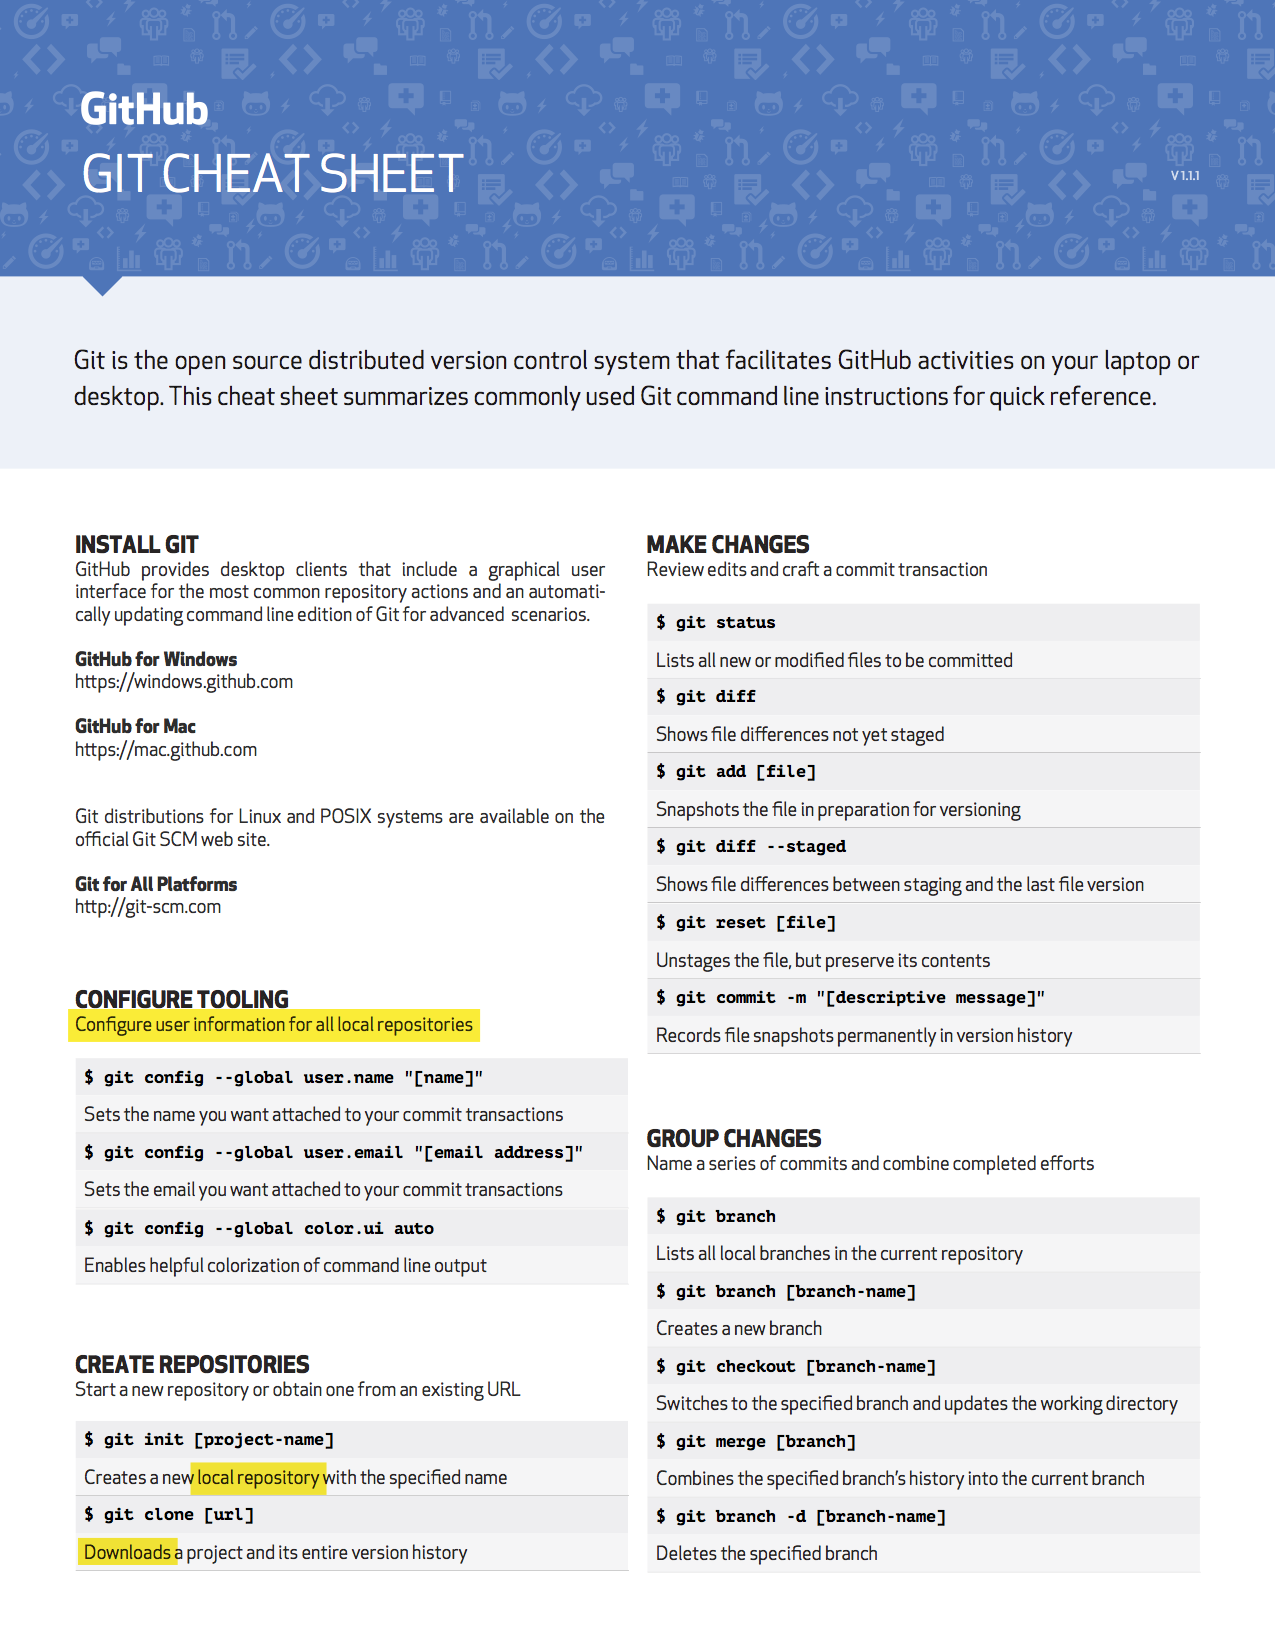
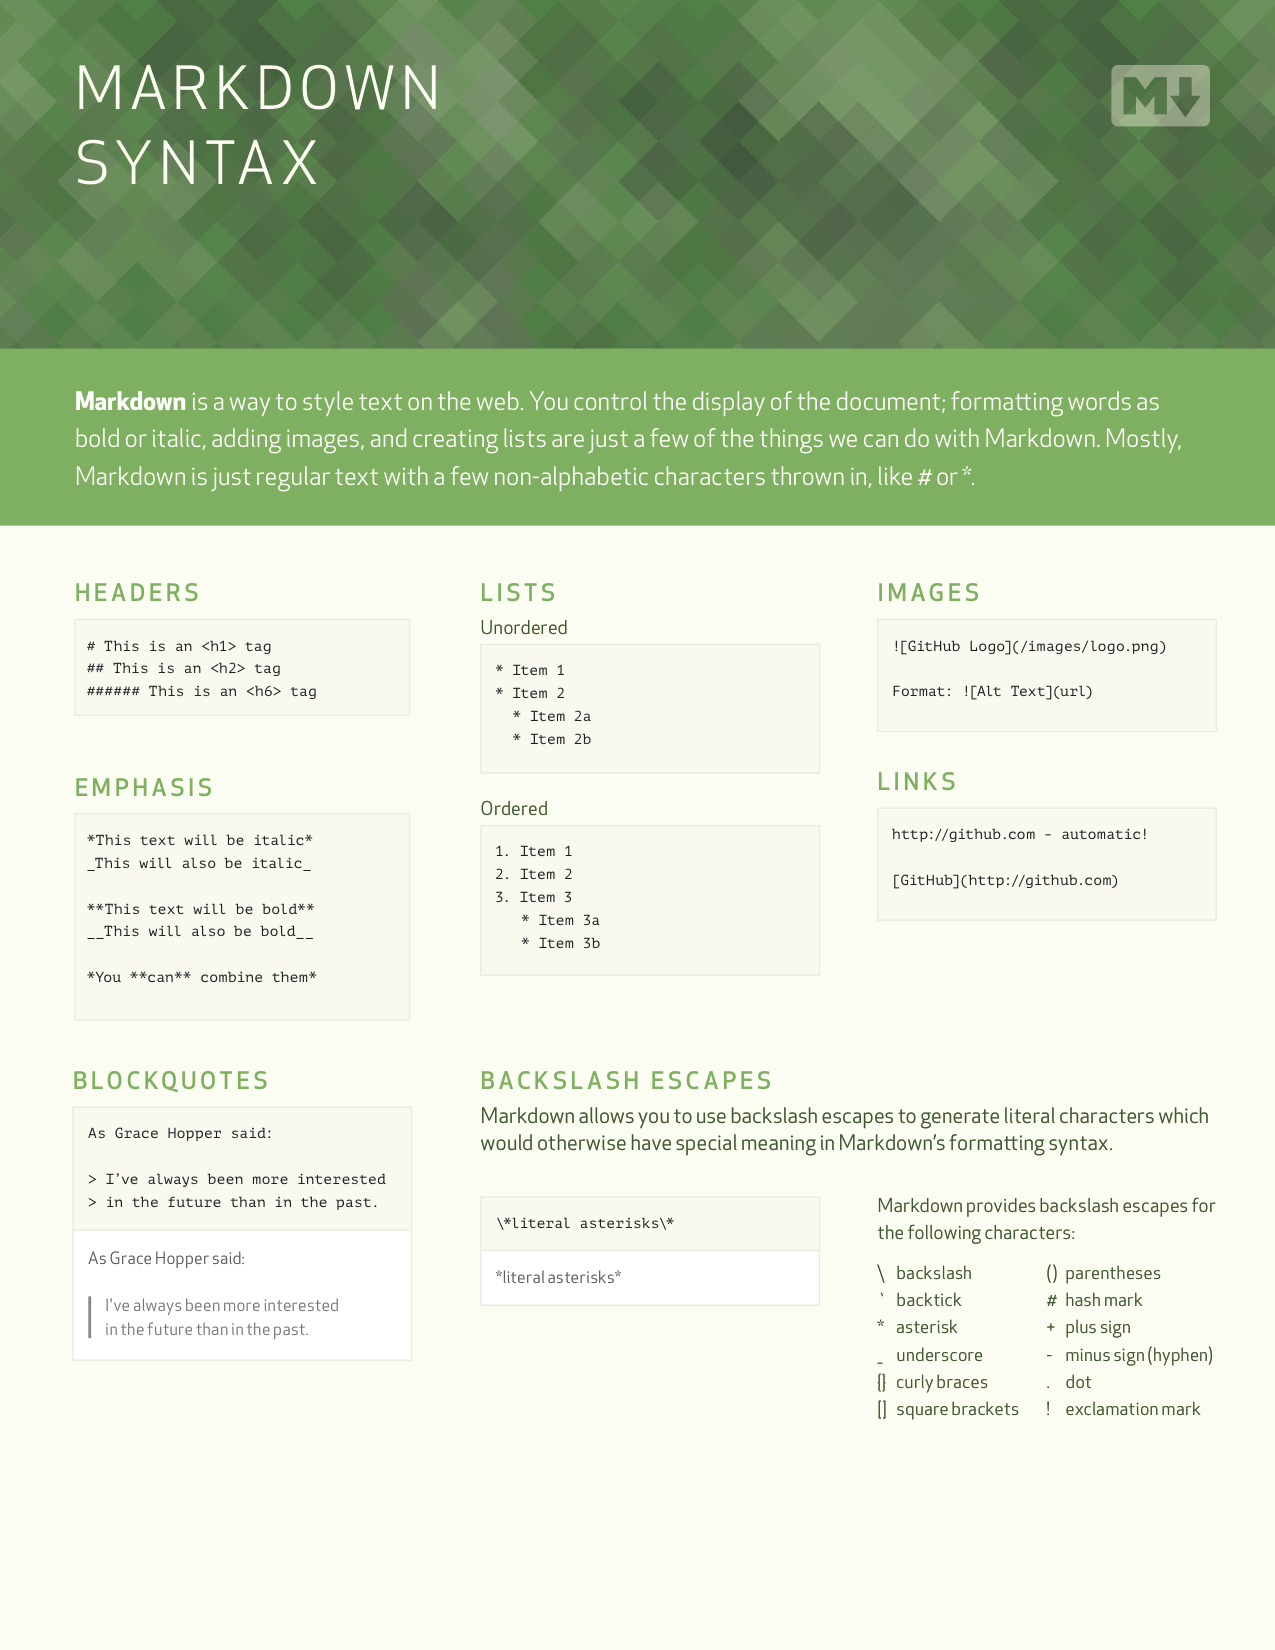
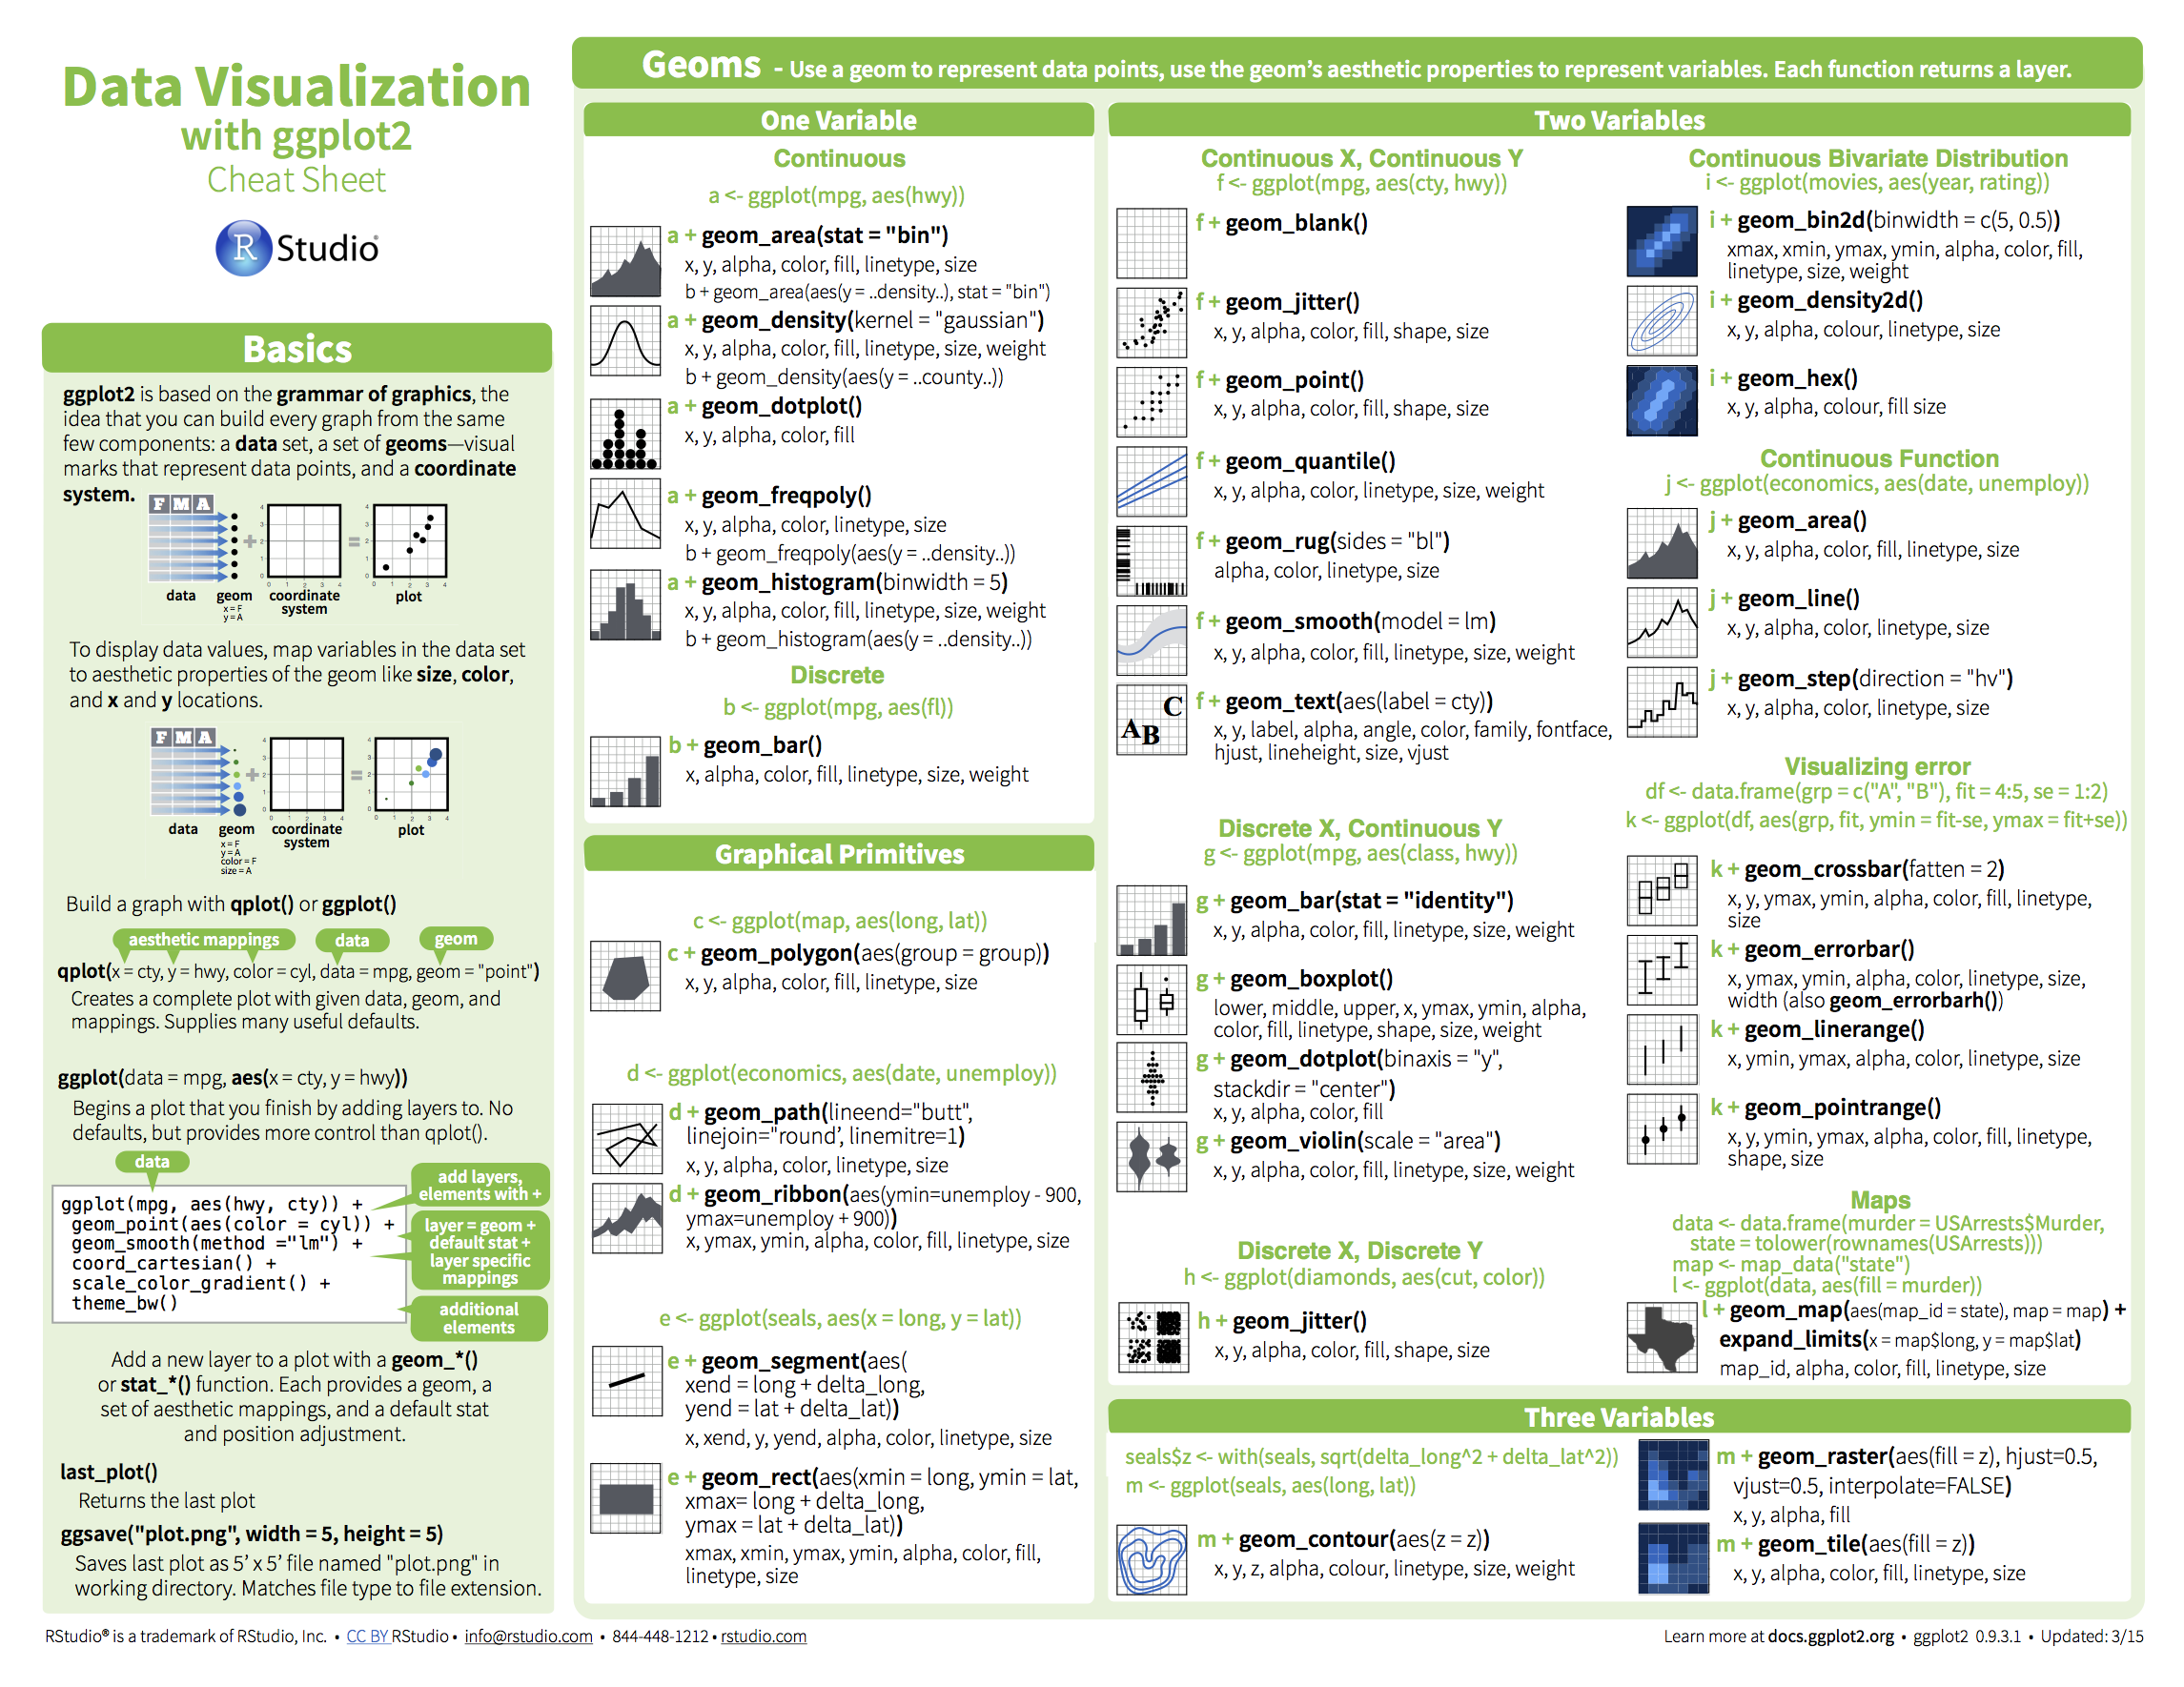
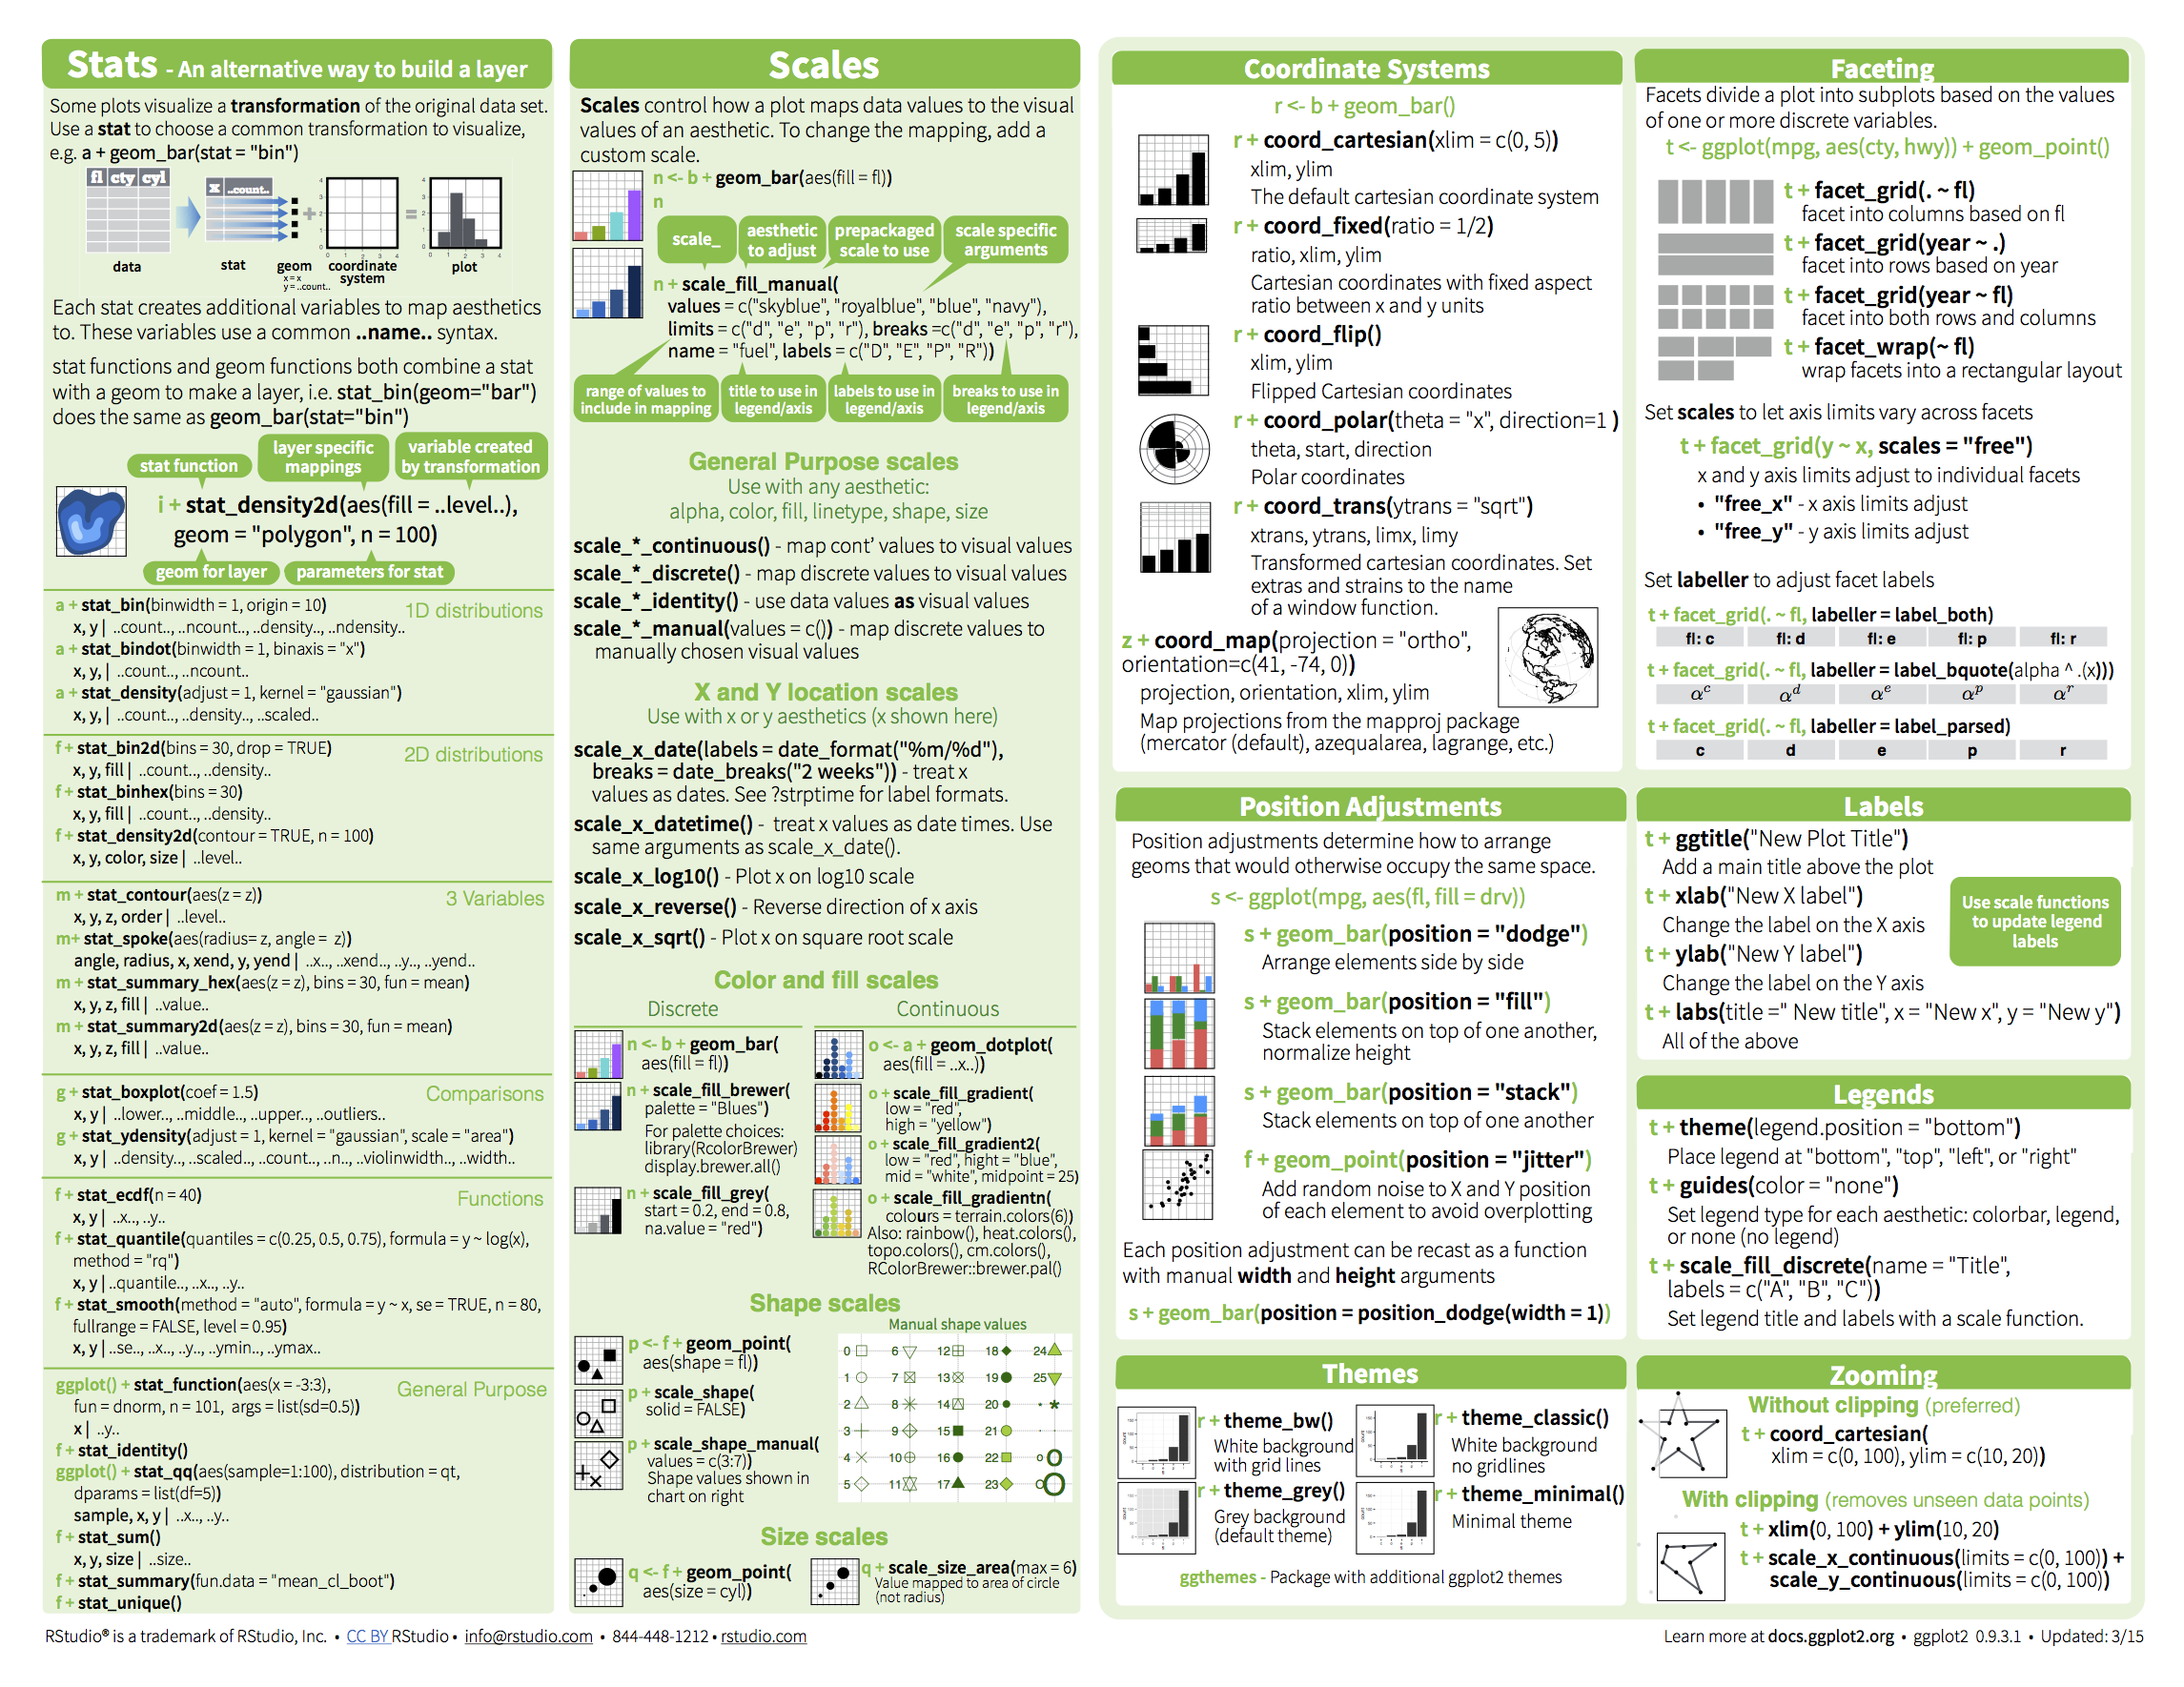
Collected cheatsheet for quick reference
2018-02-05
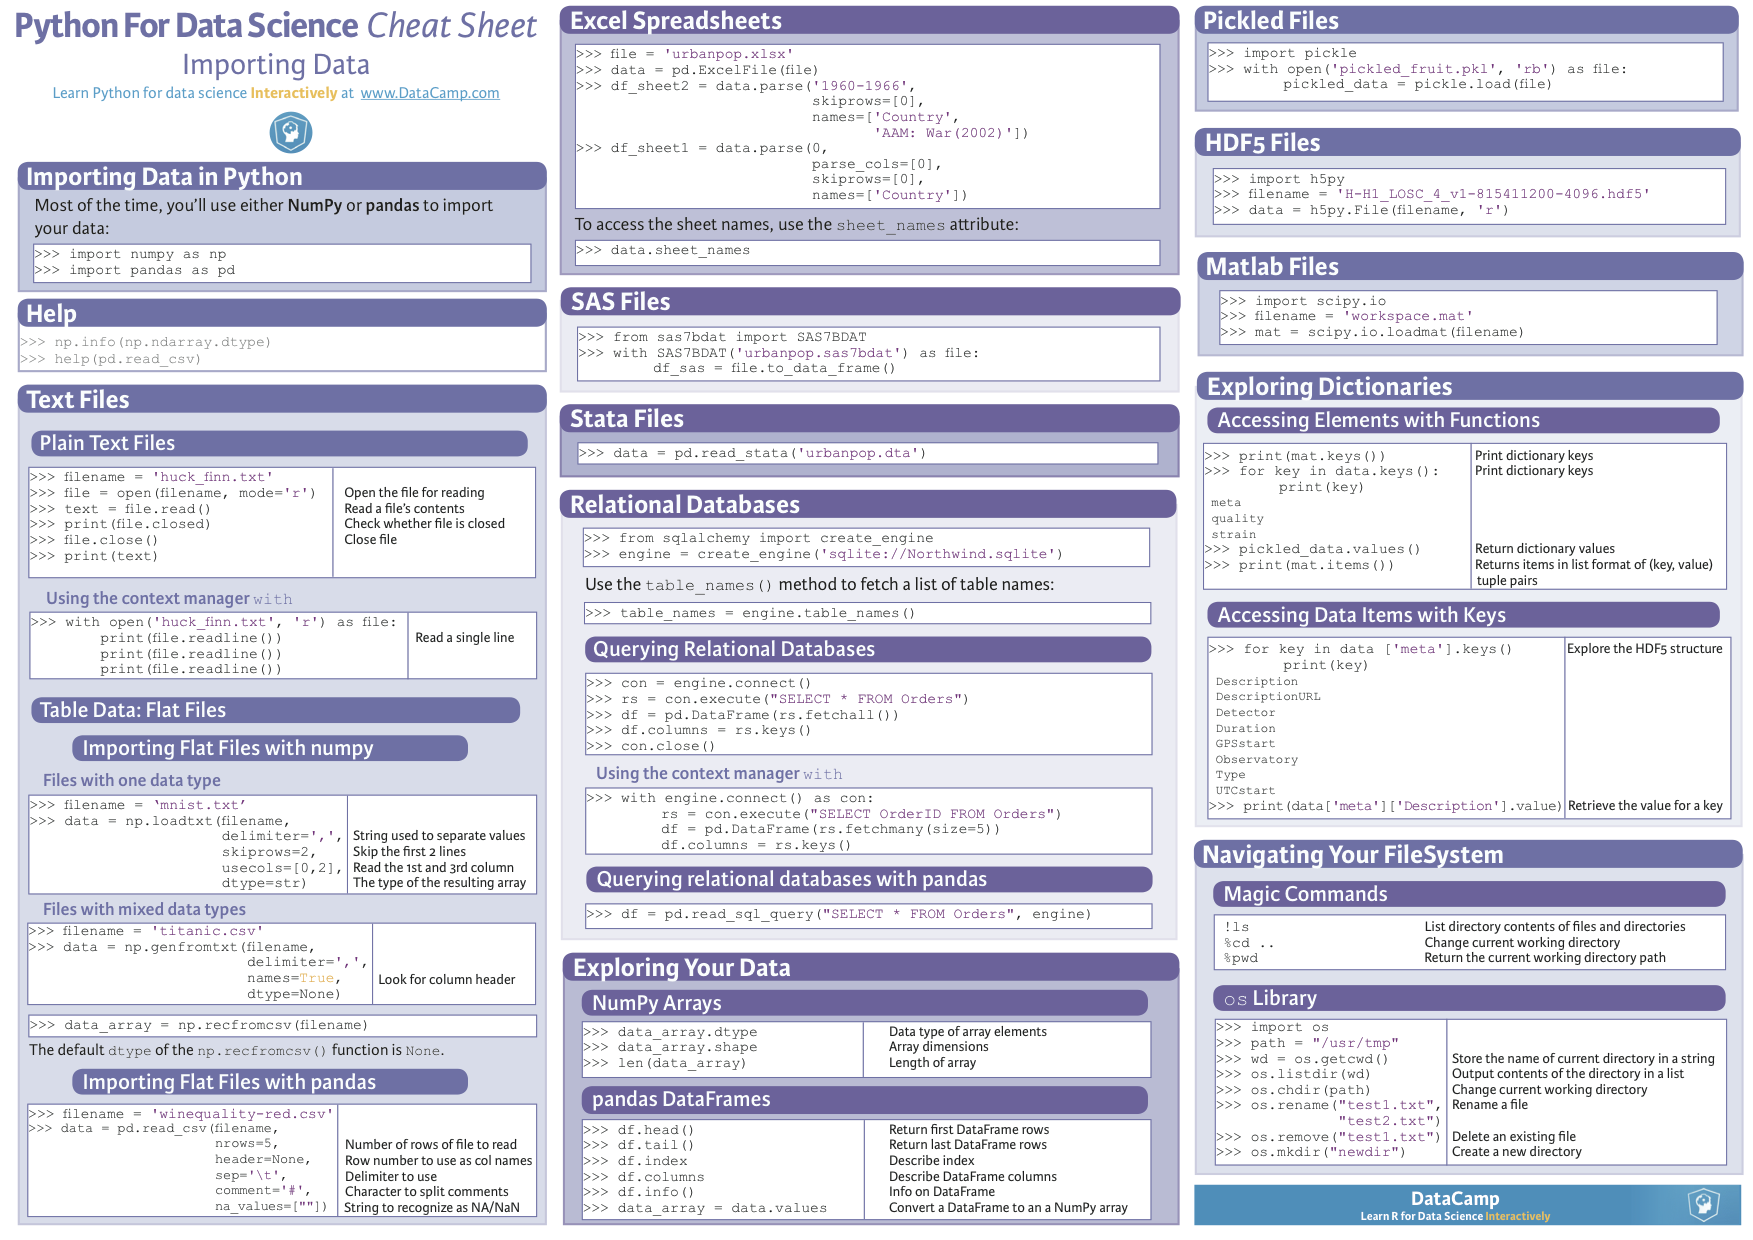
python import data
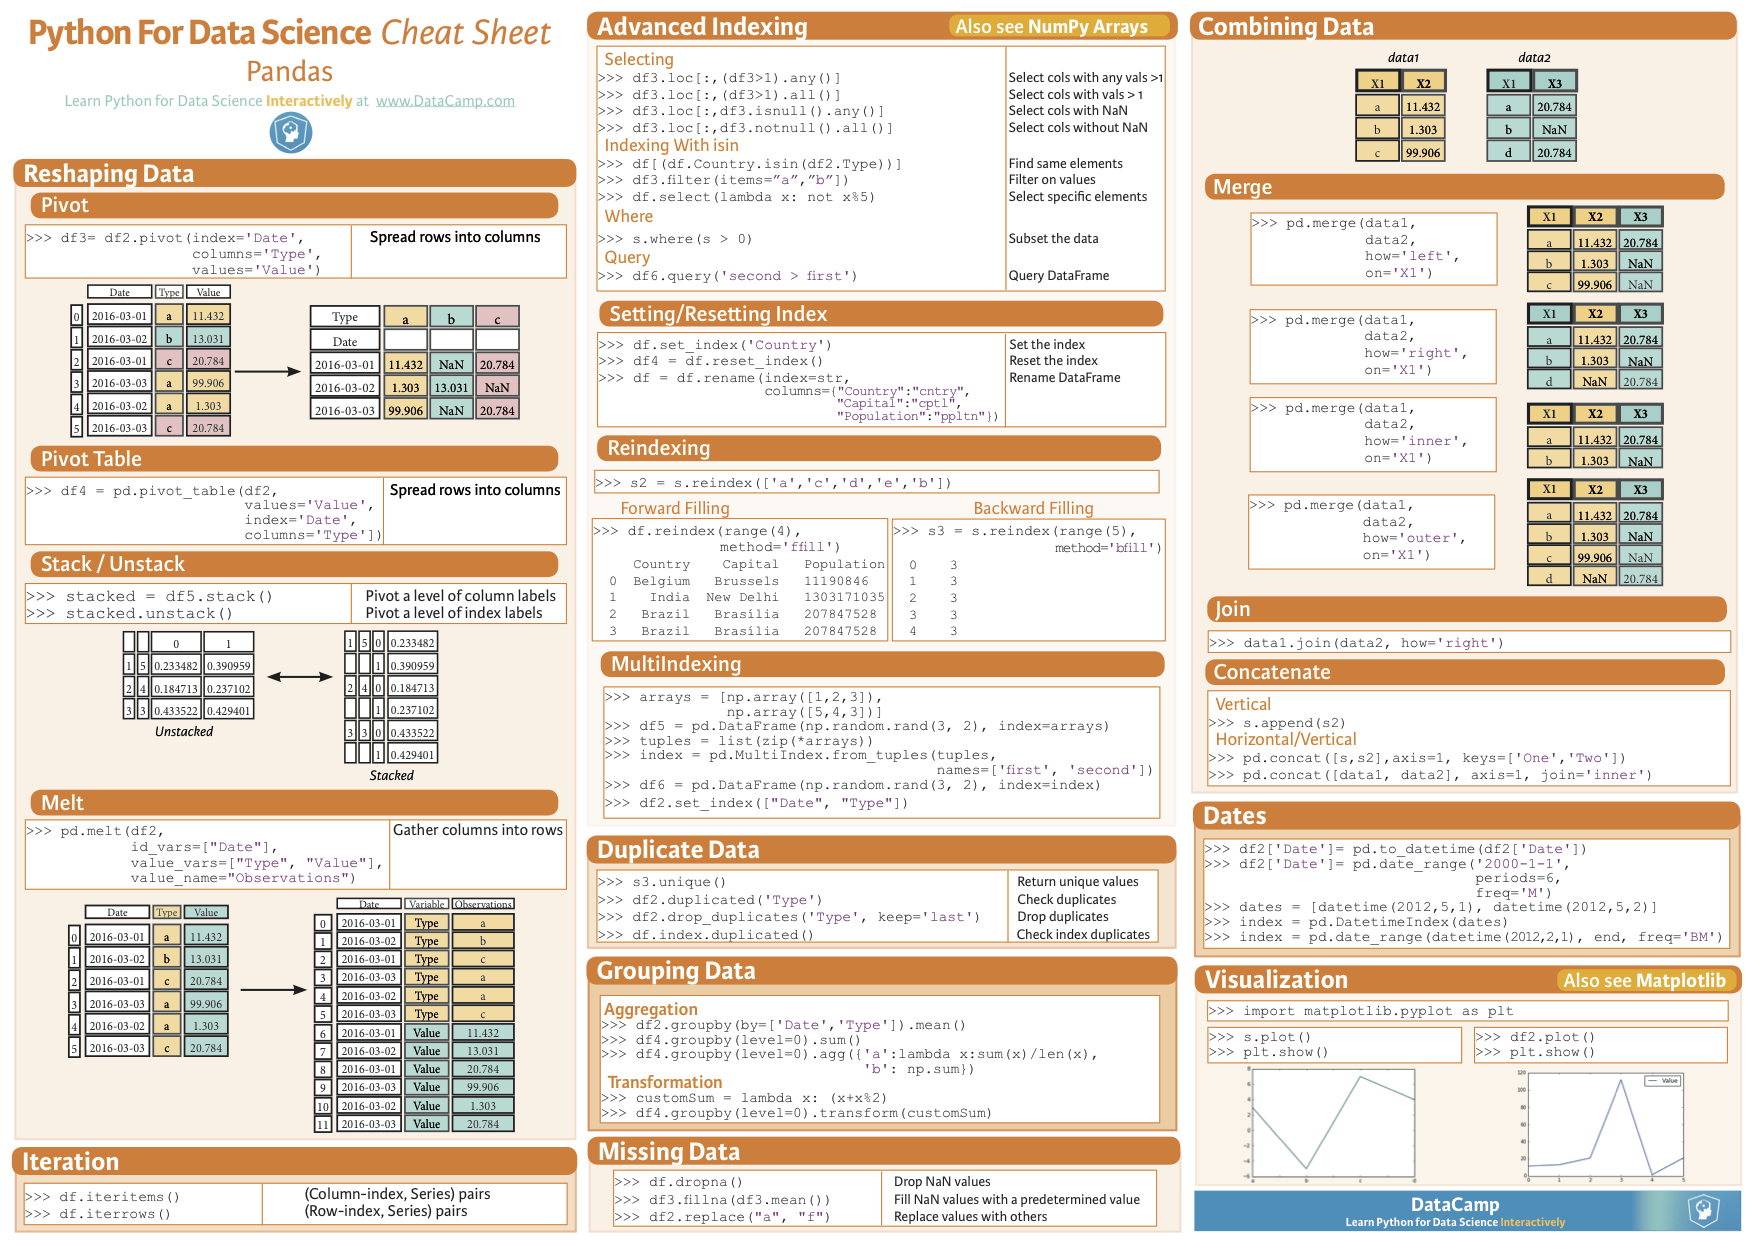
python pandas v1
python pandas v2
python pandas v3
python scipy
python numpy
python seaborn
python matplotlib
python for data science
python jupyter
python scikit-learn
github
github markdown
R ggplot2
Read full-text »
读后感-易中天《品三国》
2018-01-23
易中天《品三国》
诸侯割据,各路豪杰,鼎力三国。读历史真的可以明志,好的解读也是让人受益颇多。以前自己其实不太了解这一段历史,连三国演义电视剧都没有看全。从这里,才知道历史形象和文学形象的差距如此之大。曹操是可爱的奸雄,有宏图大志,但是不拘小节;刘备、孙权都愿意为了自己的理想不懈奋斗,诸葛亮辅佐两代君王,鞠躬尽瘁。细数,还有那么多同样智慧的将领,曹操的郭嘉、荀彧,孙权的张昭、陆逊、鲁肃、周瑜,都是那个时代的杰出人物。这些君王的共同之处,在于晚年变节。也许曾经是存粹的,有着高尚的革命情怀,但是一旦大权在握,格局动荡,人心都是会变的,自己的初心也不例外。总体看来,曹操是最具帝王风范的,虽然自己没有称帝;诸葛亮是最具智慧和中心的,唯一接近“不忘初心,砥砺前行”的人。历史是轮回的,不知道其他的朝代是不是也有如此豪杰,拭目以待。
Read full-text »
Links to all types of plot
2018-01-01
<!DOCTYPE html>
sns.set(style="ticks")
sns.set_context("poster")
from adjustText import adjust_text
f = '../data/HEK293T.duplex.RBP.stat.bed'
df = pd.read_csv(f, header=0, index_col=0, sep='\t')
color_category = []
for i in df.iterrows():
    i = i[1]
    if float(i['pct(cover RRI) 1']) >= 0.05 and float(i['pvalue']) <= 0.01 and float(i['oddsratio']) >= 1.5:
        color_category.append('high')
    elif float(i['pvalue']) <= 0.01 and float(i['oddsratio']) >= 1.5:
        color_category.append('weak')
    else:
        color_category.append('none')
df['enrich level'] = color_category
df.head()
fig,ax=plt.subplots(figsize=(10,12))

df['size'] = 0.01
sns.scatterplot(x='log2(obs/exp)', y='pct(cover RRI) 1', hue='enrich level', data=df, size='size')

xs = df[df['enrich level']!='none']['log2(obs/exp)']
ys = df[df['enrich level']!='none']['pct(cover RRI) 1']
ss = df[df['enrich level']!='none'].index

texts = []
for x, y, s in zip(xs, ys, ss):
    texts.append(plt.text(x, y, s))

# adjust_text(texts, only_move={'text': 'y'})


plt.ylabel('Percentage of interacting regions')
pd.concat([df, df], axis=1).shape
pd.DataFrame(df['enrich level'].value_counts())
1   198
2  2497
3  1274
4   506
5   217
6   349
a = [1,2,3]
a.extend([4,5])
a
np.random.seed(1234)
import random
random.sample(a, 2)
from scipy import stats
stats.pearsonr(a, a)
Read full-text »
GTF files
2017-12-28
Extract intron, CDS, UTR5, UTR3 coordinates from gtf
Ref: onetipperday
Read full-text »
Latest articles
Links
- ZhangLab , RISE database , THU life , THU info
- Data analysis: pandas , numpy , scipy
- ML/DL: sklearn , sklearn(中文) , pytorch
- Visualization: seaborn , matplotlib , gallery
- Github: me
