目录
概述
pytorch: 基于python的科学计算包
- 替代numpy,利用GPU性能进行计算
- 高灵活性、速度快的深度学习平台
基本概念
3层抽象:
- tensor:imprerative array, but runs on GPU
- variable: node in a graph, store data and gradient
- module: a neural network layer, store state or learnable weights
张量(tensor):类似于numpy里面的数组array,在GPU上可实现加速计算。
张量的基本操作:
from __future__ import print_function
import torch

# 把生成的memory返回到x,不同批次调用此函数返回值是不同的
# https://stackoverflow.com/questions/51140927/what-is-uninitialized-data-in-pytorch-empty-function
x = torch.empty(5, 3)

# 随机初始化一个矩阵
x = torch.rand(5, 3)

# 全0矩阵
x = torch.zeros(5, 3, dtype=torch.long)

# 直接张量赋值
x = torch.tensor([5.5, 3])

# 全1矩阵
x = x.new_ones(5, 3, dtype=torch.double)

# 获取x的shape,随机生成矩阵
# x = torch.randn_like(x, dtype=torch.float)
张量的基本运算:
# 加法
x = torch.tensor([5.5, 3])
y = torch.rand(5, 3)
print(x + y)

# 加法
print(torch.add(x, y))

# 加法
result = torch.empty(5, 3)
torch.add(x, y, out=result)

# 原位加法,此时y的值是改变的
y.add_(x)

# 取值
print(x[:, 1])

# 改变array形状
x = torch.randn(4, 4)
y = x.view(16)
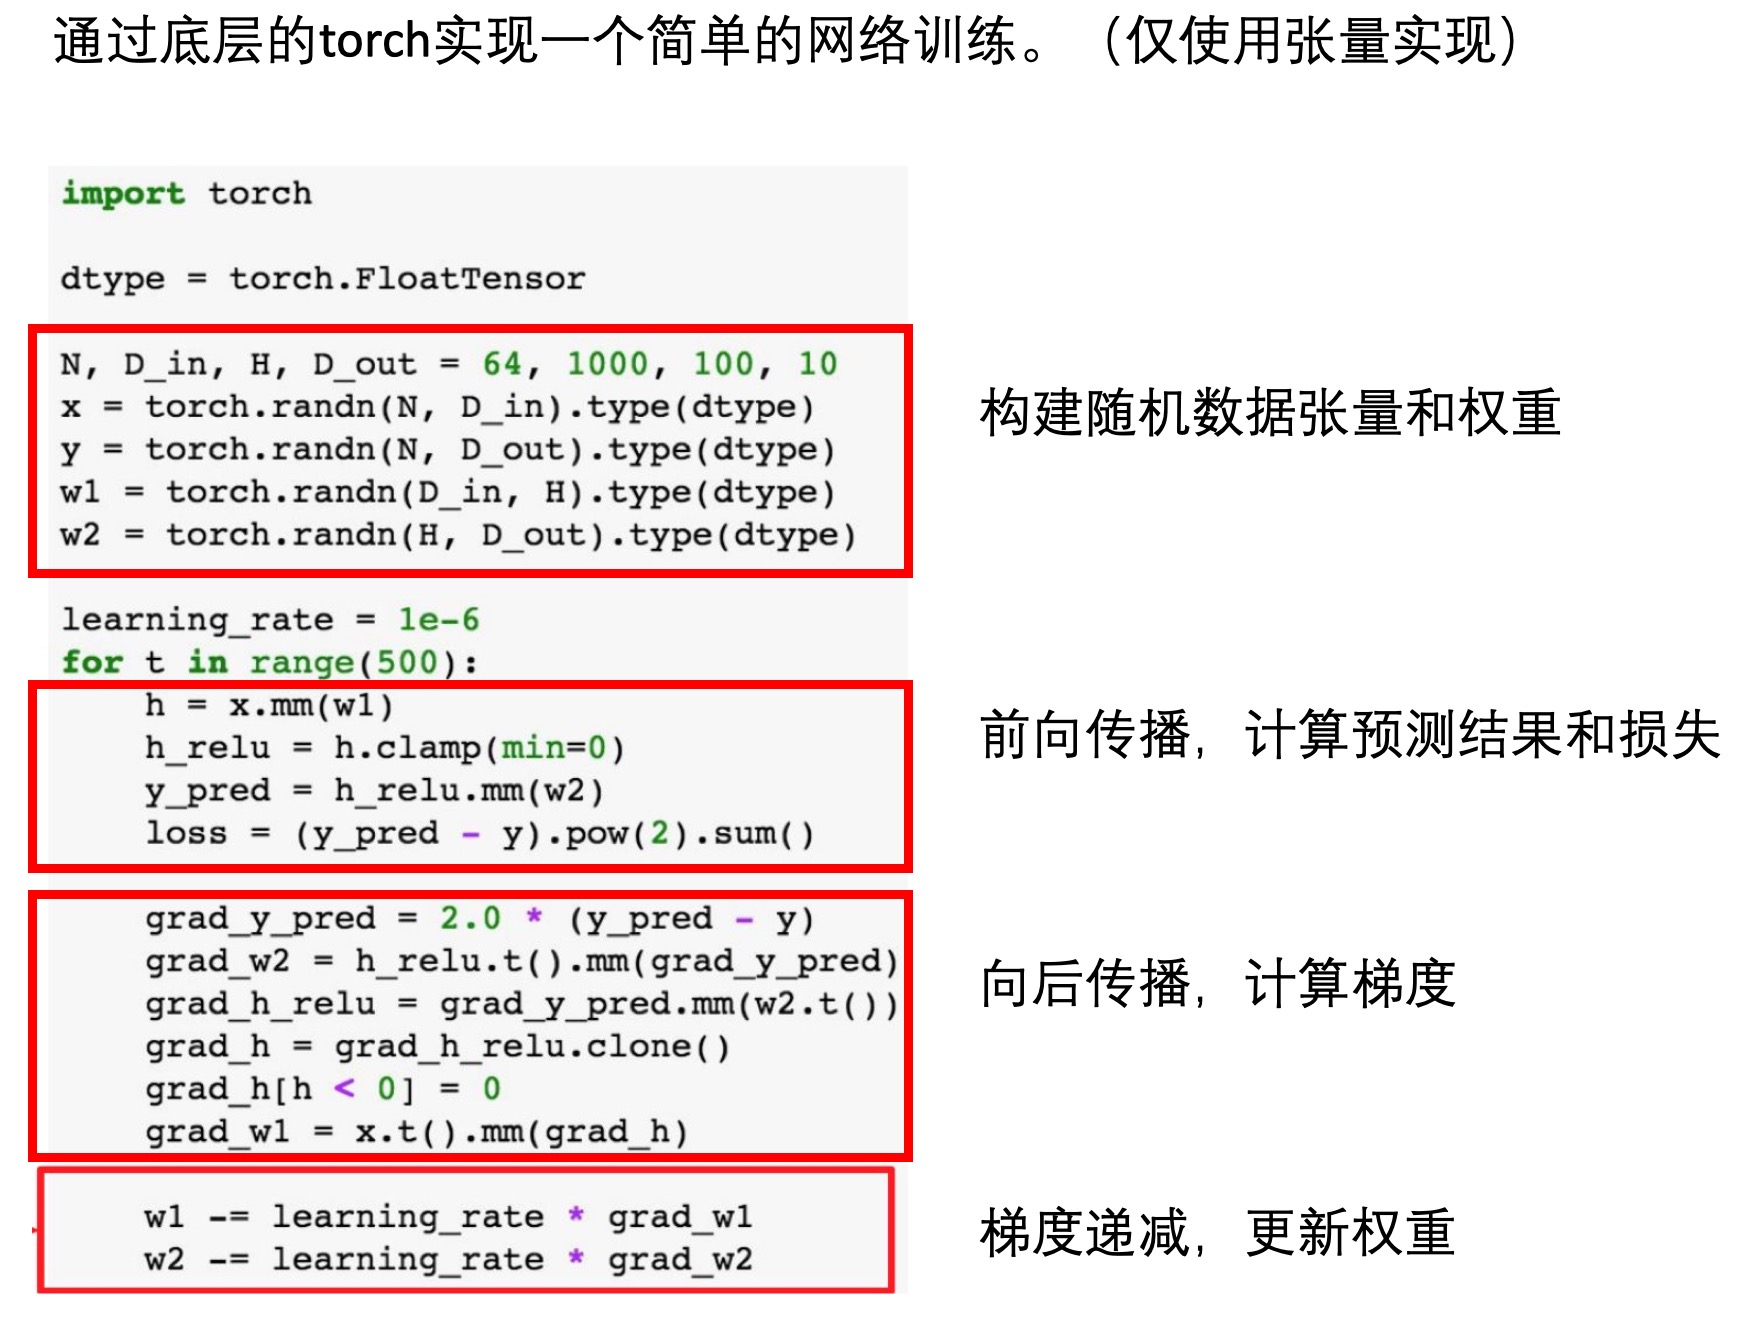
下面是一个使用底层张量实现的网络训练:
Autograd:自动求导
张量的求导是可追踪的,即某个张量的求导设置为true时,基于此张量的操作或者后续张量,其也是具有可求导属性的。
a = torch.randn(2, 2)
a = ((a * 3) / (a - 1))
print(a.requires_grad)
a.requires_grad_(True)
print(a.requires_grad)
b = (a * a).sum()
print(b.grad_fn)

# False
# True
# <SumBackward0 object at 0x7f1b24845f98>
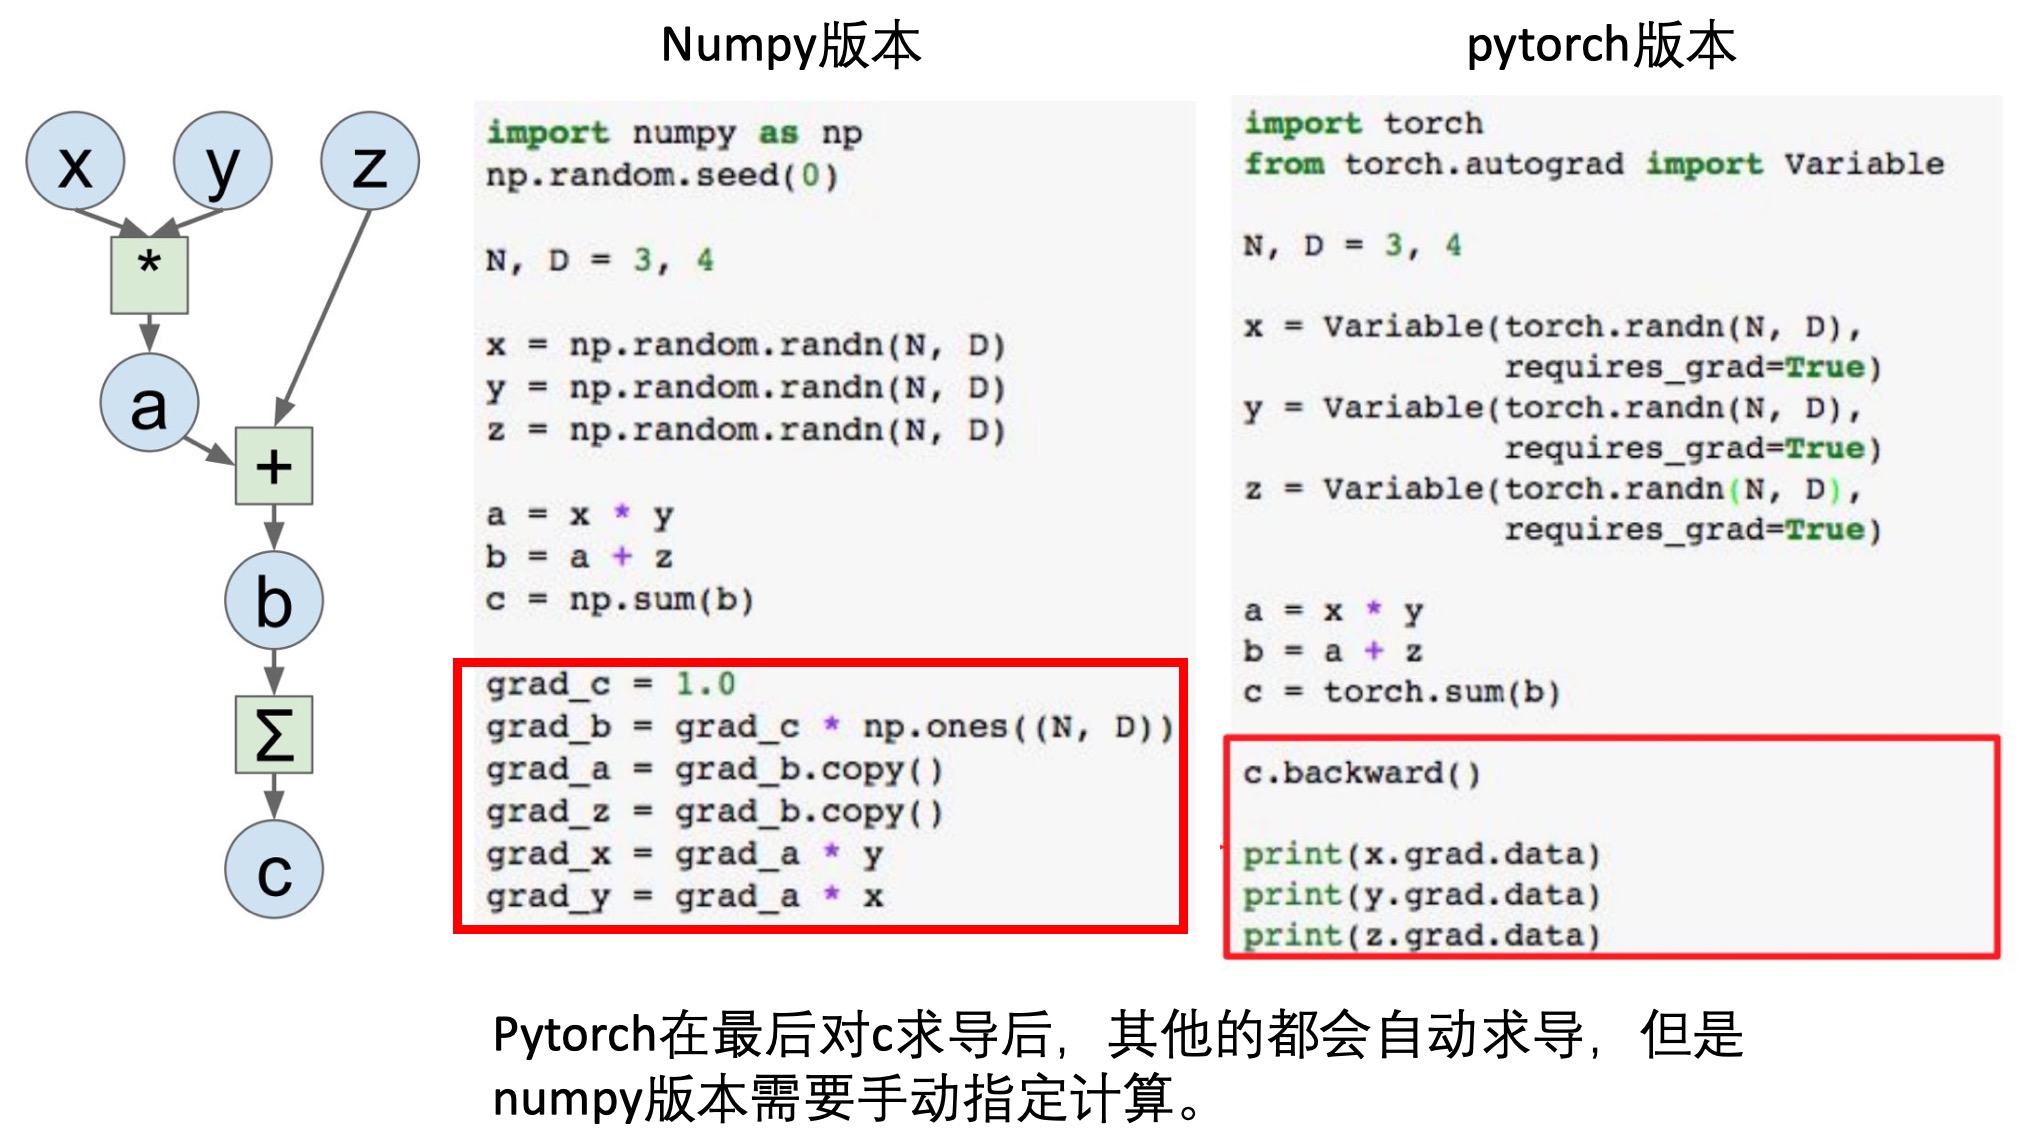
下面是对于变换过程中的求导,在numpy和pytorch中的实现,可以看到,后者能够实现追踪:
示例: 手写数字识别的LeNet5卷积神经网络

准备数据
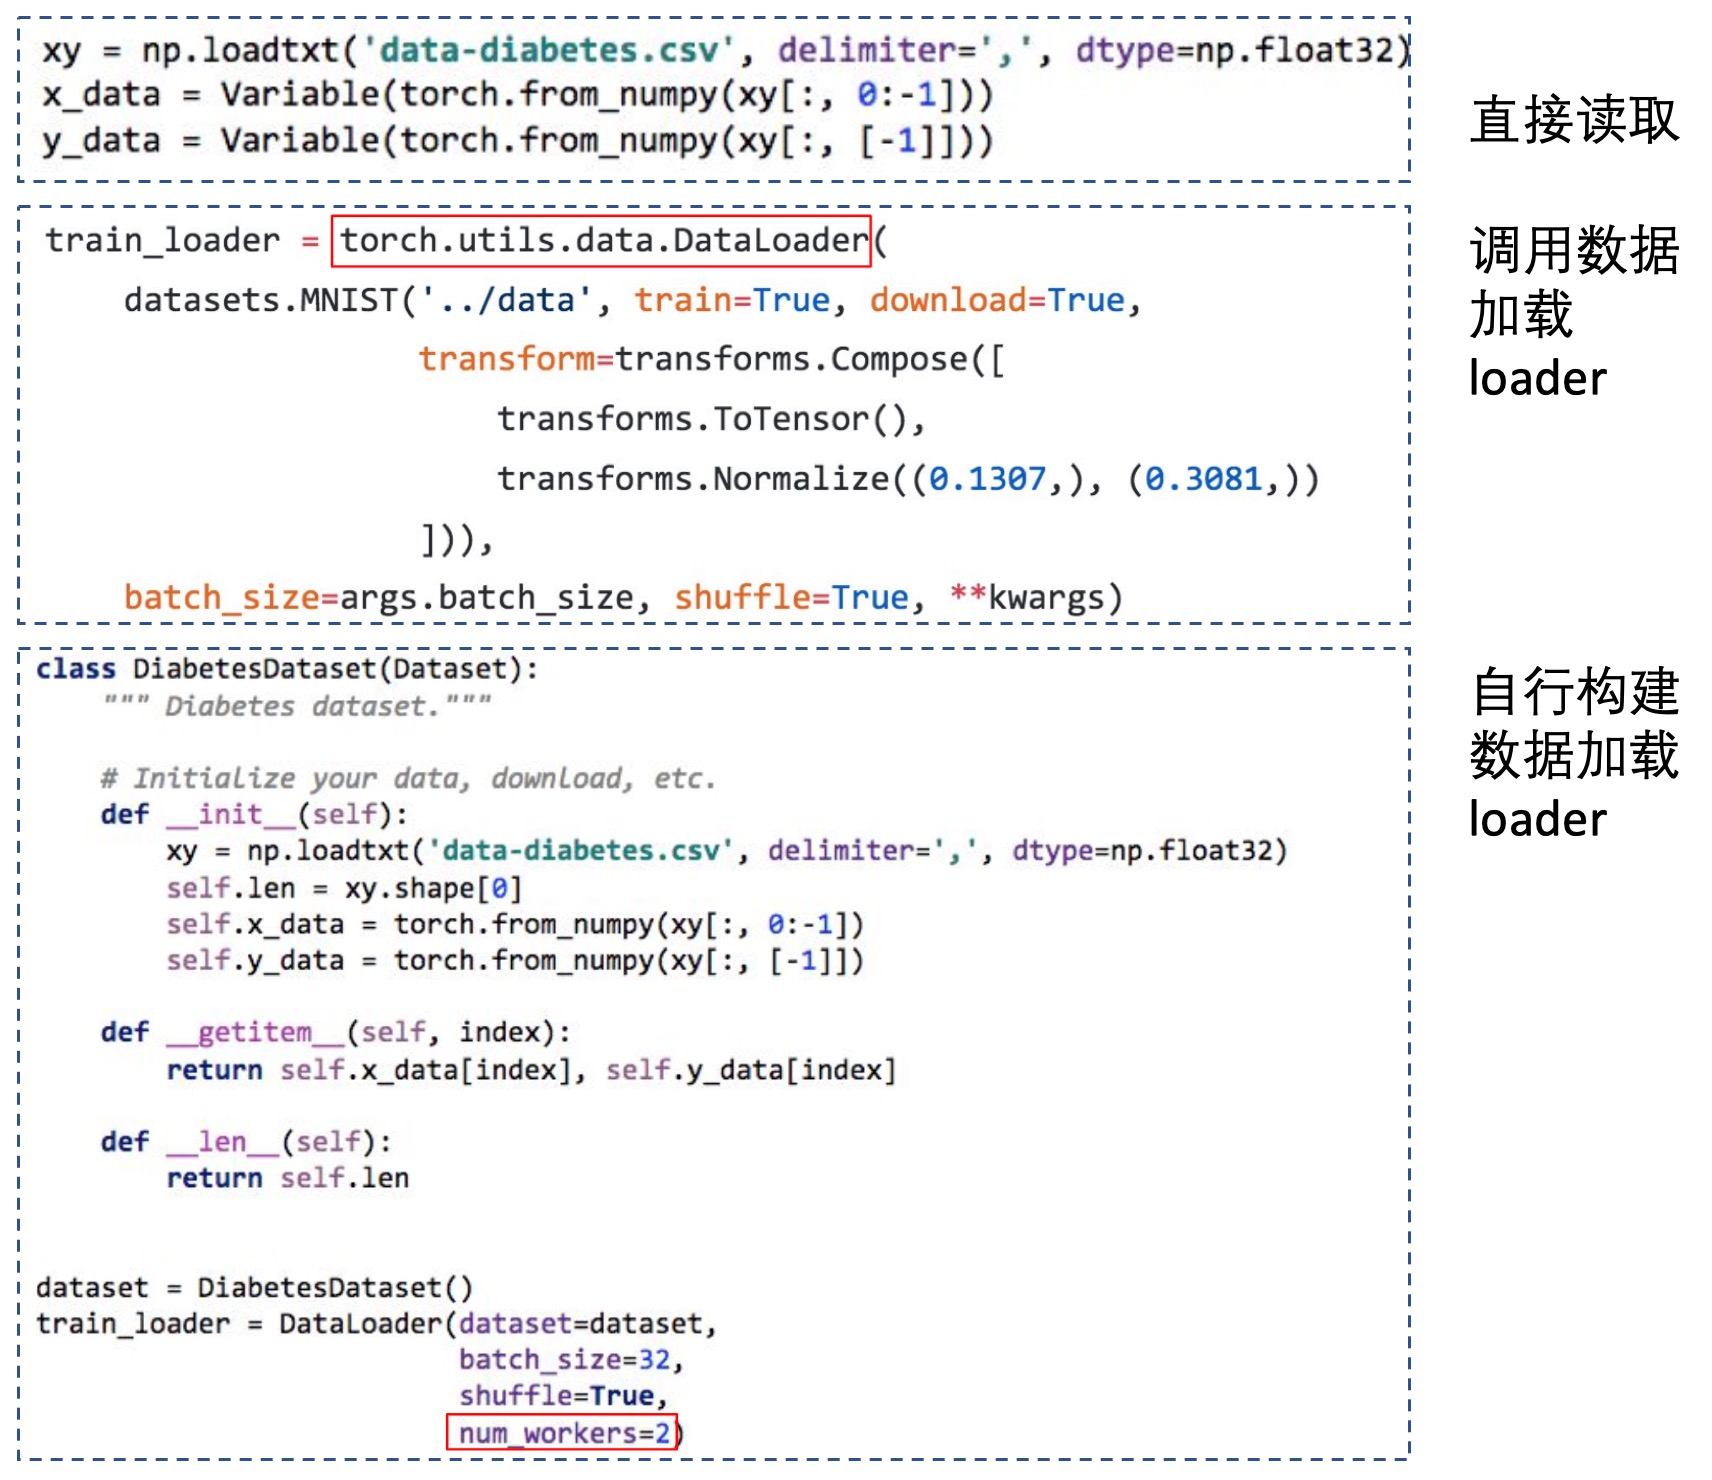
加载数据的方法有多种(如下图):
这里使用的数据集都是比较经典的,一般使用torch.utils.data.DataLoader:
import torchvision.datasets as dset
import torchvision.transforms as transforms

root = './data'
if not os.path.exists(root):
    os.mkdir(root)

# 这里的0.5,1.0是对数据进行归一化时使用的mean和variance
# 在MNIST里面,图片的均值和方差分别是:0.1307,0.3081,所以这里提供的值不是对的
trans = transforms.Compose([transforms.ToTensor(), transforms.Normalize((0.5,), (1.0,))])
# if not exist, download mnist dataset
train_set = dset.MNIST(root=root, train=True, transform=trans, download=True)
test_set = dset.MNIST(root=root, train=False, transform=trans, download=True)

batch_size = 100

train_loader = torch.utils.data.DataLoader(
                 dataset=train_set,
                 batch_size=batch_size,
                 shuffle=True)
test_loader = torch.utils.data.DataLoader(
                dataset=test_set,
                batch_size=batch_size,
                shuffle=False)
定义网络
import torch
import torch.nn as nn
import torch.nn.functional as F

class Net(nn.Module):

    def __init__(self):
        super(Net, self).__init__()
        # 输入图像channel:1;输出channel:6;5x5卷积核
        # 这里构建的网络的padding是1,但是真实的一般使用的是2(外层补上两圈0),输入是32x32
        self.conv1 = nn.Conv2d(1, 6, 5)
        self.conv2 = nn.Conv2d(6, 16, 5)
        # an affine operation: y = Wx + b
        self.fc1 = nn.Linear(16 * 5 * 5, 120)
        self.fc2 = nn.Linear(120, 84)
        self.fc3 = nn.Linear(84, 10)

    def forward(self, x):
        # 2x2 Max pooling, 先卷积,然后调用relu激活函数,再最大值池化操作
        x = F.max_pool2d(F.relu(self.conv1(x)), (2, 2))
        # If the size is a square you can only specify a single number
        # 第二次卷积+池化操作
        x = F.max_pool2d(F.relu(self.conv2(x)), 2)
        # 重新塑形,将多维数据重新塑造为二维数据,256*400
        x = x.view(-1, self.num_flat_features(x))
        #第一个全连接
        x = F.relu(self.fc1(x))
        x = F.relu(self.fc2(x))
        x = self.fc3(x)
        return x

    def num_flat_features(self, x):
        # x.size()返回值为(256, 16, 5, 5),size的值为(16, 5, 5),256是batch_size
        # x.size返回的是一个元组,size表示截取元组中第二个开始的数字
        size = x.size()[1:]  # 除去批大小维度的其余维度
        num_features = 1
        for s in size:
            num_features *= s
        return num_features

net = Net()
print(net)

# 构建的网络
# Net(
#   (conv1): Conv2d(1, 6, kernel_size=(5, 5), stride=(1, 1))
#   (conv2): Conv2d(6, 16, kernel_size=(5, 5), stride=(1, 1))
#   (fc1): Linear(in_features=400, out_features=120, bias=True)
#   (fc2): Linear(in_features=120, out_features=84, bias=True)
#   (fc3): Linear(in_features=84, out_features=10, bias=True)
# )
这里卷积层的构建调用的是.Conv2d()函数:
# https://pytorch.org/docs/stable/nn.html#conv2d

torch.nn.Conv2d(in_channels, out_channels, kernel_size, stride=1, padding=0, dilation=1,
                groups=1, bias=True, padding_mode='zeros')

# 参数列表
# in_channels (int) – Number of channels in the input image
# out_channels (int) – Number of channels produced by the convolution
# kernel_size (int or tuple) – Size of the convolving kernel
# stride (int or tuple, optional) – Stride of the convolution. Default: 1
# padding (int or tuple, optional) – Zero-padding added to both sides of the input. Default: 0
# padding_mode (string, optional) – zeros
# dilation (int or tuple, optional) – Spacing between kernel elements. Default: 1
# groups (int, optional) – Number of blocked connections from input channels to output channels. Default: 1
# bias (bool, optional) – If True, adds a learnable bias to the output. Default: True
上面还使用到了view函数,用于对数组进行reshape,类似于numpy里面的resize函数。作用:把原先tensor的数据排成一个一维的数据,然后按照view提供的参数转换为其他维度的张量。
# 【1】即使原始的张量维度不一样,但是提供的view参数一致,那么转换后的张量也是一样的
a=torch.Tensor([[[1,2,3],[4,5,6]]])
b=torch.Tensor([1,2,3,4,5,6])

print(a.view(1,6))
print(b.view(1,6))

# tensor([[1., 2., 3., 4., 5., 6.]])

# 【2】从2x3转换为3x2
a=torch.Tensor([[[1,2,3],[4,5,6]]])
print(a.view(3,2))

# tensor([[1., 2.],
#        [3., 4.],
#        [5., 6.]])

# 【3】view的参数不能为空,用-1代替未知的
# -1表示自动推断的
# 比如:原始是2x3=6的,现在view第一个参数是1,转换为二维的,那么-1自动推断此维度为6,所以转换后的张量是1x6
a = torch.Tensor(2,3)
print(a)
# tensor([[0.0000, 0.0000, 0.0000],
#        [0.0000, 0.0000, 0.0000]])
print(a.view(1,-1))
# tensor([[0.0000, 0.0000, 0.0000, 0.0000, 0.0000, 0.0000]])
定义损失函数和优化器
import torch.optim as optim

# https://pytorch.org/docs/stable/nn.html#loss-functions
# 这里定义了各种不同的损失函数
criterion = nn.CrossEntropyLoss()
optimizer = optim.SGD(net.parameters(), lr=0.001, momentum=0.9)
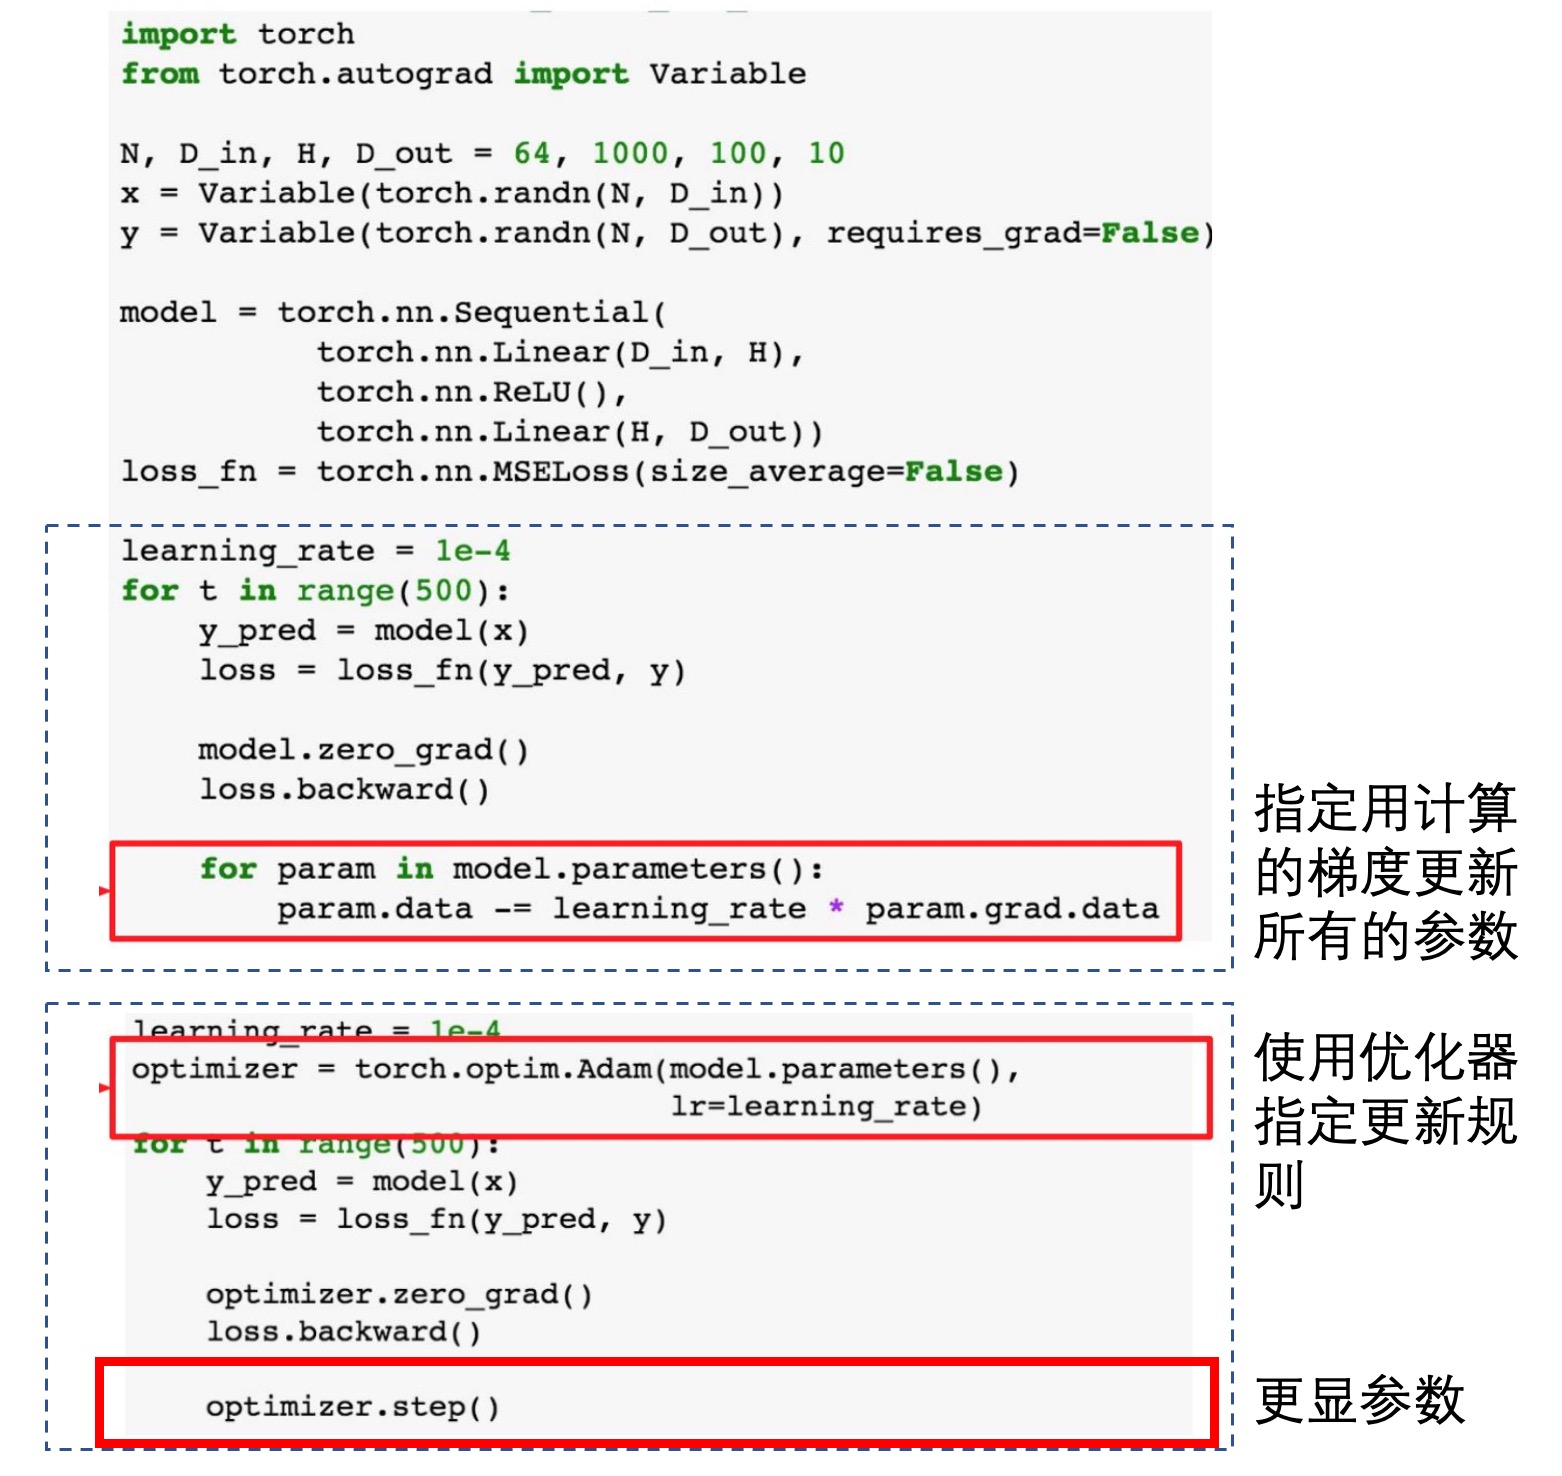
最好是直接调用优化器,但是最基础的也可手动指定更新(不推荐):
训练网络:
for epoch in range(2):  # loop over the dataset multiple times

    running_loss = 0.0
    for i, data in enumerate(trainloader, 0):
        # get the inputs
        inputs, labels = data

        # zero the parameter gradients
        optimizer.zero_grad()

        # forward + backward + optimize
        outputs = net(inputs)
        loss = criterion(outputs, labels)
        loss.backward()
        optimizer.step()

        # print statistics
        running_loss += loss.item()
        if i % 2000 == 1999:    # print every 2000 mini-batches
            print('[%d, %5d] loss: %.3f' % (epoch + 1, i + 1, running_loss / 2000))
            running_loss = 0.0

print('Finished Training')

# [1,  2000] loss: 2.182
# [1,  4000] loss: 1.819
# [1,  6000] loss: 1.648
# [1,  8000] loss: 1.569
# [1, 10000] loss: 1.511
# [1, 12000] loss: 1.473
# [2,  2000] loss: 1.414
# [2,  4000] loss: 1.365
# [2,  6000] loss: 1.358
# [2,  8000] loss: 1.322
# [2, 10000] loss: 1.298
# [2, 12000] loss: 1.282
# Finished Training
评估模型
correct = 0
total = 0
with torch.no_grad():
    for data in testloader:
        images, labels = data
        outputs = net(images)
        _, predicted = torch.max(outputs.data, 1)
        total += labels.size(0)
        correct += (predicted == labels).sum().item()

print('Accuracy of the network on the 10000 test images: %d %%' % (
    100 * correct / total))

# Accuracy of the network on the 10000 test images: 55 %
cheatsheet
- Pytorch official : https://pytorch.org/tutorials/beginner/ptcheat.html
- Pytorch_Tutorial : https://web.cs.ucdavis.edu/~yjlee/teaching/ecs289g-winter2018/Pytorch_Tutorial.pdf
参考
If you link this blog, please refer to this page, thanks!
Post link:https://tsinghua-gongjing.github.io/posts/pytorch.html
Previous:
【4-1】卷积神经网络
Next:
【4-2】深度卷积网络:实例探究
Latest articles
Links
- ZhangLab , RISE database , THU life , THU info
- Data analysis: pandas , numpy , scipy
- ML/DL: sklearn , sklearn(中文) , pytorch
- Visualization: seaborn , matplotlib , gallery
- Github: me


