Algorithm: 时间复杂度
2017-01-05
时间复杂度
- 是一个函数,定性描述算法算法的运行时间
- 大O表示法:
- 算法的操作数(Operation)
- 指出了算法运行时间的增速
- 单位不是秒
- 指出最糟糕情况下的运行时间
- 常见大O运行时间:
- O(logn): 对数时间,比如二分查找
- O(n): 线性时间,比如简单(穷举)查找
- O(n * logn): 比如快速排序(较快的排序算法)
- O(n^2): 比如选择排序(很慢的排序算法)
- O(n!): 比如旅行商问题,也是很慢的算法
-
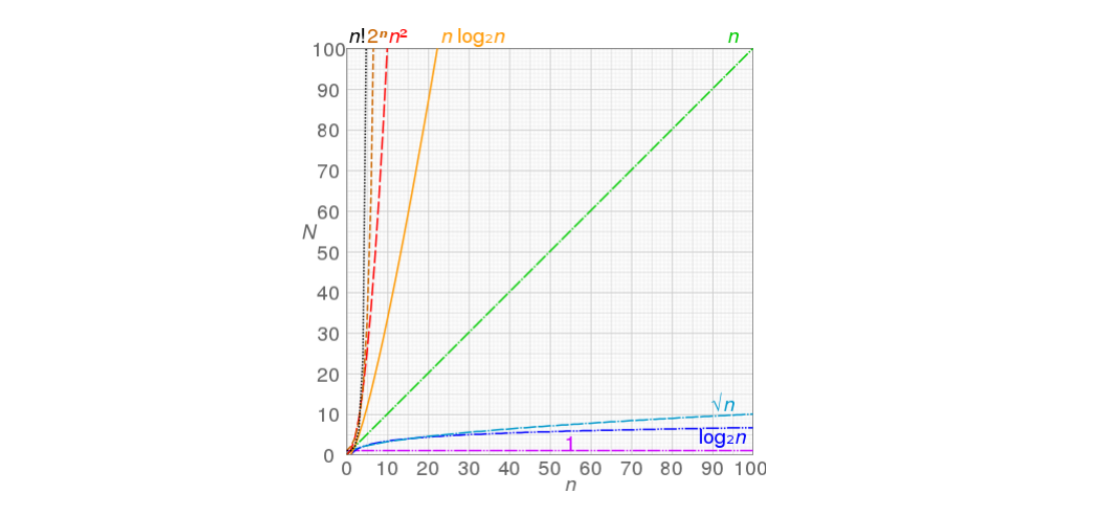
快 O(1)<O(㏒2n)<O(n)<O(n2)<O(2n) 慢
- 常见函数值与n的关系,可以看到,当n增大时,阶乘(n!)、平方(n^2)等是操作数增长最快的,也是最慢的
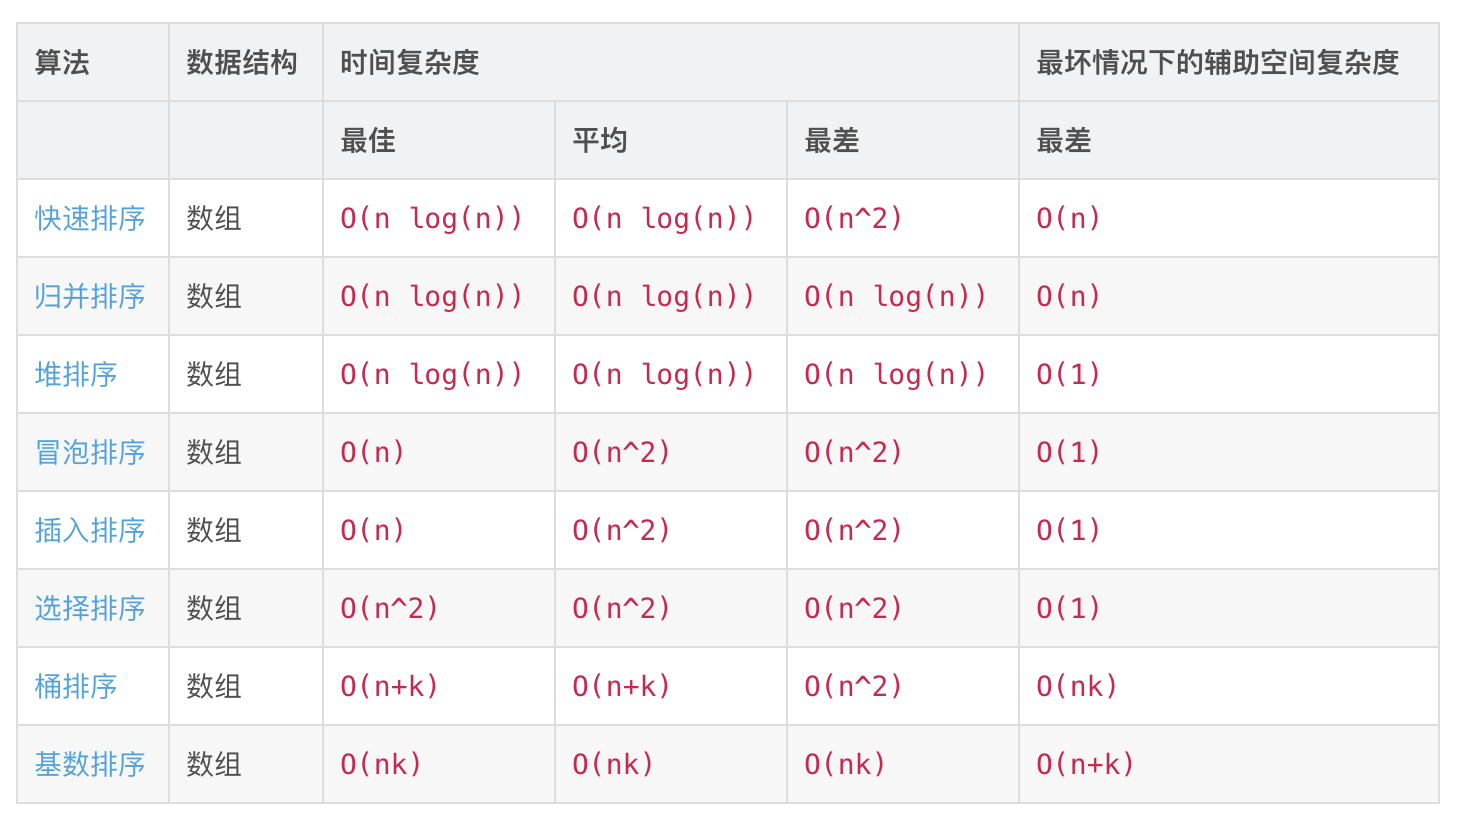
常见算法的复杂度
搜索

排序
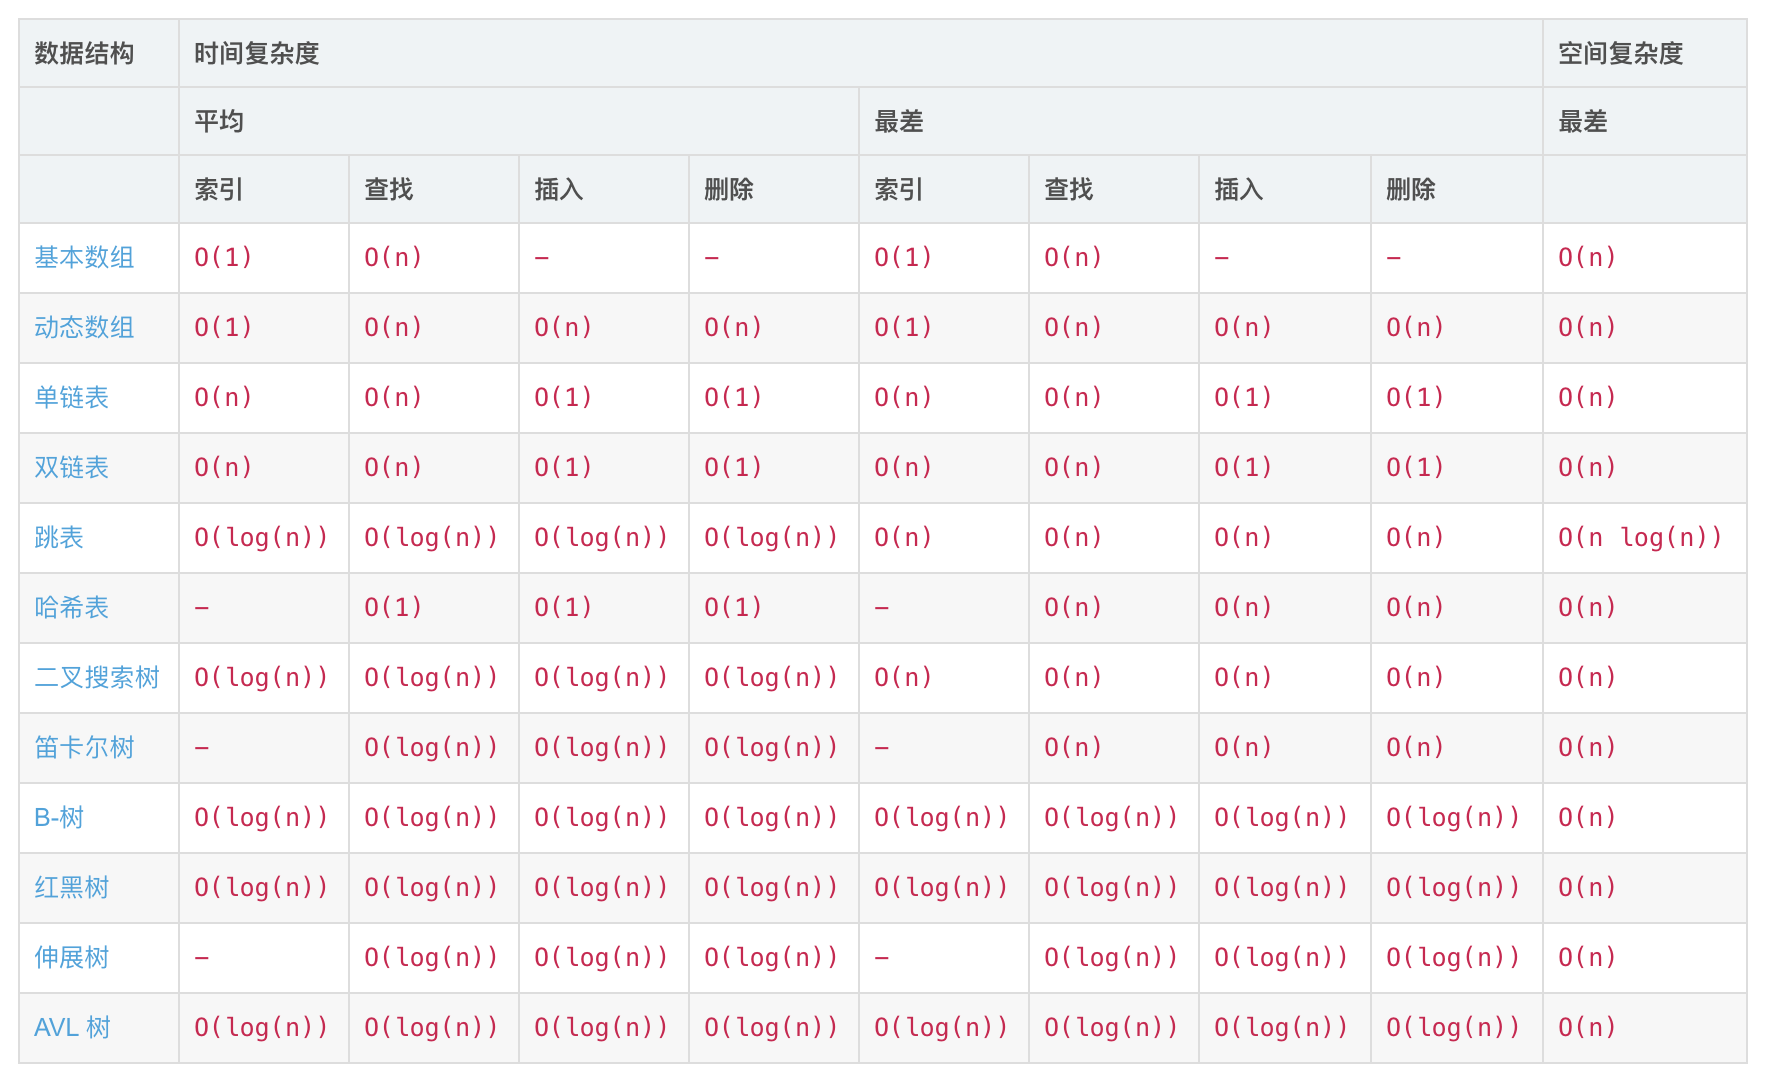
数据结构
堆

图

参考
Read full-text »
Algorithm: 穷举、二分查找
2017-01-03
问题背景
查找问题:
- 在电话薄中找名字以K打头的人
- 在字典中找一个以O打头的单词
- facebook核查用户登录的信息
简单(穷举)查找
每次查找排除一个数字,但是这个非常耗时。下面是一个动画,演示寻找数字37:

二分查找
描述:输入一个有序的元素列表,如果查找的元素包含在列表中,返回其位置,否则返回null。
思想:每次都通过中间值进行判断,从而否定掉一半的可能性
- 注意:必须是有序的
- 时间复杂度:对于含有n个元素的列表,最多需要log2(n)步,而简单查找最多需要n步
def binary_search(list, item):
  # low and high keep track of which part of the list you'll search in.
  low = 0
  high = len(list) - 1

  # While you haven't narrowed it down to one element ...
  while low <= high:
    # ... check the middle element
    mid = (low + high) // 2
    guess = list[mid]
    # Found the item.
    if guess == item:
      return mid
    # The guess was too high.
    if guess > item:
      high = mid - 1
    # The guess was too low.
    else:
      low = mid + 1

  # Item doesn't exist
  return None

my_list = [1, 3, 5, 7, 9]
print(binary_search(my_list, 3)) # => 1

# 'None' means nil in Python. We use to indicate that the item wasn't found.
print(binary_search(my_list, -1)) # => None
参考
Read full-text »
Scatter plot
2016-12-15
df = sns.load_dataset('tips')
print df.head()

total_bill   tip     sex smoker  day    time  size
0       16.99  1.01  Female     No  Sun  Dinner     2
1       10.34  1.66    Male     No  Sun  Dinner     3
2       21.01  3.50    Male     No  Sun  Dinner     3
3       23.68  3.31    Male     No  Sun  Dinner     2
4       24.59  3.61  Female     No  Sun  Dinner     4
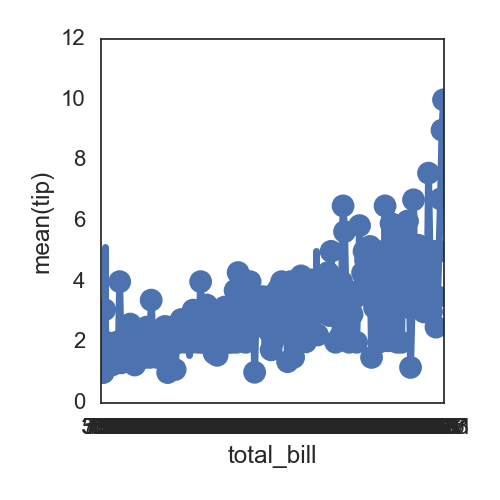
seaborn的pointplot适合画,单一变量在不同类别中的变化趋势,不适合直接展示两个变量之间的相关性:
sns.pointplot(x='total_bill', y='tip', data=df)
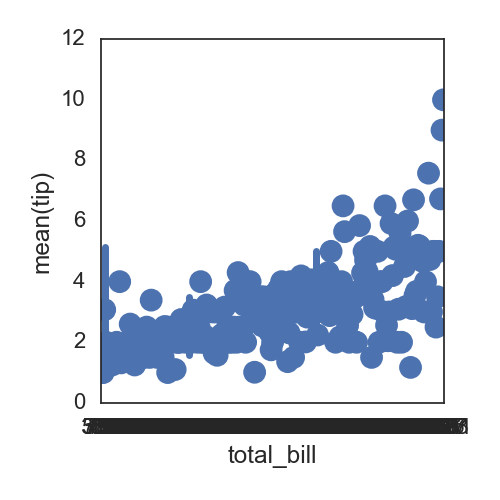
默认的点与点之间是有连线的,可以指定为没有:
sns.pointplot(x="total_bill", y="tip", data=df, linestyles='', )
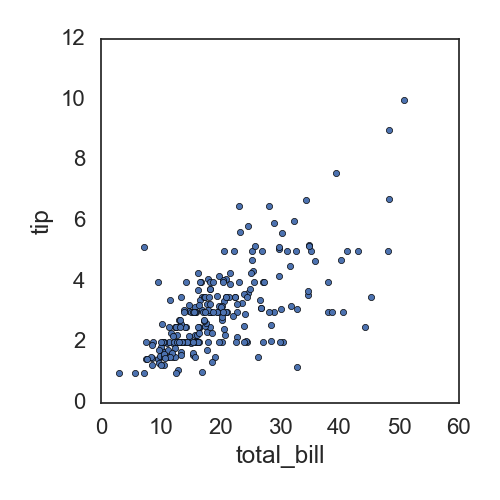
所以直接展示两个变量之间的相关性时,可以直接使用pandas的关于df的函数plot:
df.plot(kind='scatter', x='total_bill', y='tip')
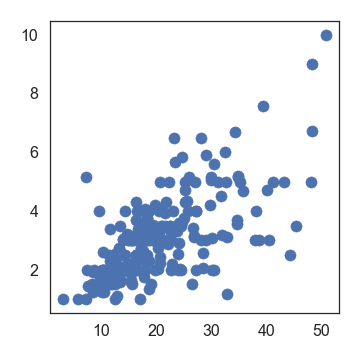
也可用matplot自带的实现,但是默认的效果没有基于df的好:
plt.scatter(x=df['total_bill'], y=df['tip'])
在这里还有很多调试其他的参数的例子,如果需要,可以参考。
连接型的scatter plot,直接用plot函数即可实现:
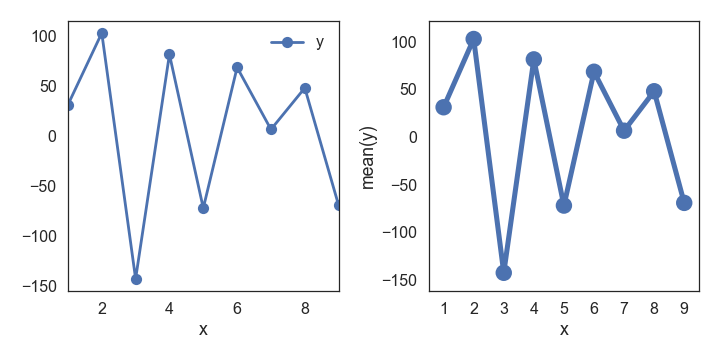
df=pd.DataFrame({'x': range(1,10), 'y': np.random.randn(9)*80+range(1,10) })
plt.plot( 'x', 'y', data=df, linestyle='-', marker='o')

也可用df.plot或者seaborn的pointplot直接画,默认的pointplot看起来效果更好:
df2.plot(ax=ax[0], x='x', y='y',linestyle='-', marker='o')
sns.pointplot(x='x', y='y', data=df2, ax=ax[1])
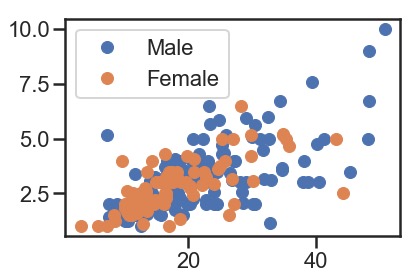
指定点的颜色按照某一列的属性进行上色(参考这里):
# specify the category columns and grouping
groups = df.groupby('sex')

# Plot
fig, ax = plt.subplots()
ax.margins(0.05) # Optional, just adds 5% padding to the autoscaling
for name, group in groups:
    ax.plot(group.total_bill, group.tip, marker='o', linestyle='', ms=12, label=name)
ax.legend()

plt.show()
Read full-text »
Frequently used genome related data
2016-12-03
public data
Gencode download
Note:
Genome sequences are assume consistent between different sources.
NCBI download
| Species | Genome | GTF | GFF | BED | Transcriptome |
|---|---|---|---|---|---|
| human (hg19) | GRCh37.gff3 | hg19.genomeCoor.bed, hg19.transCoor.bed | hg19_transcriptome.fa | ||
| human (hg38) | GRCh38.gff3 | hg38.genomeCoor.bed, hg38.transCoor.bed | hg38_transcriptome.fa | ||
| mouse (mm10) | GRCm38.gff3 | mm10.genomeCoor.bed, mm10.transCoor.bed | mm10_transcriptome.fa |
UCSC download
| Species | Genome | GTF | GFF | BED | Transcriptome |
|---|---|---|---|---|---|
| human (hg19) | chromFa.tar.gz | refMrna.fa.gz | |||
| human (hg38) | — | — | — | — | — |
| mouse (mm10) | — | — | — | — | — |
| mouse (mm9) | — | — | — | — | — |
| zebrafish (z10) | — | — | — | — | — |
Note:
| file | description |
|---|---|
| chromFa.tar.gz | The assembly sequence in one file per chromosome. Repeats from RepeatMasker and Tandem Repeats Finder (with period of 12 or less) are shown in lower case; non-repeating sequence is shown in upper case. |
| refMrna.fa.gz | RefSeq mRNA from the same species as the genome.This sequence data is updated once a week via automatic GenBank updates. |
Reference:
Read full-text »
Heatmap plot
2016-11-09
目录
plot use seaborn
fig,ax=plt.subplots()
sns.heatmap(df, linecolor='grey', linewidths=0.1, cbar=False, square=True, cmap="Greens", ax=ax)
available color map
Possible values are:
Accent, Accent_r, Blues, Blues_r, BrBG, BrBG_r, BuGn, BuGn_r, BuPu, BuPu_r,
CMRmap, CMRmap_r,
Dark2, Dark2_r,
GnBu, GnBu_r, Greens, Greens_r, Greys, Greys_r,
OrRd, OrRd_r, Oranges, Oranges_r,
PRGn, PRGn_r, Paired, Paired_r, Pastel1, Pastel1_r, Pastel2, Pastel2_r, PiYG, PiYG_r, PuBu, PuBuGn, PuBuGn_r, PuBu_r, PuOr, PuOr_r, PuRd, PuRd_r, Purples, Purples_r,
RdBu, RdBu_r, RdGy, RdGy_r, RdPu, RdPu_r, RdYlBu, RdYlBu_r, RdYlGn, RdYlGn_r, Reds, Reds_r,
Set1, Set1_r, Set2, Set2_r, Set3, Set3_r, Spectral, Spectral_r,
Vega10, Vega10_r, Vega20, Vega20_r, Vega20b, Vega20b_r, Vega20c, Vega20c_r,
Wistia, Wistia_r, YlGn, YlGnBu, YlGnBu_r, YlGn_r, YlOrBr, YlOrBr_r, YlOrRd, YlOrRd_r,
afmhot, afmhot_r, autumn, autumn_r,
binary, binary_r, bone, bone_r, brg, brg_r, bwr, bwr_r,
cool, cool_r, coolwarm, coolwarm_r, copper, copper_r, cubehelix, cubehelix_r,
flag, flag_r,
gist_earth, gist_earth_r, gist_gray, gist_gray_r, gist_heat, gist_heat_r, gist_ncar, gist_ncar_r, gist_rainbow, gist_rainbow_r, gist_stern, gist_stern_r, gist_yarg, gist_yarg_r, gnuplot, gnuplot2, gnuplot2_r, gnuplot_r, gray, gray_r,
hot, hot_r, hsv, hsv_r,
icefire, icefire_r, inferno, inferno_r,
jet, jet_r,
magma, magma_r, mako, mako_r,
nipy_spectral, nipy_spectral_r,
ocean, ocean_r,
pink, pink_r, plasma, plasma_r, prism, prism_r,
rainbow, rainbow_r, rocket, rocket_r,
seismic, seismic_r, spectral, spectral_r, spring, spring_r, summer, summer_r,
tab10, tab10_r, tab20, tab20_r, tab20b, tab20b_r, tab20c, tab20c_r, terrain, terrain_r,
viridis, viridis_r, vlag, vlag_r,
winter, winter_r
- 常用的
红-黄-绿是RdYlGn,红色是小值,绿色是大值,如果要更换顺序,就用对应的翻转reverse版本RdYlGn_r - 具体的color map效果可以参考这里: https://matplotlib.org/gallery/color/colormap_reference.html
Read full-text »
Sam file related
2016-10-15
file format
header lines
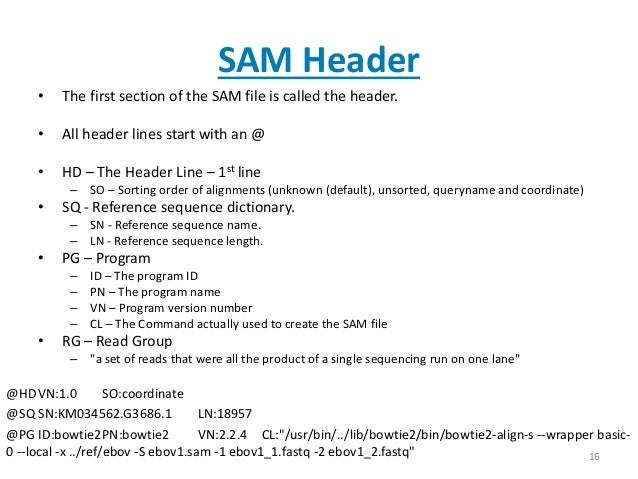
meaning of each column:

FLAG: how is the read mapped ?
explain-flags from broad institue
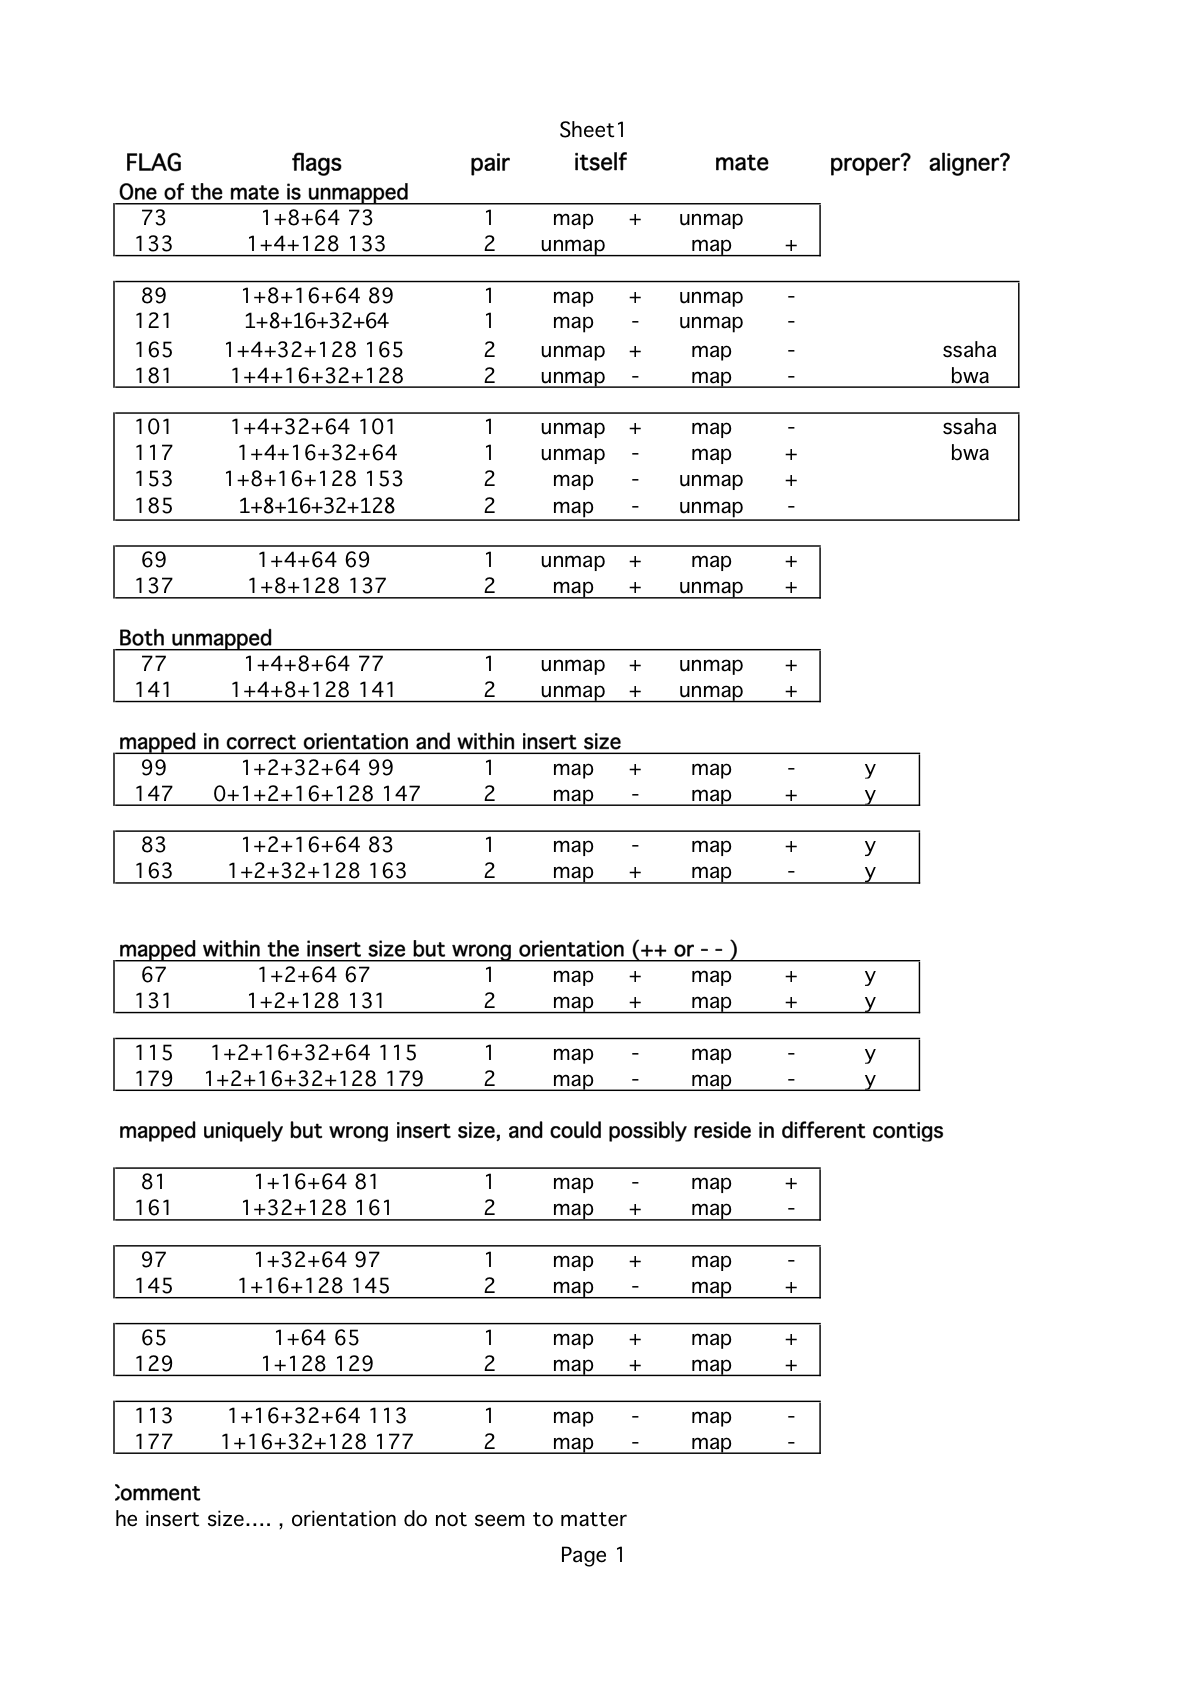
Example operation
Here SAM and BAM filtering oneliners (github) list some of basic usages
Extracting reads for a single chromosome from BAM/SAM source
If no regions or options: print all, If specific one or more regions (space separted): print restricted Note: need sorted and indexed
samtools view -h hur_MO-h6_rep2.sorted.bam NM_001002366 > test.sam

# convert bam directly
samtools view -bS HG00096.chr20.sam > HG00096.chr20.bam

# specific multiple chromosome or regions by space
samtools view -bS *bam chr1 chr2 chr3 > test.bam
Calculate number of mapped reads biostar
# number of entries excluding those marked as read #1 in a pair
[zhangqf7@bnode02 decay]$ samtools view -F 0x40 RIP_h4.bam| cut -f1 | sort | uniq | wc -l
104336

[zhangqf7@bnode02 decay]$ samtools flagstat RIP_h4.bam
208877 + 0 in total (QC-passed reads + QC-failed reads)
0 + 0 secondary
0 + 0 supplementary
0 + 0 duplicates
208877 + 0 mapped (100.00% : N/A)
208877 + 0 paired in sequencing
104541 + 0 read1
104336 + 0 read2
200984 + 0 properly paired (96.22% : N/A)
207883 + 0 with itself and mate mapped
994 + 0 singletons (0.48% : N/A)
71 + 0 with mate mapped to a different chr
71 + 0 with mate mapped to a different chr (mapQ>=5)

# Count mapped reads number from sam file
[zhangqf7@ZIO01 bowtie2_genome]$ samtools flagstat riboseq.sam
1704656 + 0 in total (QC-passed reads + QC-failed reads)
0 + 0 secondary
0 + 0 supplementary
0 + 0 duplicates
1704656 + 0 mapped (100.00% : N/A)
0 + 0 paired in sequencing
0 + 0 read1
0 + 0 read2
0 + 0 properly paired (N/A : N/A)
0 + 0 with itself and mate mapped
0 + 0 singletons (N/A : N/A)
0 + 0 with mate mapped to a different chr
0 + 0 with mate mapped to a different chr (mapQ>=5)

# for single-end data
[zhangqf7@bnode02 decay]$ samtools view -F 0x904 RIP_h4.bam| cut -f1 | sort | uniq | wc -l
104971

# for pair-end data
[zhangqf7@bnode02 decay]$ samtools view -F 0x4 RIP_h4.bam| cut -f1 | sort | uniq | wc -l
104971
Compute coverage of each base
bamCoverage from deeptools [slow]
# old version
bamCoverage --bam RIP_h6.bam --outFileName RIP_h6.bam.bw --binSize 1 --normalizeTo1x 37421801
# 37421801, the total bases in our merge reference

# new version of bamCoverage (DeepTools)
bamCoverage --bam RIP_h6.bam --outFileName RIP_h6.bam.bw --binSize 1 --effectiveGenomeSize 37421801 --normalizeUsing RPGC

# RPGC: RPGC (per bin) = number of reads per bin / scaling factor for 1x average coverage. This scaling factor, in turn, is determined from the sequencing depth: (total number of mapped reads * fragment length) / effective genome size. The scaling factor used is the inverse of the sequencing depth computed for the sample to match the 1x coverage. This option requires –effectiveGenomeSize.
igvtools count command in igvtools [fast]
igvtools count -w 1 RIP_h4.bam RIP_h4.wig /Share/home/zhangqf7/gongjing/zebrafish/data/reference/gtf/refseq_ensembl91_merge.tarns.fa
Add tag using pysam
ref: biostar
r = pysam.AlignedRead()

# add alignment end ad tag 'EN' which can be used for color
r.tags += [('EN', read.reference_end)]
Read full-text »
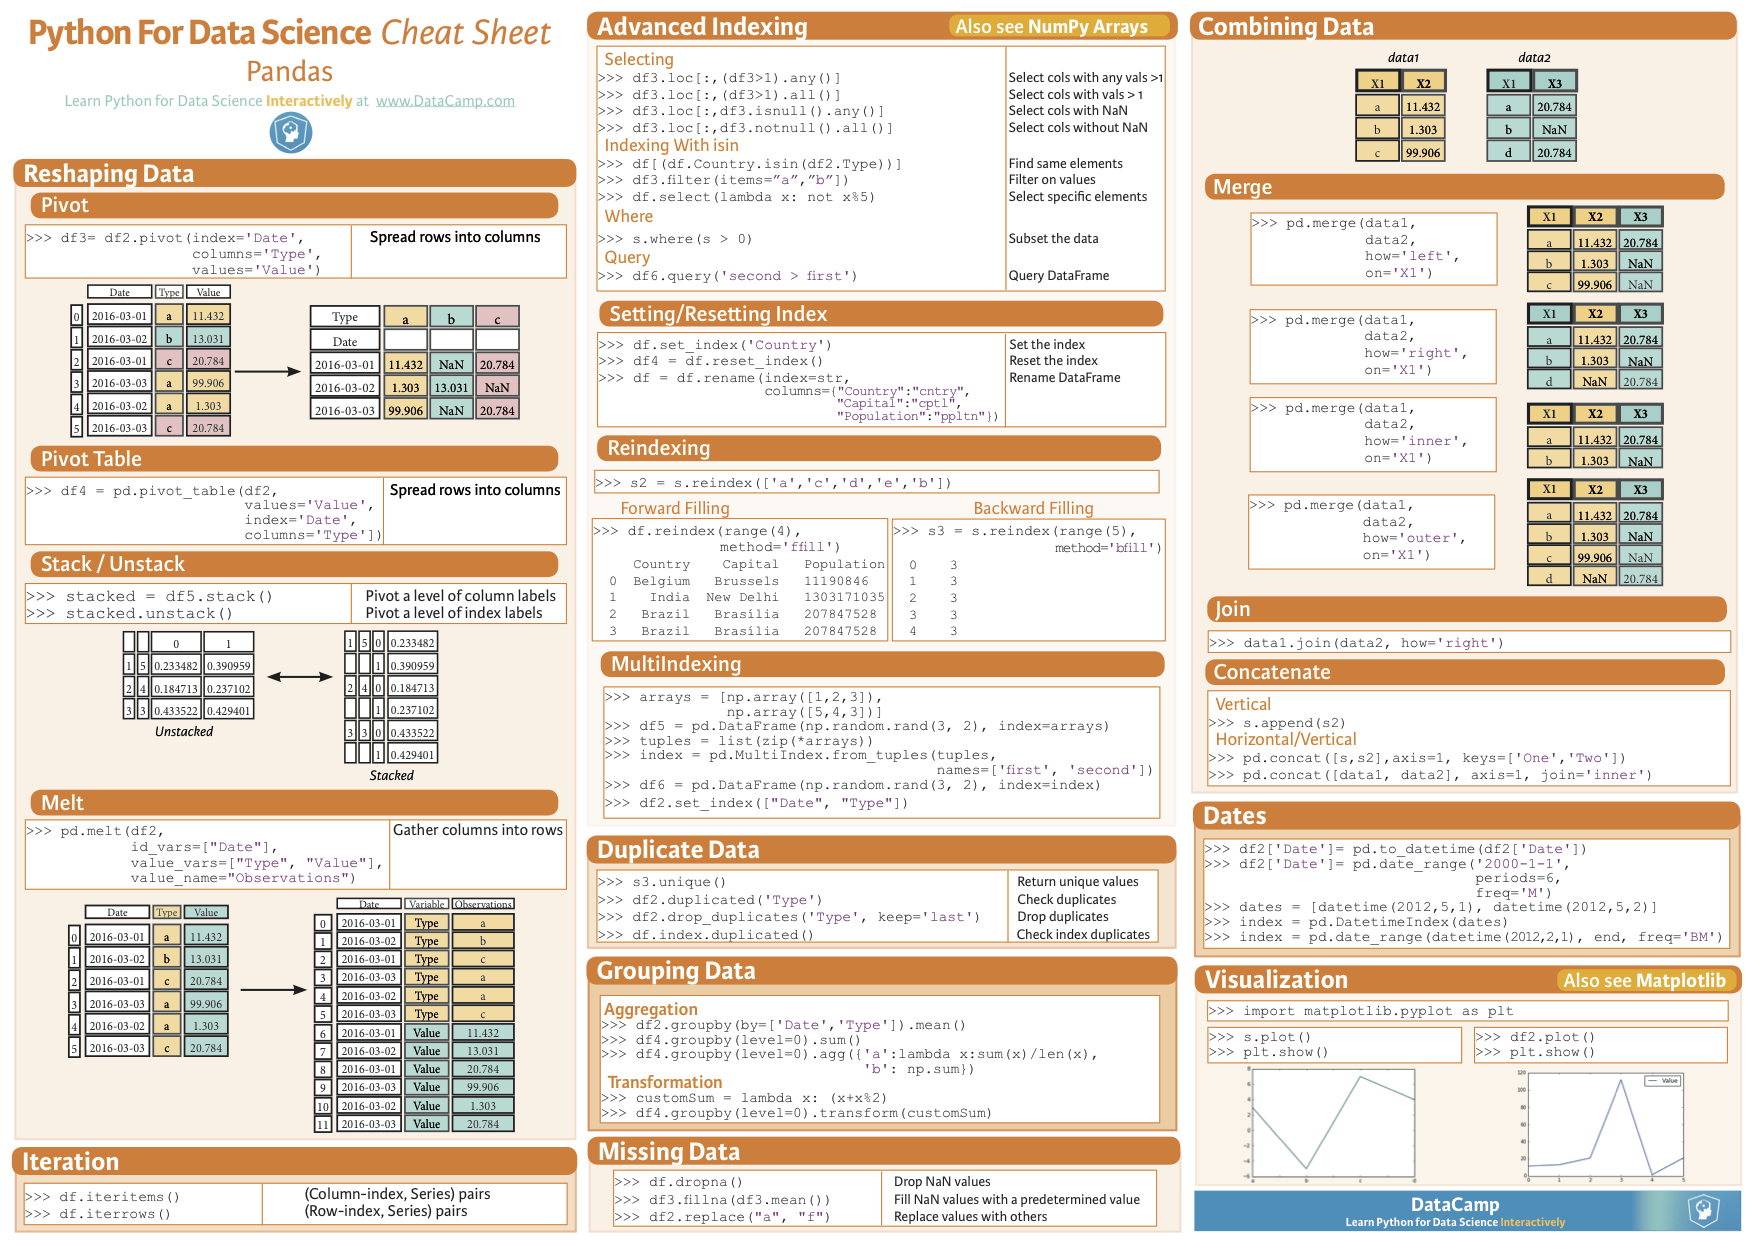
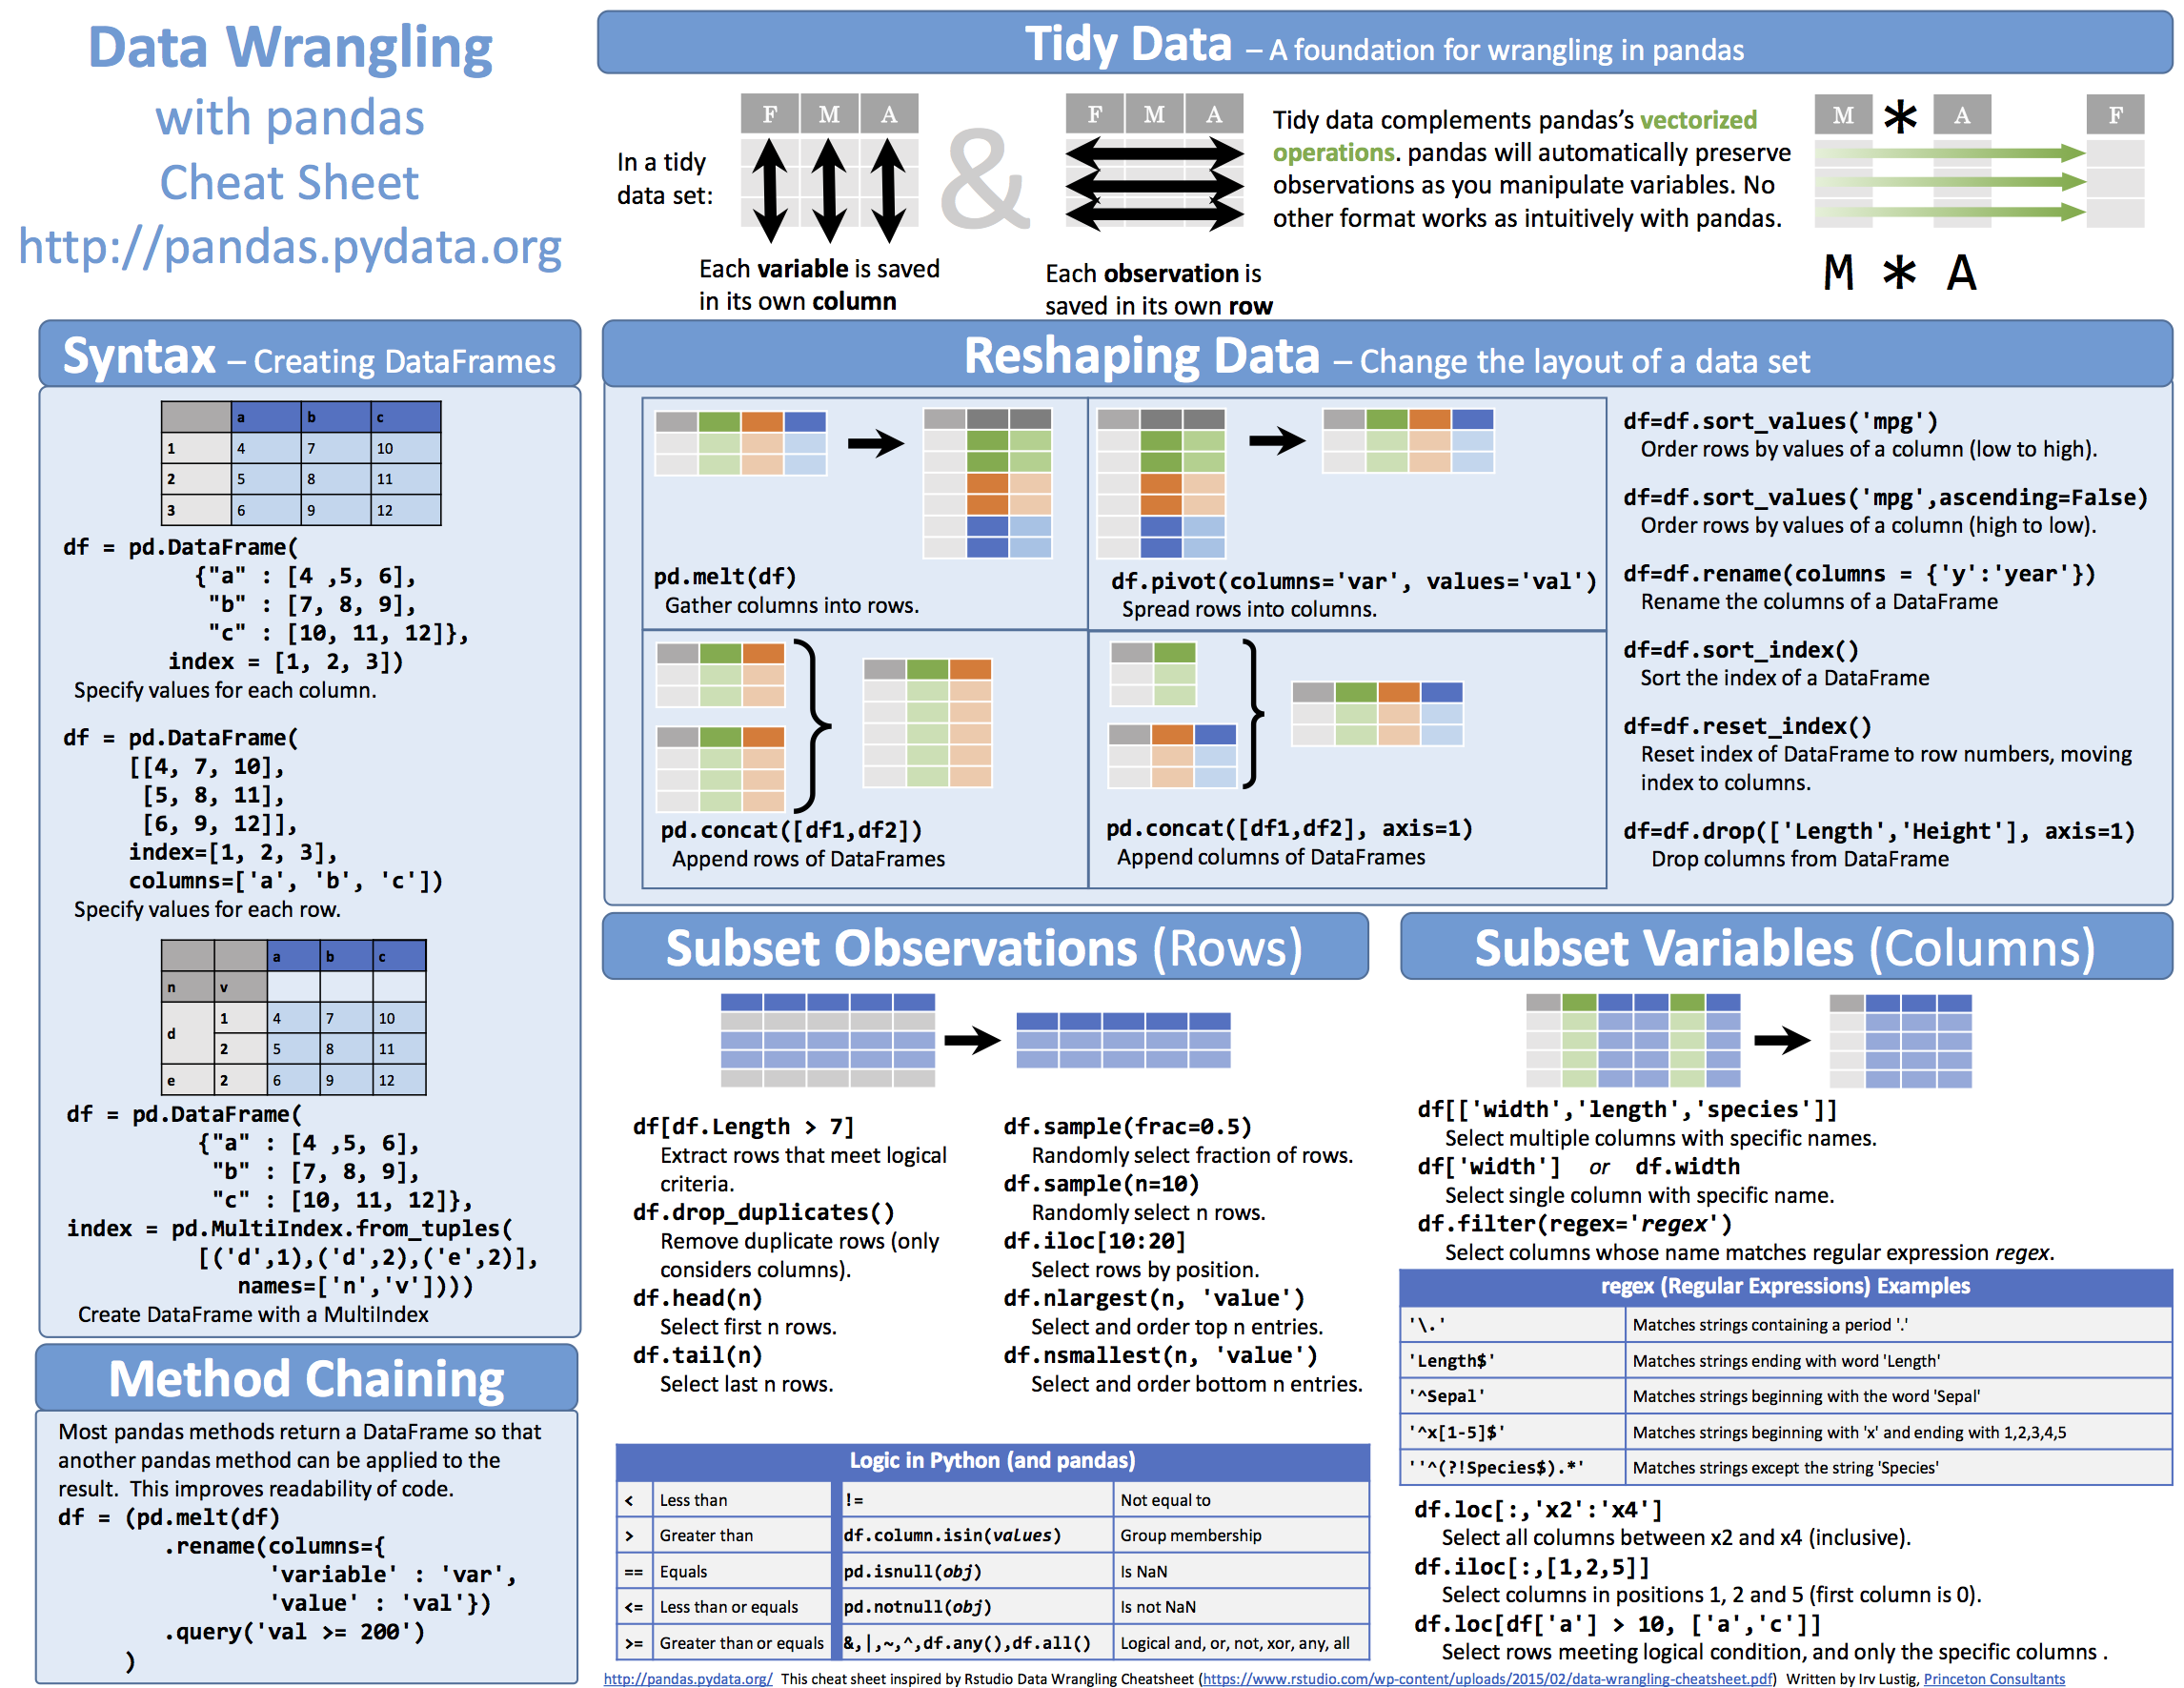
Python module pandas
2016-10-08
Python pandas v1
Python pandas v2
Python pandas v3
Read full-text »
Syntax of Vim editor
2016-08-23
一些常用操作的快捷键
ctrl+A ## move cursor to the start of a line
ctrl+E ## move cursor to the end of a line
Esc+B  ## move to beginning of previous or current word
ctrl+K ## delete from current cursor to the end
ctrl+U ## delete from beginning to the current cursor
ctrl+W ## delete the word before the cursor
Alt+B  ## goes back one word at a time
Alt+F  ## move forward one word at a time
Alt+C  ## capitalizes letter where cursor is and moves to the end of word
Comment multiple lines as discussed here
- press
Esc(to leave editing or other mode) - hit
ctrl + v(visual block mode) - use the
up/down arrow keys to selectlines Shift + i (capital I):这时光标会在所选择的block的第一行的第一个字符处- insert the text you want, i.e.
# - press
EscEsc,一定是两次Esc.
Uncomment multiple lines
- press
Esc(to leave editing or other mode) - hit
ctrl + v(visual block mode) - use the
up/down arrow keys to selectlines Shift + x (capital X)
Read full-text »
Latest articles
Links
- ZhangLab , RISE database , THU life , THU info
- Data analysis: pandas , numpy , scipy
- ML/DL: sklearn , sklearn(中文) , pytorch
- Visualization: seaborn , matplotlib , gallery
- Github: me
