【5-1】循环序列模型
2019-03-11
目录
- 目录
- 为什么选择序列模型?
- 数学符号
- RNN模型
- 通过时间的反向传播
- 不同类型的RNN
- 语言模型和序列生成
- 对新序列采样
- RNN中的梯度消失
- GRU门控循环单元
- LSTM长短期记忆
- 双向神经网络
- 深层RNN
- 参考
为什么选择序列模型?
- 在语音识别、自然语言处理等领域引起变革
- 例子:
- 注意:
- 问题归纳:都是使用标签数据(X,Y)作为训练集的监督学习
- 输入和输出不一定都是序列
- 输入和输出的长度不一定相等
数学符号
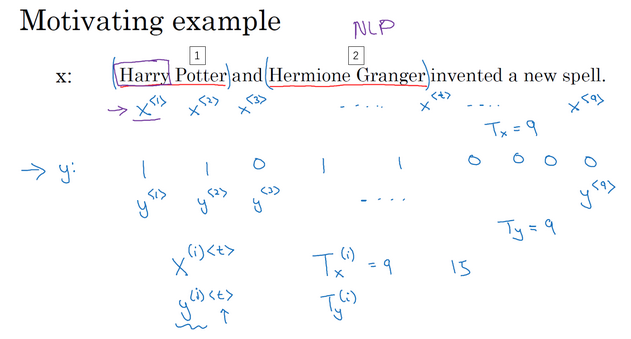
- 都是序列模型,以输入是序列为例看怎么表示数据
- 例子:
- 单词表示:
- 词典表示法
- 每个单词使用所选词典的one-hot表示,此词所在index为1,其他index为0
- 所以如果选用的词典是10000,那么对于一个序列长度为9的句子,其表示就是:9个长度为10000的向量
- 遇到不在词典中的单词,可创建新的标记叫做Unknown Word的伪造单词,
作为标记 [](https://raw.githubusercontent.com/Tsinghua-gongjing/blog_codes/master/images/20191010144812.png)
RNN模型
- 为什么不使用标准神经网络模型?
- RNN:
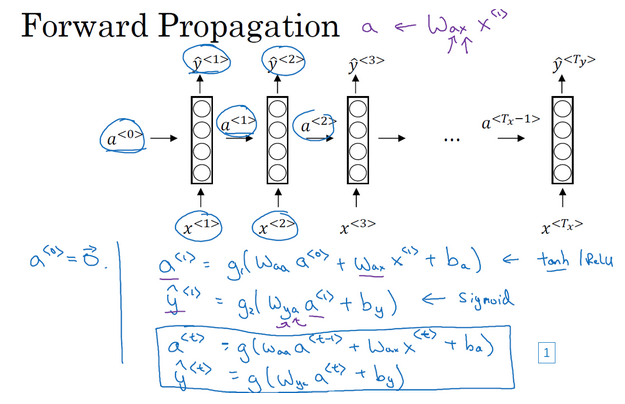
- RNN前向传播计算:
- 前向传播示意图:
通过时间的反向传播
- 因为这里的网络是按照时间进行传递的,所以反向传播相当于时间回溯了
- 下图中蓝色的流就代表前向传播,红色的流代表反向传播

- 例子:计算a1,y1
- 输入:x1
- 前一刻的激活值:a0
- 计算a1还需要:Wa和ba,因为a1=g(Wa * [a0, x1] + ba),这里的Wa和ba在之后的每一个时间步也是需要用到的,所以是需要学习的参数
- 计算y1还需要:Wy和by,因为y1=g(Wy * a1 + by),这里的Wy和by在之后的每一个时间步也是需要用到的,所以是需要学习的参数
- 损失函数:
- 逻辑回归损失函数(交叉熵损失函数)
- 整个序列的损失:每一个时间步上的损失的和
- 反向传播示意图:
不同类型的RNN

- 一对一:标准的小型神经网络,输入x输出y
- 一对多:一个输入,多个输出
- 音乐生成。输入只有一个,比如音乐类型等,甚至是空的输入,但是需要输出一连串的音符
- 多对一:很多的输入,最后一个时间上输出
- 情感分析。输入的是一个序列(句子),最后给出一个评价等
- 多对多:输入是一个序列,输出也是一个序列
- 输出和输入长度相等。比如实体名称标注。
- 输出和输入长度不相等。比如机器翻译,从一个语言翻译到另一个语言,所用的词语长度不一定是一样的。
语言模型和序列生成
- 语言模型:
- 如何构建语言模型?
- 训练集:很大的英文文本语料库(corpus)
- 语料库:自然语言处理的专有名词,指很长的或者说数量众多的英文句子组成的文本
- 句子标记化:根据词字典(比如10000个词),把句子中的每个单词转化成one-hot向量
- 构建RNN模型得到这些序列的概率
- 时间t=0:输入x1和a0计算激活项a1,通常a0取0向量,x1也设为全为0的集合。此时是通过softmax预测第一个词是什么(就是y1),具体就是预测任意词为第一个词的概率,比如a,the,dog等各个词的概率。
- 时间t=1:计算第二个词(y2)是什么。有激活项a1,x1是什么?此时的x1是上一个时刻的输出y1,即x2=y1,那么久可以计算激活项a2,然后计算y2。此时预测y2是各个词的概率,只是此时的概率是个条件概率,就是说前面已经是某个词的情况下,此时预测的词是什么。
- 依次类推,把上一个时刻预测的输出作为下一个时刻的输入,再预测当前时刻的输出。每一步都会考虑前面得到的单词。
- 直到到达序列结尾

- 代价函数:
- softmax损失:预测值和真实值之间的差异
- 总体损失:单个预测的损失函数相加起来
对新序列采样
- 如何知道模型学到了什么?新序列采样的方式进行评估
- 采样:
- 基于字符的RNN模型
- 绝大部分使用的是基于词汇的语言模型
RNN中的梯度消失
- 基本的RNN一个很大的问题:梯度消失
- 训练的时候后面的loss更新对前面的层没有影响
- 如果RNN处理一个1000时间序列长度的数据,那么就相当于是一个1000层的网络,容易出现梯度消失。
- 例子:
- ”The cat, which already ate,…, was full“
- “The cats, which ate, were full”
- 句子前后有长期依赖,就是前面的单词对后面的单词有影响,但是基本的RNN不善于捕捉长期依赖效应

- 标准网络:从输出y得到的梯度很难传播回去,很难影响靠前层的权重,从而影响到前面的层(上图编号4)
- 基本的RNN有很多局部影响
- 比如上图中的输出y3主要受其附近的值的影响
- 不擅长处理长期依赖的问题
- 梯度爆炸:
- 在反向传播中,随着层数的增多,梯度不仅可能指数型下降,也可能指数型上升
- 梯度爆炸:很容易发现,因为参数会大到崩溃,看到很多NaN或者不是数字情况(网络计算出现了数值溢出)
- 解决:梯度修剪。最大值修剪,观察梯度向量,如果大于某个阈值,就缩放梯度向量。是比较鲁棒的方法。
GRU门控循环单元
- GRU:
- gated recurrent unit,门控循环单元
- 改变了RNN的隐藏层
- 更好的捕捉深层连接
- 改善了梯度消失的问题
- RNN单元可视化回顾:
- 根据a(t-1)和x(t)的线性加和,输入到一个激活函数(这里是tanh)计算a(t)
- 把a(t)丢到softmax进行预测
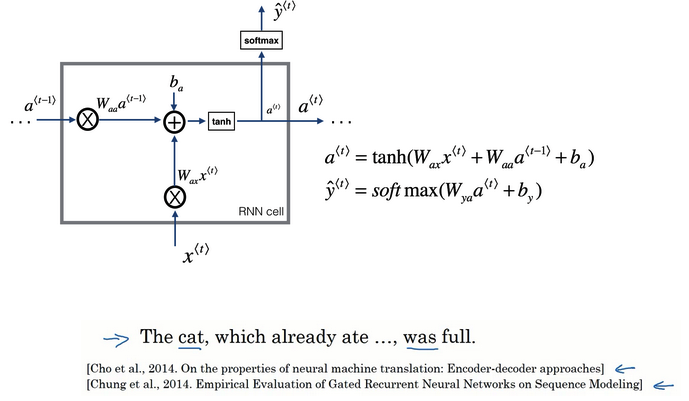
- GRU简化版:
- 新变量c:记忆细胞
- 时间t处的记忆细胞值等于此时的激活值:c(t)=a(t)。在这里是一样的,在后面的LSTM可以看到是不一样的。
- 记忆细胞的候选值:使用激活函数计算,输入是上一时间的记忆细胞c(t-1)和此时的输入x(t)。计算公式类似于计算a(t),但是具体的权重参数不同。
- 门:更新门,关乎着是否要对记忆细胞的值进行更新。其计算的输入是:上一时间的记忆细胞c(t-1)和此时的输入x(t),但是采用的是sigmoid激活函数。因为sigmoid函数值范围在【0,1】之间,这个跟后面的判断更新有关。
- 是否更新?表达式:门 * 记忆细胞候选值 + 门反面 * 记忆细胞旧值

- 【步骤1】根据上一时刻的记忆细胞和输入x计算记忆细胞的候选值
- 【步骤2】根据上一时刻的记忆细胞和输入x计算更新门
- 【步骤3】根据门确定是否更新旧的细胞记忆值,得到激活值或者此时的记忆值
- 如果更新门=0(不更新):激活值=旧值保留
-
如果更新门=1(更新):激活值=候选值,丢掉旧值
- 门用的是sigmoid激活函数,如果其自变量值是很大的负数,那么激活后近似于0.此时,c(t)=c(t-1),非常有利于维持细胞的值,即使经过很多的时间步,能很好的维持。且此时更新门的值很小很小,所以不会有梯度消失的问题。这就是缓解梯度消失的关键!!!
- GRU完整版:
- 更改:在计算记忆细胞的新候选值加上一个新的项
- 相关门r:相关性,告诉候选值和旧值有多大的相关性
- r计算:根据上一时刻的记忆细胞和输入x计算,公式类似于计算更新门,只是具体的权重参数不一样

LSTM长短期记忆
- LSTM:
- long short term memory,长短期记忆
- 比GRU更加高效
- LSTM vs GRU:
- 增加了遗忘门。遗忘门和更新门共同决定记忆细胞值,GRU中只有更新门。
-
增加了输出门:因为此时记忆细胞的值不再直接等于激活值,所以需要有一个输出门

- GRU:更加简单,容易创建更大的网络,计算性能更快,易于扩展到大型网络
- LSTM:更强大灵活,因为具有三个门,使用的更多(虽然出现的更早)
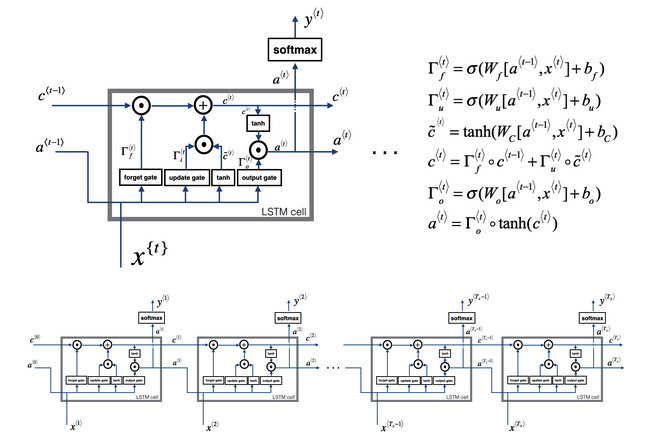
- LSTM计算:
- 【步骤1】根据上一时刻的激活值和输入x计算记忆细胞的候选值
- 【步骤2】根据上一时刻的激活值和输入x计算更新门
- 【步骤3】根据上一时刻的激活值和输入x计算遗忘门
- 【步骤4】根据上一时刻的激活值和输入x计算输出门
- 【步骤5】记忆细胞值 = 更新门 * 候选值 + 遗忘门 * 旧值,计算记忆细胞值
- 【步骤6】激活值 = 输出门 * 记忆细胞值,计算激活值
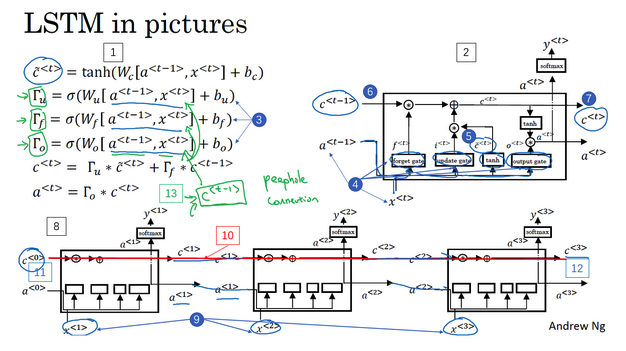
- LSTM前向传播:
- 注意看一下计算的先后顺序和细节
- 前一个激活值是会影响记忆值的计算
- 最后计算的记忆值又会影响输出的激活值
双向神经网络
- 双向RNN:在序列的某点不仅获取之前的信息,也获取未来的信息
- 单向RNN例子:
- 预测只能使用之前的信息
- 但是有时候只有根据后面的信息才能做出准确的判断
- 不管使用基本的RNN单元,还是GRU或者LSTM都是一样的
- 比如下例子中只根据前面的单词是不知道Teddy的名称属性的

- 双向RNN:
- 前向传播:包括两部分的计算,一部分是从左到右的,一部分是从右向左的
- 不仅使用之前的信息,还使用之后的信息。这里的使用就是要传播,比如使用之后的信息,就是后面的输入通过网络要传到前面的结点

- 例子:还是上面的Teddy,网络先从最开始的单词,顺序计算激活值(从左向右),计算完了之后,又从右向左计算,那么后面的值的信息也就传到前面去了。
- 基本单元也可以是GRU或者LSTM
深层RNN
- 通常网络:很多层
- 深层RNN:把多个RNN堆叠起来
- 深层网络比较:
- 左边:标准网络
- 右边:RNN,原来的激活值是a(0),a(1)这种表示的,就直接是第几层的激活值。在RNN里面,稍作修改,因为还有时间的信息,a(0)(1)这种,表示第几层网络的第几个时间点的激活值。

-
例子:a(2)(3)的激活值,两个输入,同一层的上一个时间点,上一层的同一个时间点的激活值
- 每一层网络均有自己的权重值,训练学习得到
- 通常三层就已经很多了
- 可以是GRU或者LSTM单元
参考
Read full-text »
SQL速查表
2019-03-11
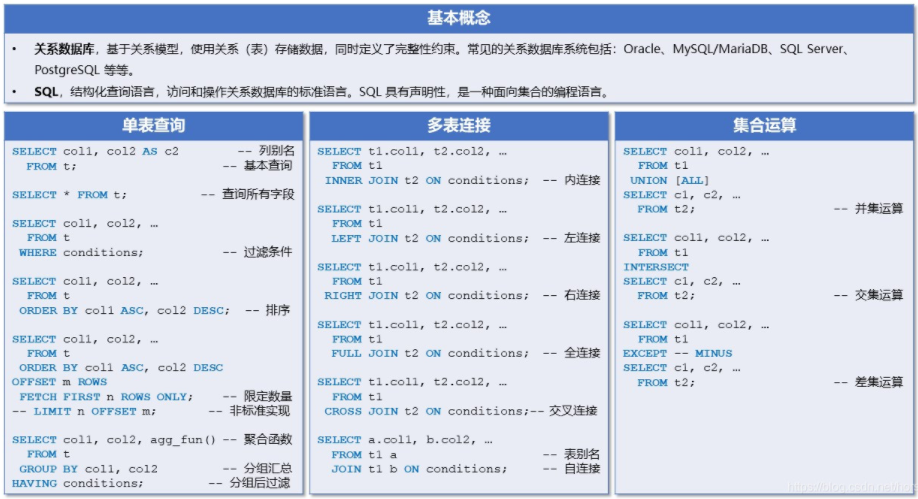
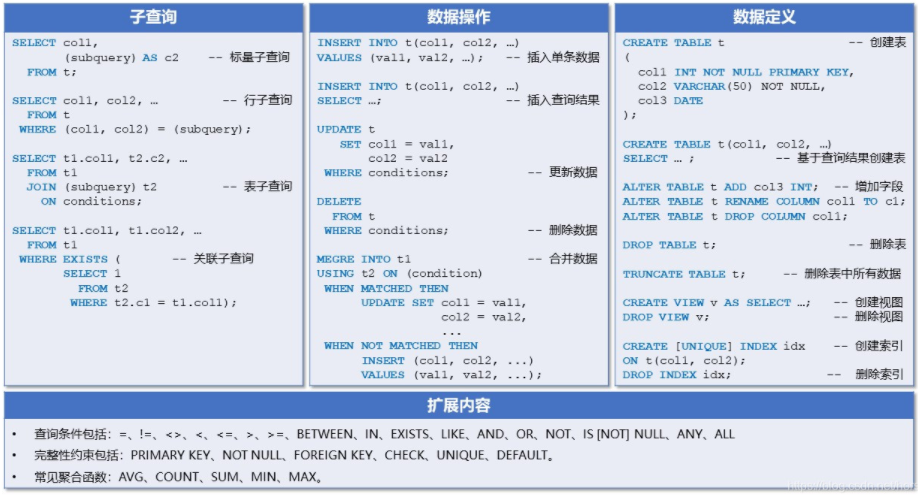
参考:SQL 速查表.pdf
Read full-text »
Connect remote jupyter server
2019-03-10
连接使用远程(集群)jupyter notebook
主要是参考了这里,这个是用的ipython,当时jupyter notebook还没完善,基本原理和操作是一样的,包括现在很多人使用的jupyter-lab,下面是连接jupyter-lab的例子:
1、在客户端打开一个指定端口的server:
jupyter-lab --port 8007
[W 13:37:55.064 LabApp] WARNING: The notebook server is listening on all IP addresses and not using encryption. This is not recommended.
[I 13:37:55.378 LabApp] JupyterLab beta preview extension loaded from /Share/home/zhangqf5/anaconda2/lib/python2.7/site-packages/jupyterlab
[I 13:37:55.378 LabApp] JupyterLab application directory is /Share/home/zhangqf5/anaconda2/share/jupyter/lab
[I 13:37:55.389 LabApp] Serving notebooks from local directory: /Share/home/zhangqf5/gongjing/rare_cell
[I 13:37:55.389 LabApp] 0 active kernels
[I 13:37:55.389 LabApp] The Jupyter Notebook is running at:
[I 13:37:55.389 LabApp] http://[all ip addresses on your system]:8007/?token=442494e19571582585464518668825f6ae1e4d4c3bdfc070
[I 13:37:55.389 LabApp] Use Control-C to stop this server and shut down all kernels (twice to skip confirmation).
[C 13:37:55.391 LabApp]

    Copy/paste this URL into your browser when you connect for the first time,
    to login with a token:
        http://localhost:8007/?token=442494e19571582585464518668825f6ae1e4d4c3bdfc070
[I 13:42:16.820 LabApp] 302 GET / (::1) 0.47ms
[W 13:42:18.565 LabApp] Could not determine jupyterlab build status without nodejs
2、在本地使用ssh用指定端口登录:
ssh -Y username@remoteIP -L 8007:localhost:8007
3、在本地浏览器输入对应的地址:http://localhost:8007,有的时候需要指定一个token,所以可以直接复制完整第地址,比如这里的:
http://localhost:8007/?token=442494e19571582585464518668825f6ae1e4d4c3bdfc070
端口映射查看训练过程
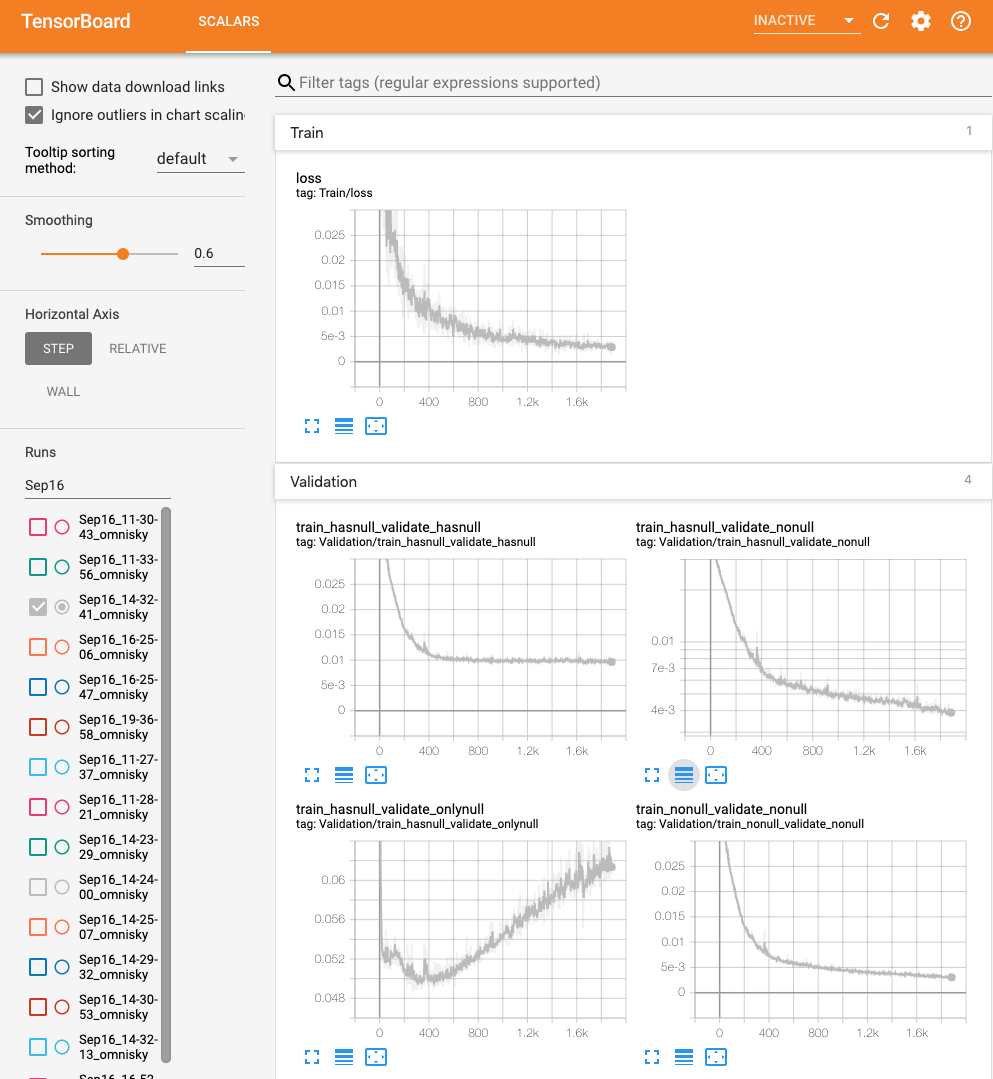
主要是参考利用多重映射从本地查看集群的tensorboard,这里使用的是TensorBoardx:
- 其中实线是smooth过后的值,背后的shaddow是原始的值,可以把鼠标放在上面,查看每个epoch上的loss值。
- 这里是定义了几个不太的loss值,所以有不同的变量曲线。
- 写的步骤:1)定义writer;2)每个epoch获取loss值;3)将loss值添加到变量
writer = SummaryWriter()

    min_loss,min_epoch,min_prediction = 100,0,0
    for epoch in range(1, args.epochs + 1):
        train_loss = train_LSTM(args, model, device, train_loader, optimizer, epoch, sequence_length, input_size)
        validate_loss,prediction_all = validate_LSTM(args, model, device, validate_loader, sequence_length, input_size)

        if validate_loss['train_nonull_validate_nonull'] < min_loss:
            min_loss = validate_loss['train_nonull_validate_nonull']
            min_epoch = epoch
            min_prediction = prediction_all

            with open(save_prediction, 'w') as SAVEFN:
                print("Write prediction: epoch:{}, loss:{}".format(min_epoch, min_loss))
                for i in min_prediction:
                    SAVEFN.write(','.join(map(str,i))+'\n')

            best_model = copy.deepcopy(model)

        writer.add_scalar('Train/loss', train_loss, epoch)
        writer.add_scalar('Validation/train_nonull_validate_nonull',
                          validate_loss['train_nonull_validate_nonull']*args.batch_size, epoch)
        writer.add_scalar('Validation/train_hasnull_validate_nonull',
                          validate_loss['train_hasnull_validate_nonull']*args.batch_size, epoch)
        writer.add_scalar('Validation/train_hasnull_validate_hasnull',
                          validate_loss['train_hasnull_validate_hasnull']*args.batch_size, epoch)
        writer.add_scalar('Validation/train_hasnull_validate_onlynull',
                          validate_loss['train_hasnull_validate_onlynull']*args.batch_size, epoch)

    writer.close()
Read full-text »
【4-4】特殊应用:人脸识别和神经风格转换
2019-03-07
目录
什么是人脸识别?
- 工作刷脸通过:人脸识别+活体检测
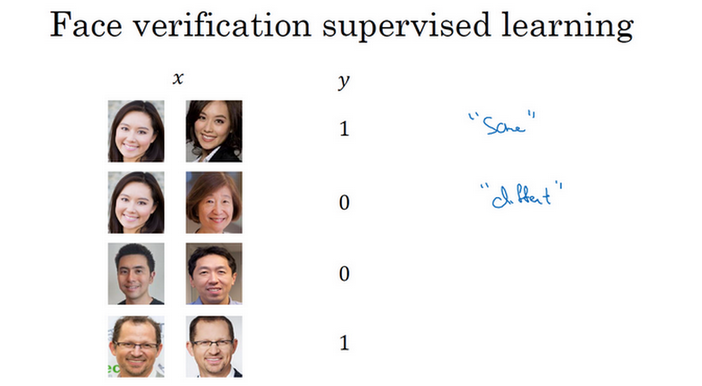
- 人脸验证:
- face verification
- 输入:一张图片,某个ID或者名字
- 输出:输入图片是否是这个人
- 做法:1对1问题,弄明白这个人是否和他声称的身份相符
- 人脸识别:
One-Shot学习
- 人脸识别挑战:
- 解法1:卷积神经网络【不推荐】
- 比如数据库4个人,可以训练CNN,输出是4种
- 效果不会好
- 训练数据集太小,不能得到稳健的模型
- 不方便:加入新加入成员,需要重新训练模型,因为此时CNN的输出是5种
- 解法2:学习相似性函数
Siamese网络
- 相似性函数d:输入两张人脸,告诉其相似度
- 做法:
Triplet损失
- 参数学习:定义三元组损失函数然后应用梯度下降
- 三元组损失:
- 模型偷懒:
- 需满足:\(\|f(A)-f(P)\|^2 - \|f(A)-f(N)\|^2 <= 0\)
- 假如f函数对于任意的图片编码,总是为0,那么上面的式子就是:0-0<=0,是总是成立的
- 为了防止网络输出无用的结果,可以🙆两者的差值不是小于0,而是一个更小一点的负数,即:\(\|f(A)-f(P)\|^2 - \|f(A)-f(N)\|^2 <= -a\)
- 这里的-a叫做间隔(margin),类似于SVM里面的
- 例子:
- 假如a=0.2,d(A,P)=0.5,如果d(A,N)=0.51,只比d(A,P)大了一点点,但是不满足两者之间的最小间隔,所以此时模型不够好。
- 损失函数:
- 三元组图片的选取:
人脸验证与二分类
- 做法:
- 如何使用逻辑回归?
- 训练集:
神经风格迁移
CNN特征可视化
- 做法:
- 对于某一层网络,选取一个神经单元,然后找到使得神经单元激活最大的一些(比如9个)小块
- 对于其他的一些神经元重复上面的操作
- 例子:这里选取的是layer1的神经元,对每个神经元,选取9个其最大激活的patch,然后画出来。这里相当于是选取了9个神经元,每一个含有9个patch。
- 其他层:
代价函数
- 给定C和S,生成G。那么需要有一个函数去评价G的好坏!
- 关于G的函数:
- 表示:\(J(G)=\alpha J_{content}(C,G)+\beta J_{style}(S, G)\)
- 内容代价:度量生成图片G与内容图片C的内容有多相似
- 风格代价:度量生成图片G的风格与图片S的风格的相似度
- 两者之间的权重由两个超参数与来确定
- 算法:
内容代价函数
- 是什么?
- 是总代价函数的一部分
- 使用隐藏层l计算内容代价。如果l很小,那么此时生成的图片会很接近原图;如果l很大(深层),会问此时的图片内容是否含有内容对象(比如狗)。因此,在实际中层l不会选的太浅也不会选的太深。
- 使用的模型可以是预训练的卷积模型。比如VGG模型等。
- 衡量一个内容图片和生成图片的相似度?
- 两个图片C和G
- 一个隐藏层l
- 图像在此隐藏层上的激活值
- 如果此激活值相似,那么两个图片的内容相似
- 定义:\(J_{content}(C,G)=\frac{1}{2}\|a^{[l][C]}-a^{[l][G]}\|^2\),两个激活值按元素相减,然后取平方
风格代价函数
- 图片风格:
- 通道间相关系数的计算?
- 通道间相关系数表示什么含义?
- 上面图片例子
- 编号1通道提取的特征是右边的编号3,垂直纹理特征
- 编号2通道提取的特征是右边的编号4,橙色区域的特征
- 如果相关(相关系数大),表示两个特征相关,说明图片中有垂直纹理的地方很大概率也是橙色的
- 如果不相关(相关系数小),表示两个特征不相关,说明图片中有垂直纹理的地方很大概率不是橙色的
- 表示:每个通道测量的特征在各个位置同时出现或者不出现的概率
- 风格矩阵:
- 如何评估风格图像和生成图像的风格是否相近?
- 风格代价函数:
一维和三维卷积
参考
Read full-text »
【4-3】目标检测
2019-03-01
目录
目标定位
- 分类:判断其中的对象是不是某个(比如汽车)
- 定位分类:判断是不是汽车,且标记其位置
- 检测:含有多个对象时,检测确定它们的位置

- 分类网络:
- 图片输入到卷积神经网络
- 输出特征向量
- softmax预测图片类型
- 定位分类网络:
- 边界框表示:
- 图片坐上角:(0,0)
- 图片右下角:(1,1)
- 边界框中心坐标:(bx, by)
- 边界框高度:bh
- 边界框宽度:bw
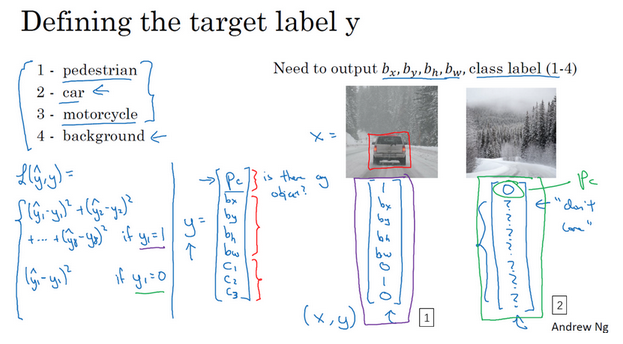
- 训练集:预测对象的分类+表示边界框的四个数字
- 目标标签如何定义(训练集):
- 损失函数:
- 平方差策略:每个元素相应差值的平方和
- 有定位对象:y1=1,Pc=1,损失值是不同元素的平方和
- 无定位对象:y1=0,Pc=0,此时不用考虑其他元素,只关注神经网络输出Pc的准确度。
- 通常:(1)对边界框左边应用平方差或类似方法,(2)对Pc应用逻辑回归函数
特征点检测
- 特征点检测:landmark detection,给出物体的特征点的具体位置,比如人脸识别中眼睛的位置
- 网络:
- 训练集:
- 标签包含特征点的坐标
- 图片中特征点的坐标是人为辛苦标注的
- 特征点的特性在所有图片中必须保持一致。比如特征点1始终是左眼的坐标值,特征点2始终是右眼的坐标值。
目标检测
- 对象检测:基于滑动窗口的目标检测算法
- 基本步骤:
- 训练集:剪切的含有或者不含有汽车的图片作为正负样本
- 卷积神经网络进行训练
- 在新的图片上进行滑动窗口目标检测
- 图像滑动窗口操作:
- 缺点:
- 计算成本太大
- 剪出很多的小方块,卷积网络一个个的处理
- 如果步幅大:窗口少,但是可能检测性能不好
- 如果步幅小:窗口多,超高的计算成本
- 以前是一些线性分类器,计算成本不是太高;但是对于卷积神经网络这种分类器,成本很高。
滑动窗口的卷积实现
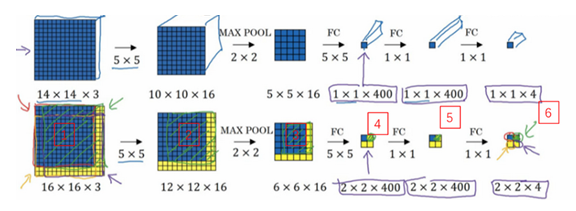
- 滑动窗口检测算法:效率低
- 卷积实现:效率高
- 实现1:将全连接层转换为卷积层
- 实现2:一次输入图片(滑动窗口的卷积实现)
- 原理:
- 不需要把输入图像分割成四个子集,再分别执行前向传播
- 而是把他们作为一张图片输入给卷积网络计算
- 其中的公共区域可以共享很多计算,也减小了计算量
- 缺点:
- 虽然提高了算法的效率
- 边界框的位置可能不够准确
Bounding Box预测
- 滑动窗口检测:不能输出最精确的边界框
- YOLO算法:
- You Only Look Once
- 更精确的边界框
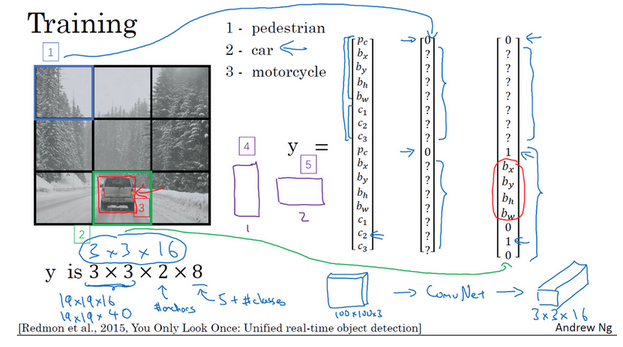
- 思路:使用精细的网格(比如19x19)将图像分隔开,对于每一个小的网格,使用前面的分类和定位算法,那么对于每一个网格,可以得到一个八维的向量(Pc,c1,c2,c3,bx, by,bh,bw)。所以整个图片就得到一个19x19x8的向量。就能够知道在哪个网格中是有汽车的,且是包含了更准确的一个边界框。

- 例子:上面是3x3的网格,最后知道在网格4和6中是有汽车的
- 注意:对象是按照其中点所在网格算的,比如网格5包含有左侧汽车的一部分,但是因为此汽车的中点是在网格4中,所以此汽车分配与网格4,而不是网格5。
- 坐标表示:
- 之前滑动窗口坐标是相对于整个图片的
- YOLO这里是相对于每个网格的
- 网格坐上是(0,0),右下是(1,1),宽度和高度是相对于此网格的比例,是0-1之间的值。
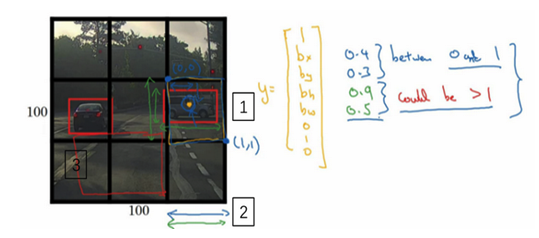
- 优点:
- 网格精细得多,多个对象分配到同一个网格的概率小很多
- 可以具有任意宽高比
- 输出更精确的坐标
- 不会受到滑动窗口分类器的步长大小限制
- 一次卷积运算:效率很高
交并比
- 交并比:
- Intersection Over Union
- 计算两个边界框交集和并集之比
- 评价对象检测算法是否精确

- 一般取:IoU>=0.5,认为检测正确
- 0.5是约定的值,也可以采取其他更严格的值
非极大抑制
- 非极大抑制:non-max suppression
- 算法对同一个对象做出多次检测
- 可以确保对每个对象只检测一次
- 疑问:但是不是中点所在的网格才算吗?检测多次有什么影响呢?中点所在的那个网格并不是概率最大的?
- 理论上是只有一个格子,但是实践中会有多个格子觉得存在检测的对象
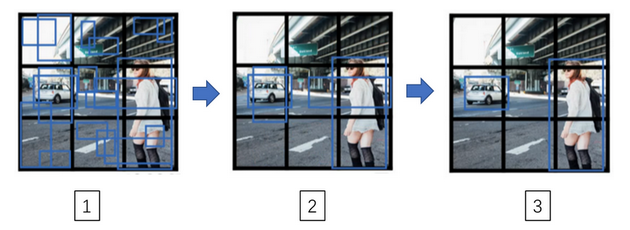
- 只输出概率最大的分类结果,但是抑制很接近但不是最大的其他预测结果

- 直观理解:
- 对于某些重叠的box,只取概率最大的
- 其他重叠的则被抑制而不输出
- 比如下面例子中:对于右边的车子,有几个box说检测到了,但是概率是不一样的,只留取最大的(高亮),其他的都被抑制掉(变暗)

- 具体算法:
- 丢掉预测概率很低的一些边界,比如Pc<=0.6的
- 对剩下的,选取概率最大的边界框(高亮)丢掉与此边界框高度重合的其他边界框(比如IoU>=0.5的)

Anchor boxes
- 目的:处理两个对象出现在同一个格子的情况
- 算法:
- 例子:
- 注意:
- 假如同一个格子有3个对象怎么办?一般处理不好,除非最开始定义多个anchor box
- 两个对象分配到一个格子,且他们anchor box形状一样
- 两个对象中点处在同一个格子中的概率很低,尤其是当格子数目很大的时候
- anchor box形状指定:手工指定,选择5-10个覆盖想要检测的对象的各种形状;更高级的是使用k-均值算法自动选择anchor box
YOLO算法
- 算法输出是包含anchor box信息的,所以在训练集的label中也是要包含这部分信息的
- 训练:
- 预测:
- 预测后的非极大抑制处理:
候选区域
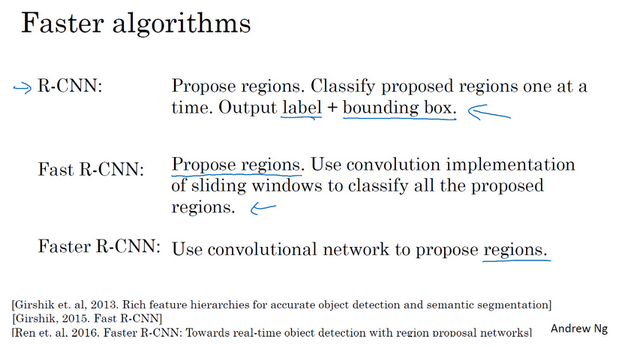
- 候选区域:
- 使用某种算法求出候选区域,对每个候选区域运行一下分类器
- 为什么?图片很多的地方没有任何对象,在这些区域进行检测(滑窗或者卷积)是在浪费时间
- 如何挑选候选区域?
- R-CNN变种:
- 吴:认为一步做完的类似YOLO算法长远是更有希望的
参考
Read full-text »
【4-2】深度卷积网络:实例探究
2019-02-26
目录
经典网络
- CNN网络的发展历史:
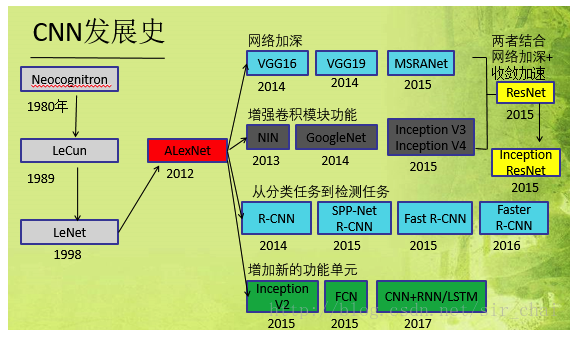
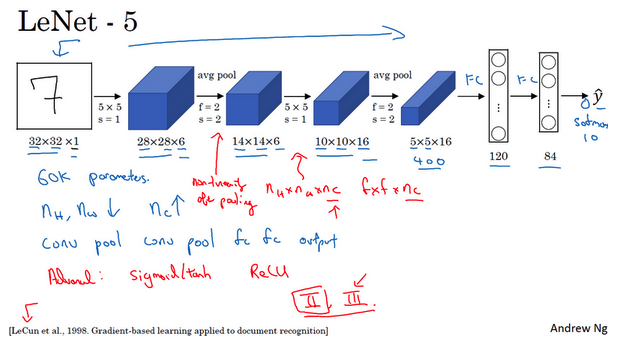
- LeNet-5:
- 识别手写数字
- 针对灰度图像进行训练
- 大约6万个参数
- 模式:一个或多个卷积层后面跟着一个池化层,然后又是若干个卷积层再接一个池化层,然后使全连接层,最后是输出。这种排列方式很常用。
- 非线性处理:使用sigmoid函数和tanh函数,而不是ReLU函数
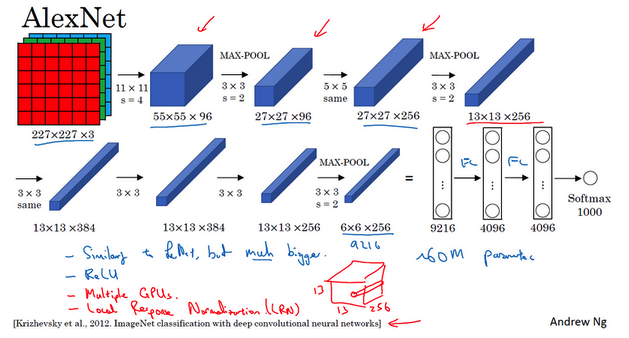
- AlexNet:
- 以第一作者Alex Krizhevsky的名字命名
- 与LeNet-5很多相似处,大得多
- 含有约6000万个参数
- 使用ReLU激活函数,使得其表现更加出色的另一个原因
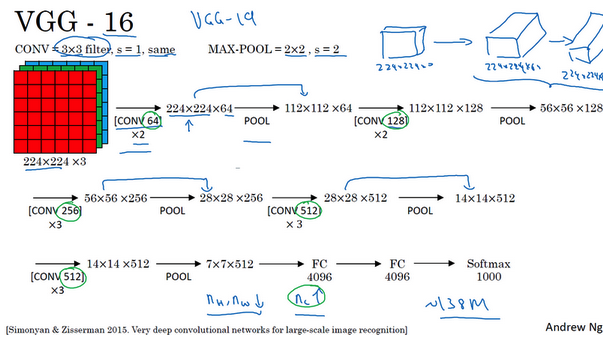
- VGG-16:
- 没有特别多的超参数
- 只需要专注于构建卷积层的简单网络
- 优点是简化了神经网络结构(相对一致的网络结构)
- 缺点是:需要训练的特征数量非常巨大
- 包含16个卷积层和全连接层
- 约1.38亿个参数,但是结构不复杂
- 亮点:随着网络的加深,图像的高度和宽度都在以一定的规律不断缩小,每次池化后刚好缩小一半,而通道数量在不断增加,而且刚好也是在每组卷积操作后增加一倍。
残差网络
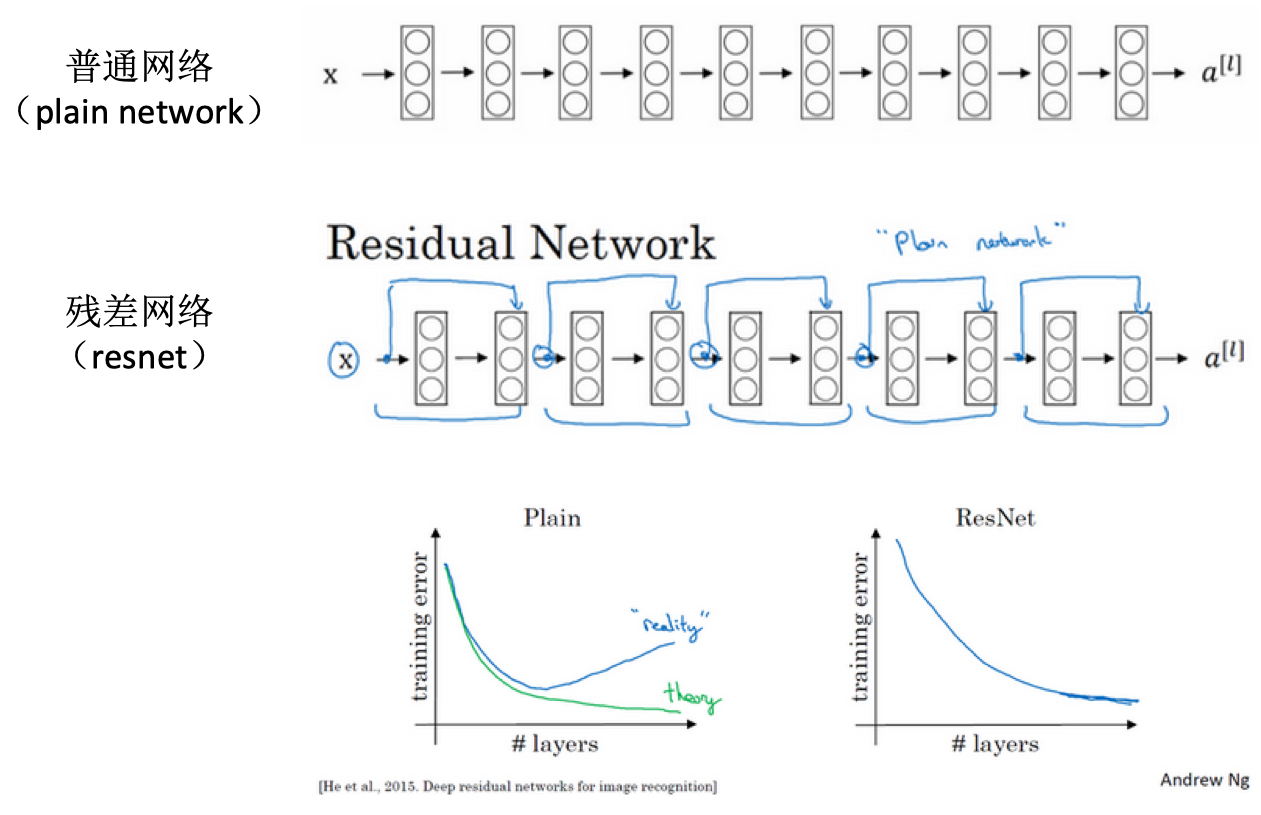
- 神经网络训练难:非常深的神经网络训练困难,存在梯度消失和梯度爆炸
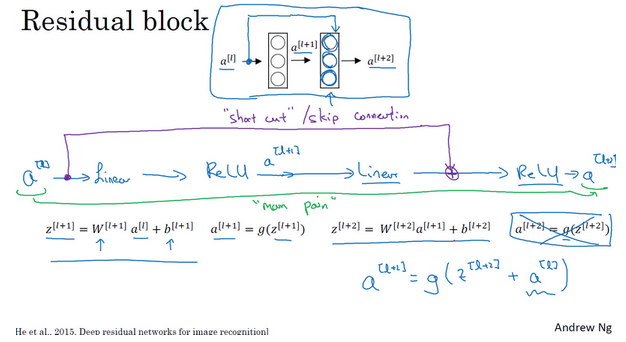
- 跳跃连接:从某一层网络层获得激活,然后迅速反馈给另外一层,甚至是神经网络的更深层。比如下面的a(l)跳过一层或者好几层,从而将信息传递到神经网络的更深层。
- 残差块:
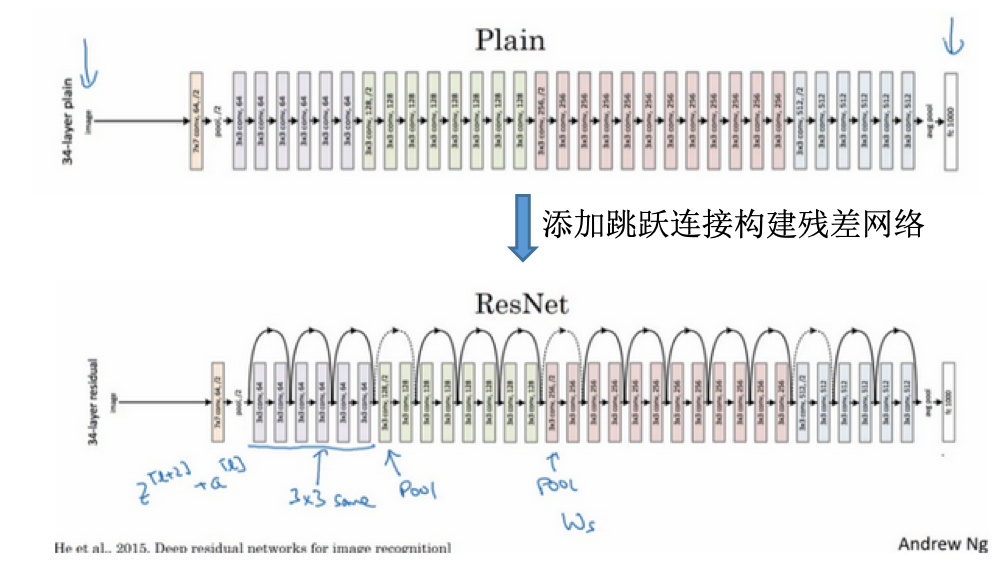
- ResNet vs plain net:
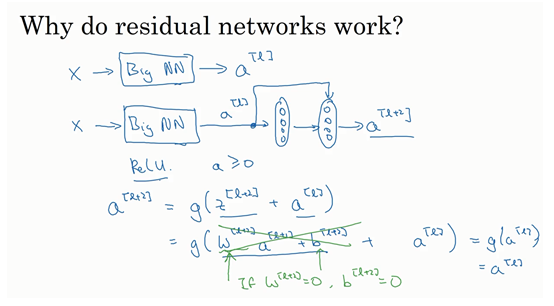
- 为什么残差网络有用?
- 论文中的网络:
网络中的网络及1x1卷积
- 1x1卷积于二维:
- 1x1卷积于三维:
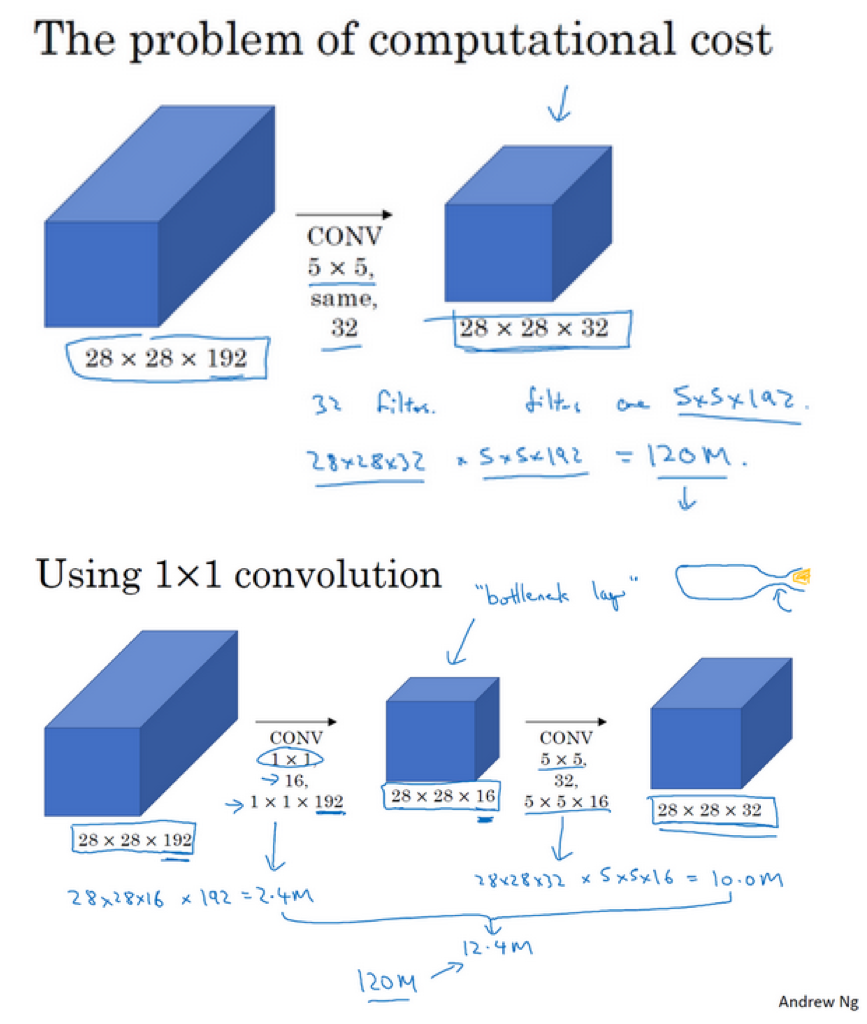
- 压缩作用:
- 池化层:压缩高度和宽度。经过池化之后,图像的大小变成原来的一半,并一直减小
- 1x1卷积:压缩通道数。当每个过滤器的深度和原图像深度一样时,但是使用不同的过滤器数目,可以使得输出的通道数变化(变大变小等)。
谷歌Inception网络
- 为什么出现Inception网络?
- 参考这里的背景介绍
- CNN结构演化图:
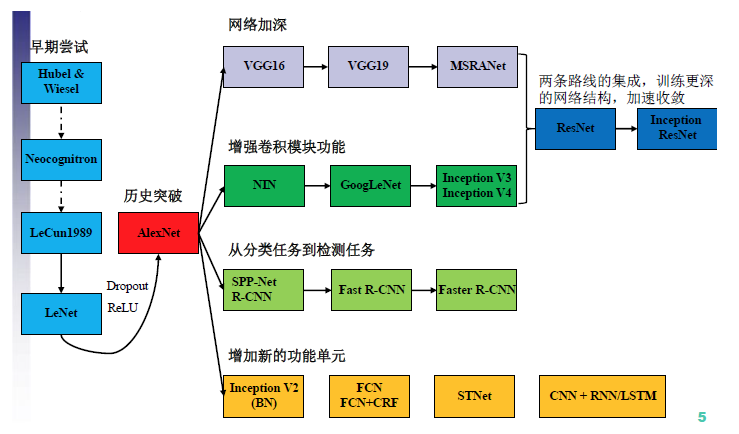
- GoogLeNet出来之前:对于网络的改进是,网络更深(层数),网络更宽(神经元数目)
- 缺点:(1)参数太多,容易过拟合;(2)网络越大计算复杂度越大;(3)网络越深,会出现梯度消失,难以优化
- 解决:增加网络深度和宽度的同时减少参数,于是就有了Inception。
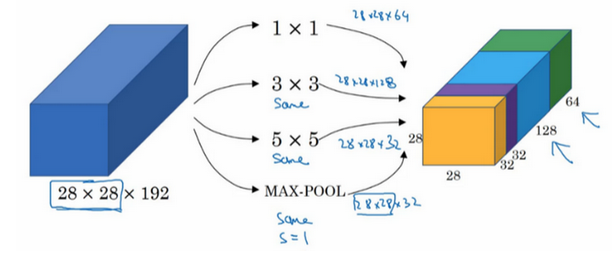
- Inception:
- 盗梦空间的电影名称
- 替你决定过滤器的大小选择多大
- Inception模块:
- 计算成本:
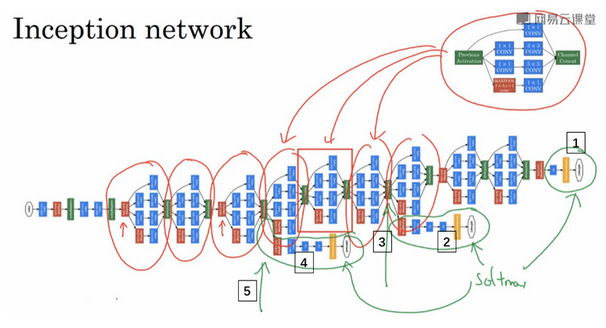
- Inception网络:
- 其他版本:引入跳跃连接等
迁移学习
- 大型的数据集:
- ImageNet
- MS COCO
- Pascal
- 研究者已经在这些数据上训练过他们的算法,训练花费长时间多GPU
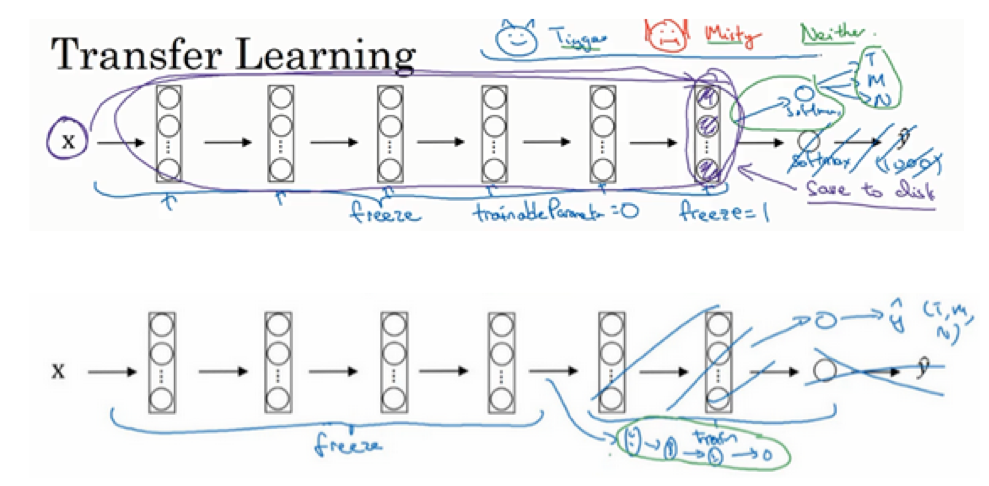
- 迁移学习:
- 下载开源的权重参数,当做一个很好的初始化用在自己的神经网络上
- 用迁移学习把公共的数据集的知识迁移到自己的问题上
- 值得考虑,除非你有一个极其大的数据集和非常大的计算量预算来从头训练你的网络
- 例子:
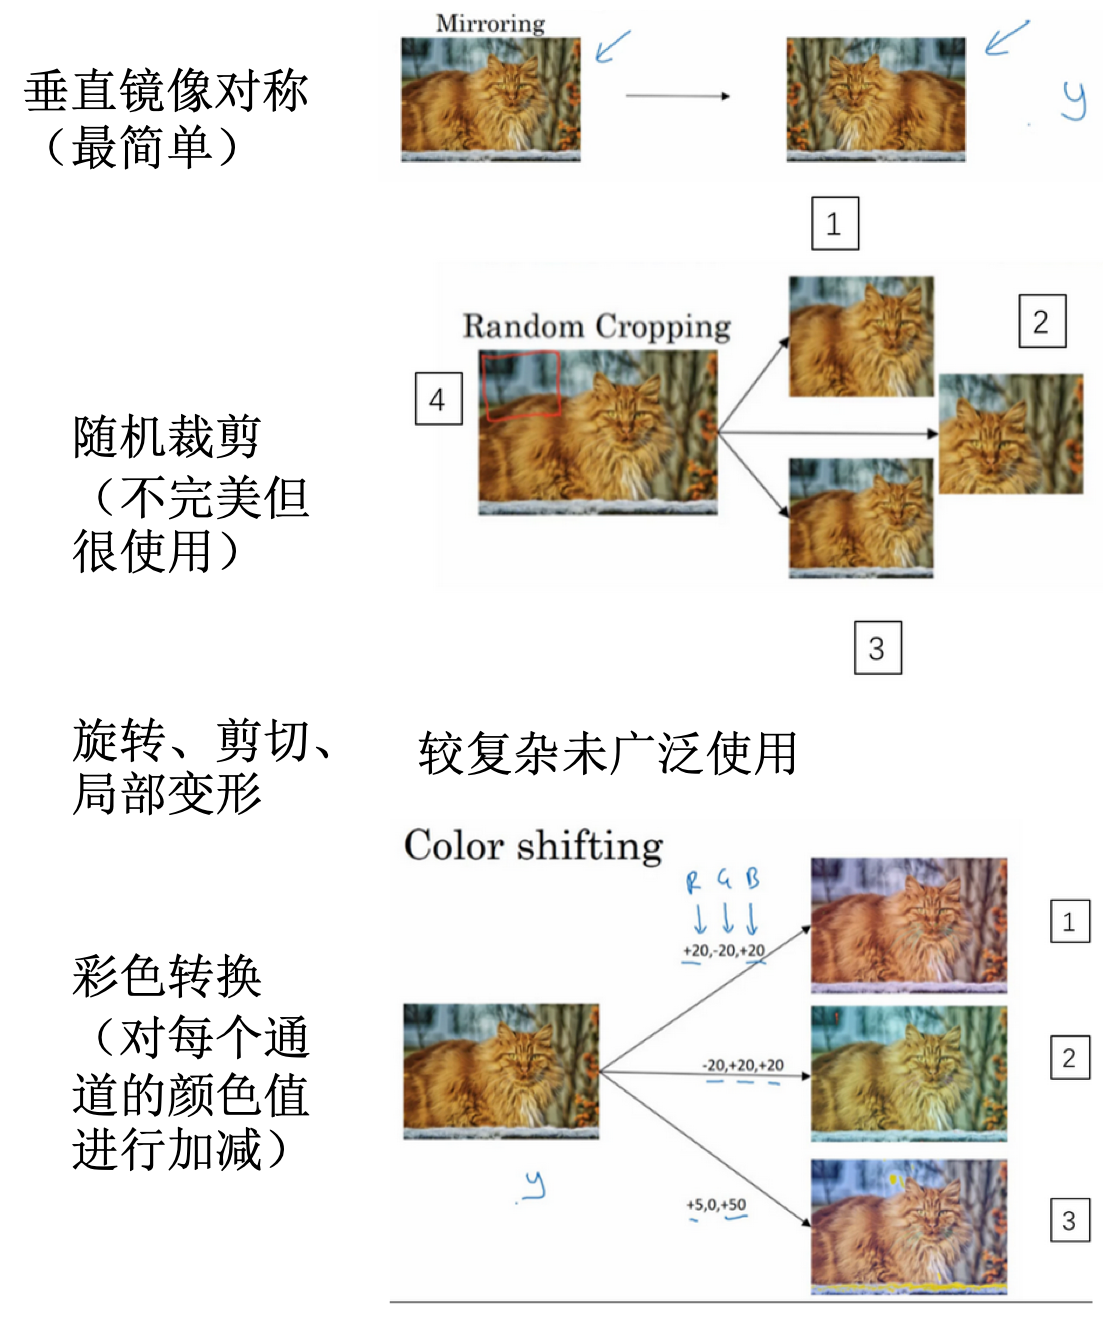
数据增强
计算机视觉现状
- 机器学习问题:介于少量数据和大量数据范围之间
- 知识或者数据的来源:
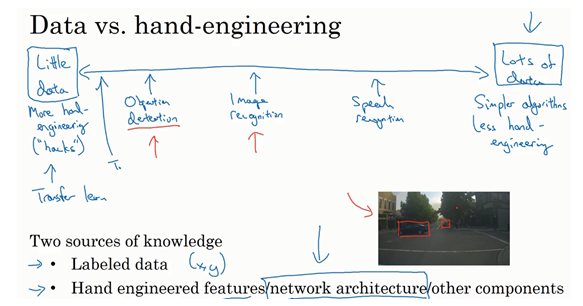
- 基准测试技巧:
- 集成。比如在多个网络中训练,取其平均结果。
- multi-scrop:裁剪选取一个中心区域,取其四个角得到四个样本,其实还是属于样本扩充。对于计算量要求很高。
- 需要耗费大量的计算,不是服务于客户的,只是为了在基准测试中取的好的效果
参考
Read full-text »
pytorch
2019-02-20
目录
概述
pytorch: 基于python的科学计算包
- 替代numpy,利用GPU性能进行计算
- 高灵活性、速度快的深度学习平台
基本概念
3层抽象:
- tensor:imprerative array, but runs on GPU
- variable: node in a graph, store data and gradient
- module: a neural network layer, store state or learnable weights
张量(tensor):类似于numpy里面的数组array,在GPU上可实现加速计算。
张量的基本操作:
from __future__ import print_function
import torch

# 把生成的memory返回到x,不同批次调用此函数返回值是不同的
# https://stackoverflow.com/questions/51140927/what-is-uninitialized-data-in-pytorch-empty-function
x = torch.empty(5, 3)

# 随机初始化一个矩阵
x = torch.rand(5, 3)

# 全0矩阵
x = torch.zeros(5, 3, dtype=torch.long)

# 直接张量赋值
x = torch.tensor([5.5, 3])

# 全1矩阵
x = x.new_ones(5, 3, dtype=torch.double)

# 获取x的shape,随机生成矩阵
# x = torch.randn_like(x, dtype=torch.float)
张量的基本运算:
# 加法
x = torch.tensor([5.5, 3])
y = torch.rand(5, 3)
print(x + y)

# 加法
print(torch.add(x, y))

# 加法
result = torch.empty(5, 3)
torch.add(x, y, out=result)

# 原位加法,此时y的值是改变的
y.add_(x)

# 取值
print(x[:, 1])

# 改变array形状
x = torch.randn(4, 4)
y = x.view(16)
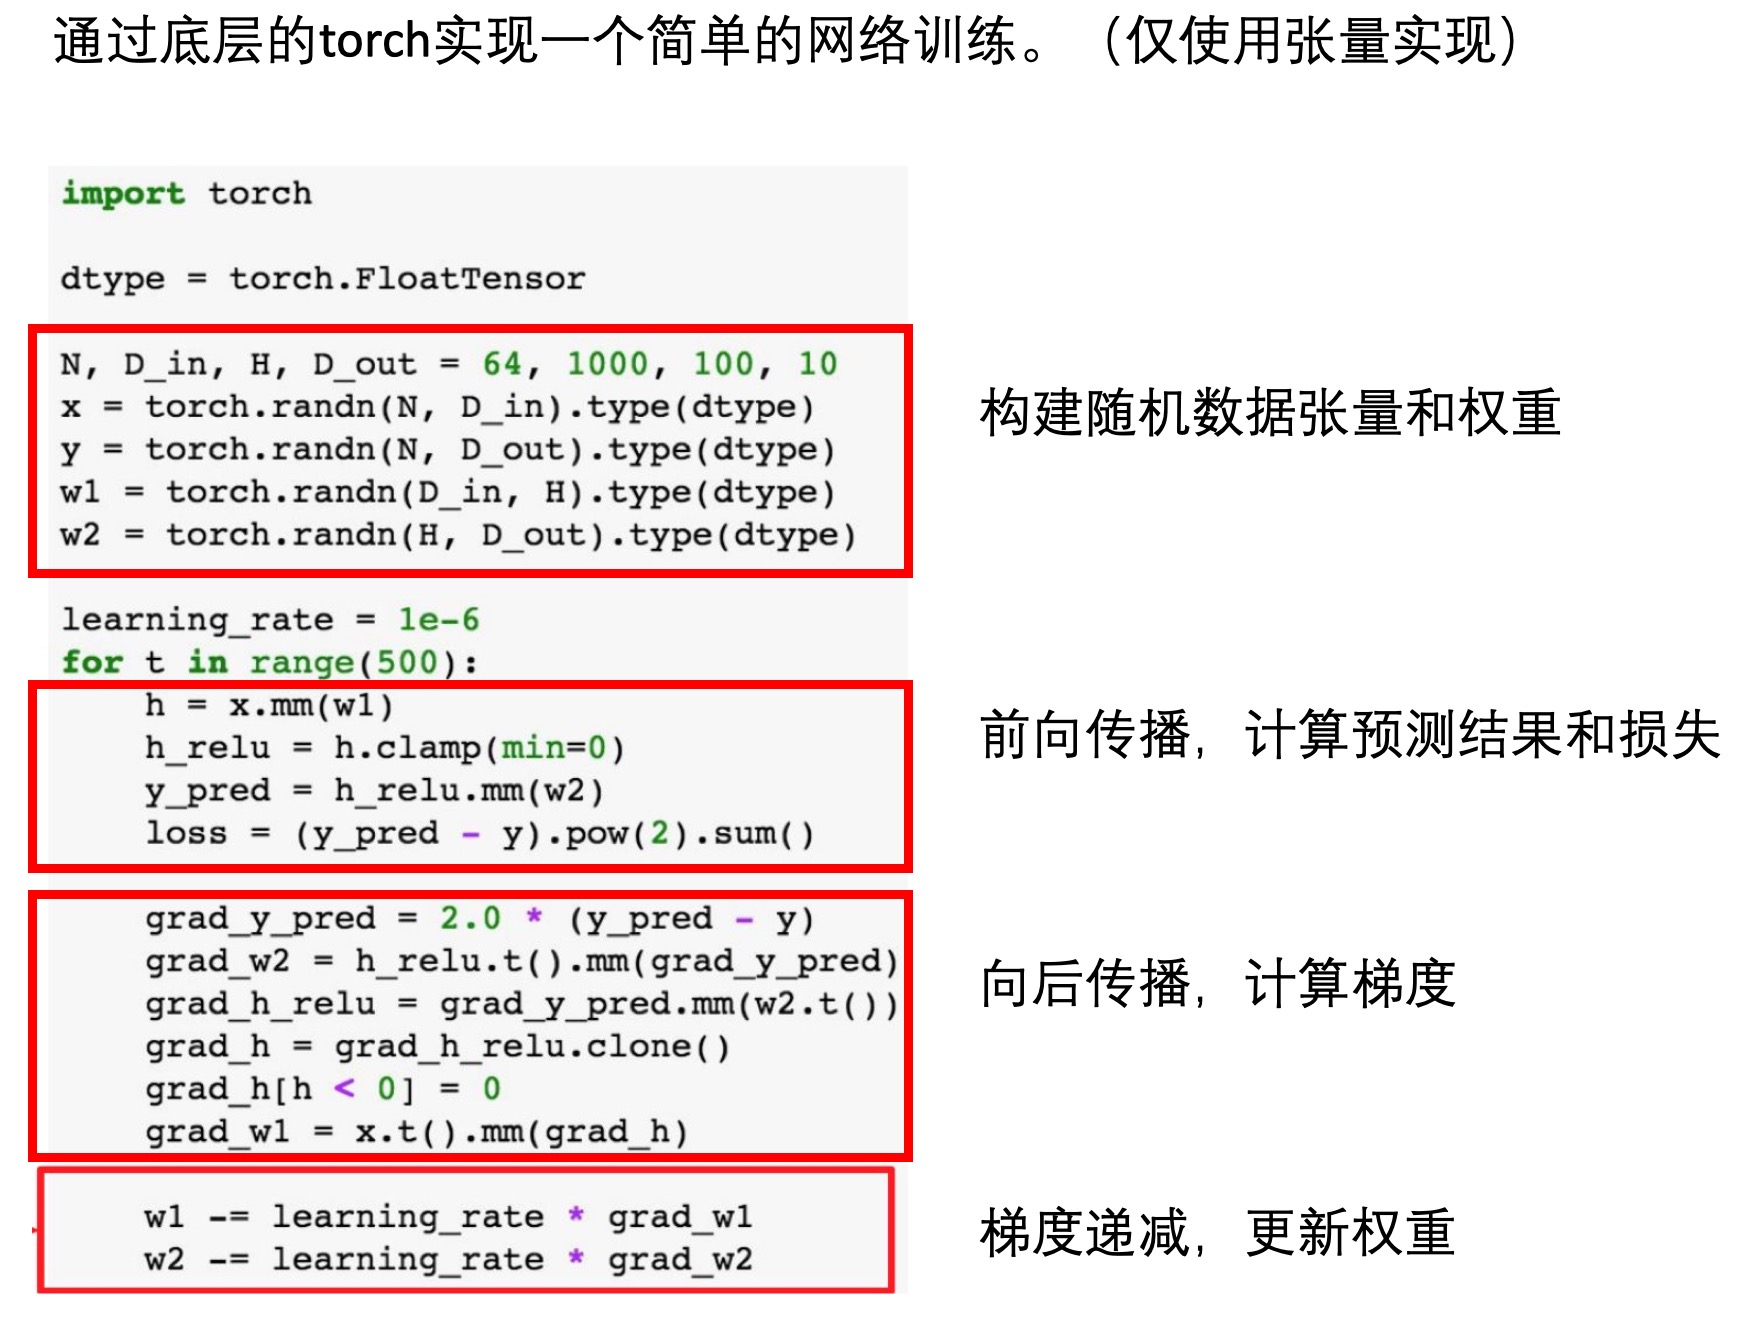
下面是一个使用底层张量实现的网络训练:
Autograd:自动求导
张量的求导是可追踪的,即某个张量的求导设置为true时,基于此张量的操作或者后续张量,其也是具有可求导属性的。
a = torch.randn(2, 2)
a = ((a * 3) / (a - 1))
print(a.requires_grad)
a.requires_grad_(True)
print(a.requires_grad)
b = (a * a).sum()
print(b.grad_fn)

# False
# True
# <SumBackward0 object at 0x7f1b24845f98>
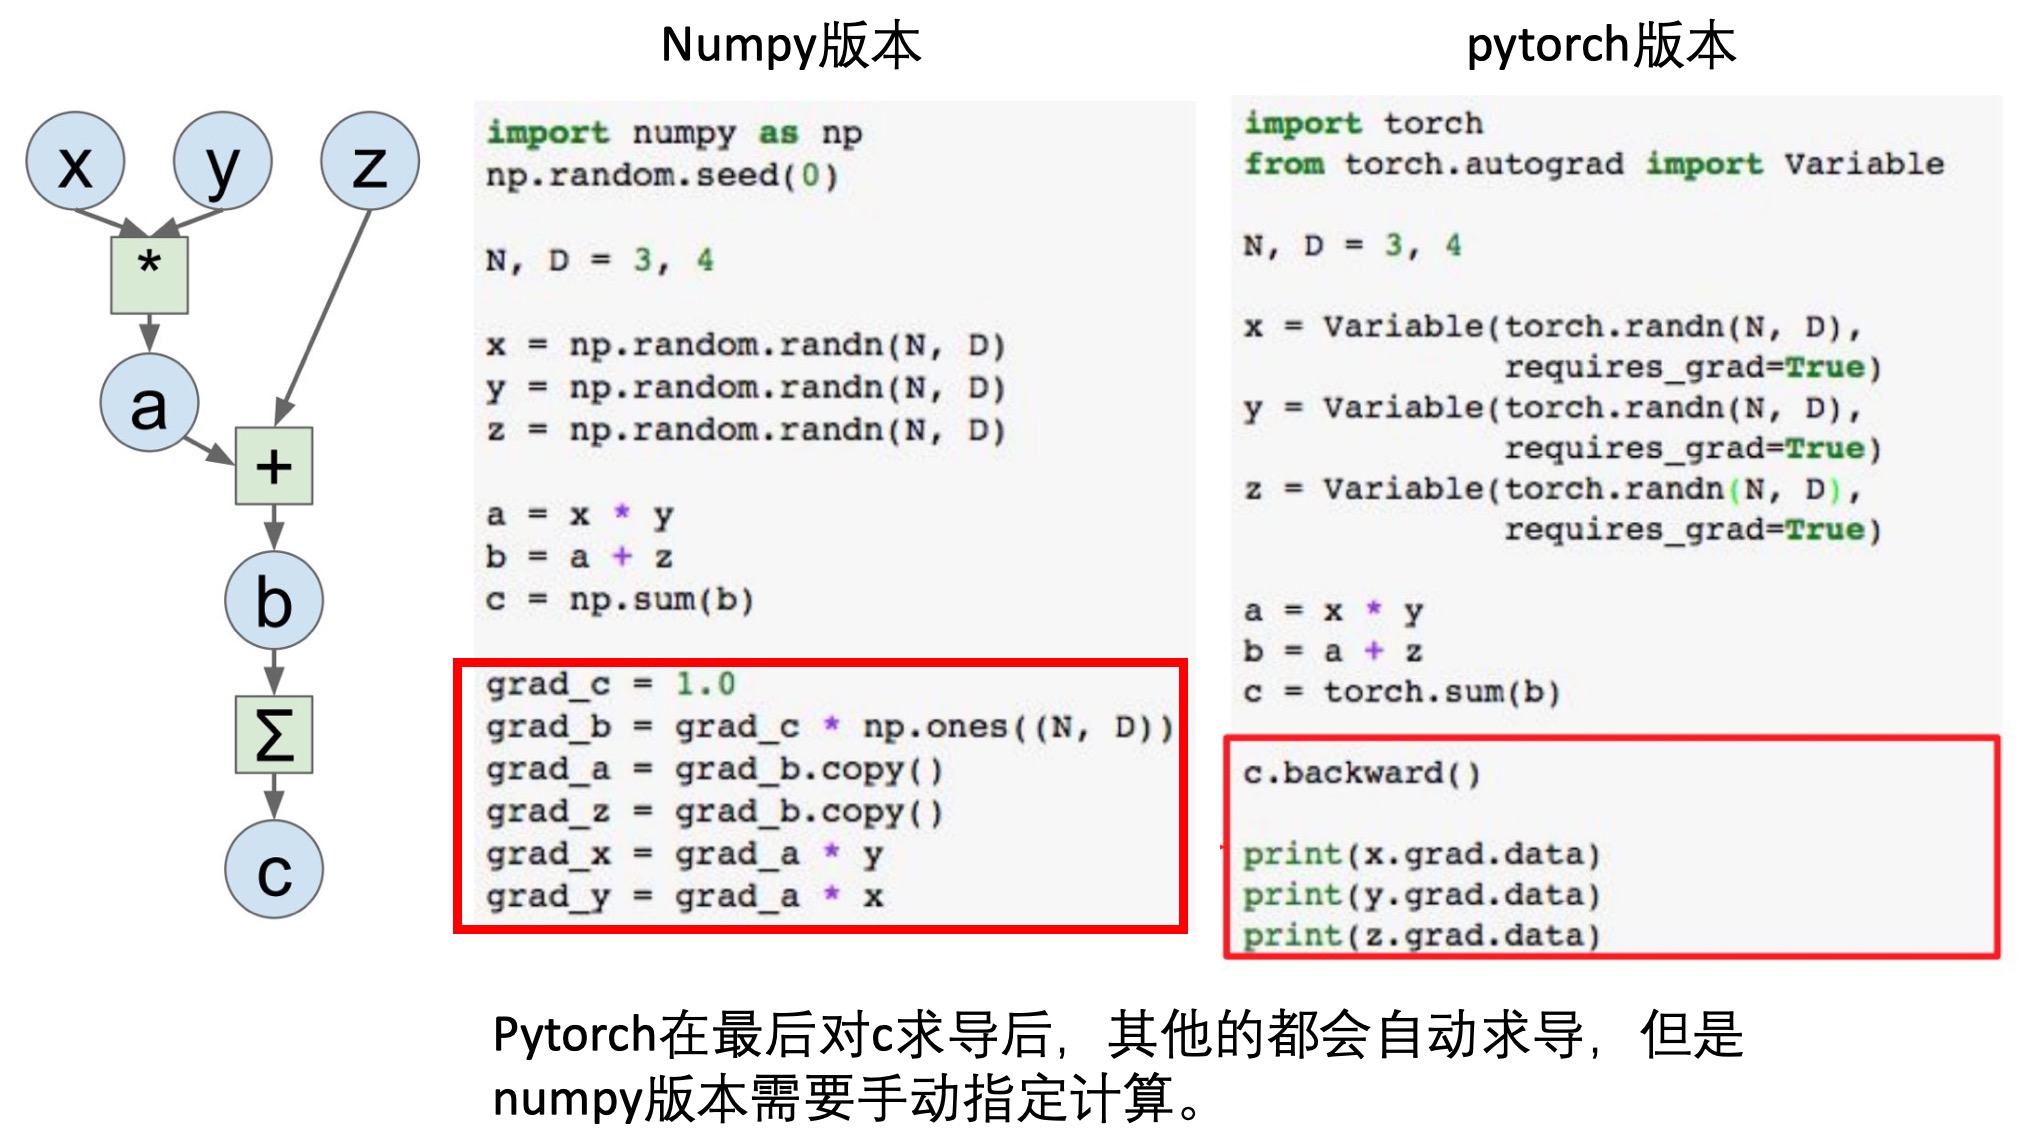
下面是对于变换过程中的求导,在numpy和pytorch中的实现,可以看到,后者能够实现追踪:
示例: 手写数字识别的LeNet5卷积神经网络

准备数据
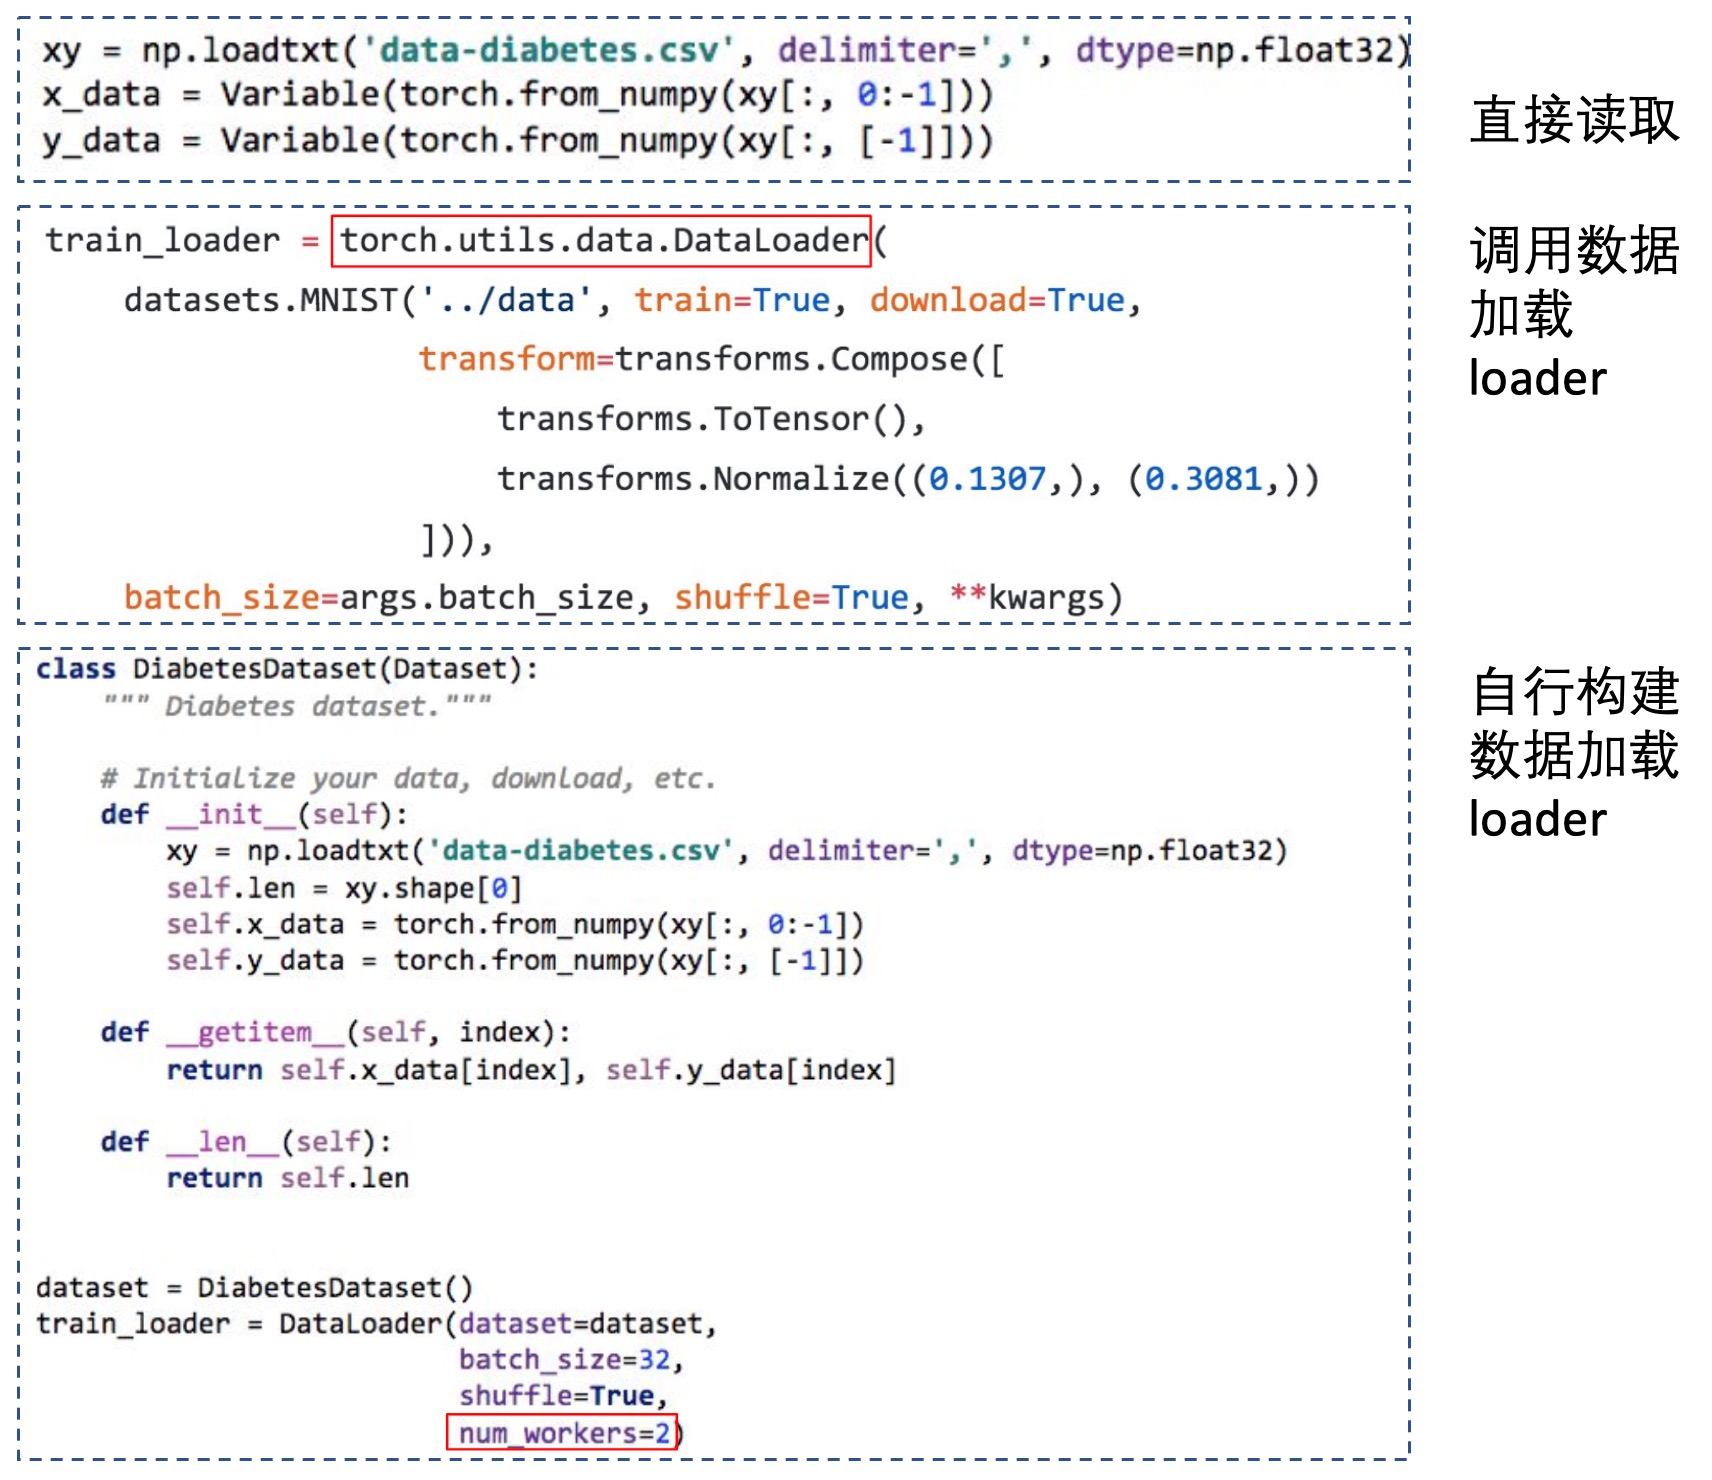
加载数据的方法有多种(如下图):
这里使用的数据集都是比较经典的,一般使用torch.utils.data.DataLoader:
import torchvision.datasets as dset
import torchvision.transforms as transforms

root = './data'
if not os.path.exists(root):
    os.mkdir(root)

# 这里的0.5,1.0是对数据进行归一化时使用的mean和variance
# 在MNIST里面,图片的均值和方差分别是:0.1307,0.3081,所以这里提供的值不是对的
trans = transforms.Compose([transforms.ToTensor(), transforms.Normalize((0.5,), (1.0,))])
# if not exist, download mnist dataset
train_set = dset.MNIST(root=root, train=True, transform=trans, download=True)
test_set = dset.MNIST(root=root, train=False, transform=trans, download=True)

batch_size = 100

train_loader = torch.utils.data.DataLoader(
                 dataset=train_set,
                 batch_size=batch_size,
                 shuffle=True)
test_loader = torch.utils.data.DataLoader(
                dataset=test_set,
                batch_size=batch_size,
                shuffle=False)
定义网络
import torch
import torch.nn as nn
import torch.nn.functional as F

class Net(nn.Module):

    def __init__(self):
        super(Net, self).__init__()
        # 输入图像channel:1;输出channel:6;5x5卷积核
        # 这里构建的网络的padding是1,但是真实的一般使用的是2(外层补上两圈0),输入是32x32
        self.conv1 = nn.Conv2d(1, 6, 5)
        self.conv2 = nn.Conv2d(6, 16, 5)
        # an affine operation: y = Wx + b
        self.fc1 = nn.Linear(16 * 5 * 5, 120)
        self.fc2 = nn.Linear(120, 84)
        self.fc3 = nn.Linear(84, 10)

    def forward(self, x):
        # 2x2 Max pooling, 先卷积,然后调用relu激活函数,再最大值池化操作
        x = F.max_pool2d(F.relu(self.conv1(x)), (2, 2))
        # If the size is a square you can only specify a single number
        # 第二次卷积+池化操作
        x = F.max_pool2d(F.relu(self.conv2(x)), 2)
        # 重新塑形,将多维数据重新塑造为二维数据,256*400
        x = x.view(-1, self.num_flat_features(x))
        #第一个全连接
        x = F.relu(self.fc1(x))
        x = F.relu(self.fc2(x))
        x = self.fc3(x)
        return x

    def num_flat_features(self, x):
        # x.size()返回值为(256, 16, 5, 5),size的值为(16, 5, 5),256是batch_size
        # x.size返回的是一个元组,size表示截取元组中第二个开始的数字
        size = x.size()[1:]  # 除去批大小维度的其余维度
        num_features = 1
        for s in size:
            num_features *= s
        return num_features

net = Net()
print(net)

# 构建的网络
# Net(
#   (conv1): Conv2d(1, 6, kernel_size=(5, 5), stride=(1, 1))
#   (conv2): Conv2d(6, 16, kernel_size=(5, 5), stride=(1, 1))
#   (fc1): Linear(in_features=400, out_features=120, bias=True)
#   (fc2): Linear(in_features=120, out_features=84, bias=True)
#   (fc3): Linear(in_features=84, out_features=10, bias=True)
# )
这里卷积层的构建调用的是.Conv2d()函数:
# https://pytorch.org/docs/stable/nn.html#conv2d

torch.nn.Conv2d(in_channels, out_channels, kernel_size, stride=1, padding=0, dilation=1,
                groups=1, bias=True, padding_mode='zeros')

# 参数列表
# in_channels (int) – Number of channels in the input image
# out_channels (int) – Number of channels produced by the convolution
# kernel_size (int or tuple) – Size of the convolving kernel
# stride (int or tuple, optional) – Stride of the convolution. Default: 1
# padding (int or tuple, optional) – Zero-padding added to both sides of the input. Default: 0
# padding_mode (string, optional) – zeros
# dilation (int or tuple, optional) – Spacing between kernel elements. Default: 1
# groups (int, optional) – Number of blocked connections from input channels to output channels. Default: 1
# bias (bool, optional) – If True, adds a learnable bias to the output. Default: True
上面还使用到了view函数,用于对数组进行reshape,类似于numpy里面的resize函数。作用:把原先tensor的数据排成一个一维的数据,然后按照view提供的参数转换为其他维度的张量。
# 【1】即使原始的张量维度不一样,但是提供的view参数一致,那么转换后的张量也是一样的
a=torch.Tensor([[[1,2,3],[4,5,6]]])
b=torch.Tensor([1,2,3,4,5,6])

print(a.view(1,6))
print(b.view(1,6))

# tensor([[1., 2., 3., 4., 5., 6.]])

# 【2】从2x3转换为3x2
a=torch.Tensor([[[1,2,3],[4,5,6]]])
print(a.view(3,2))

# tensor([[1., 2.],
#        [3., 4.],
#        [5., 6.]])

# 【3】view的参数不能为空,用-1代替未知的
# -1表示自动推断的
# 比如:原始是2x3=6的,现在view第一个参数是1,转换为二维的,那么-1自动推断此维度为6,所以转换后的张量是1x6
a = torch.Tensor(2,3)
print(a)
# tensor([[0.0000, 0.0000, 0.0000],
#        [0.0000, 0.0000, 0.0000]])
print(a.view(1,-1))
# tensor([[0.0000, 0.0000, 0.0000, 0.0000, 0.0000, 0.0000]])
定义损失函数和优化器
import torch.optim as optim

# https://pytorch.org/docs/stable/nn.html#loss-functions
# 这里定义了各种不同的损失函数
criterion = nn.CrossEntropyLoss()
optimizer = optim.SGD(net.parameters(), lr=0.001, momentum=0.9)
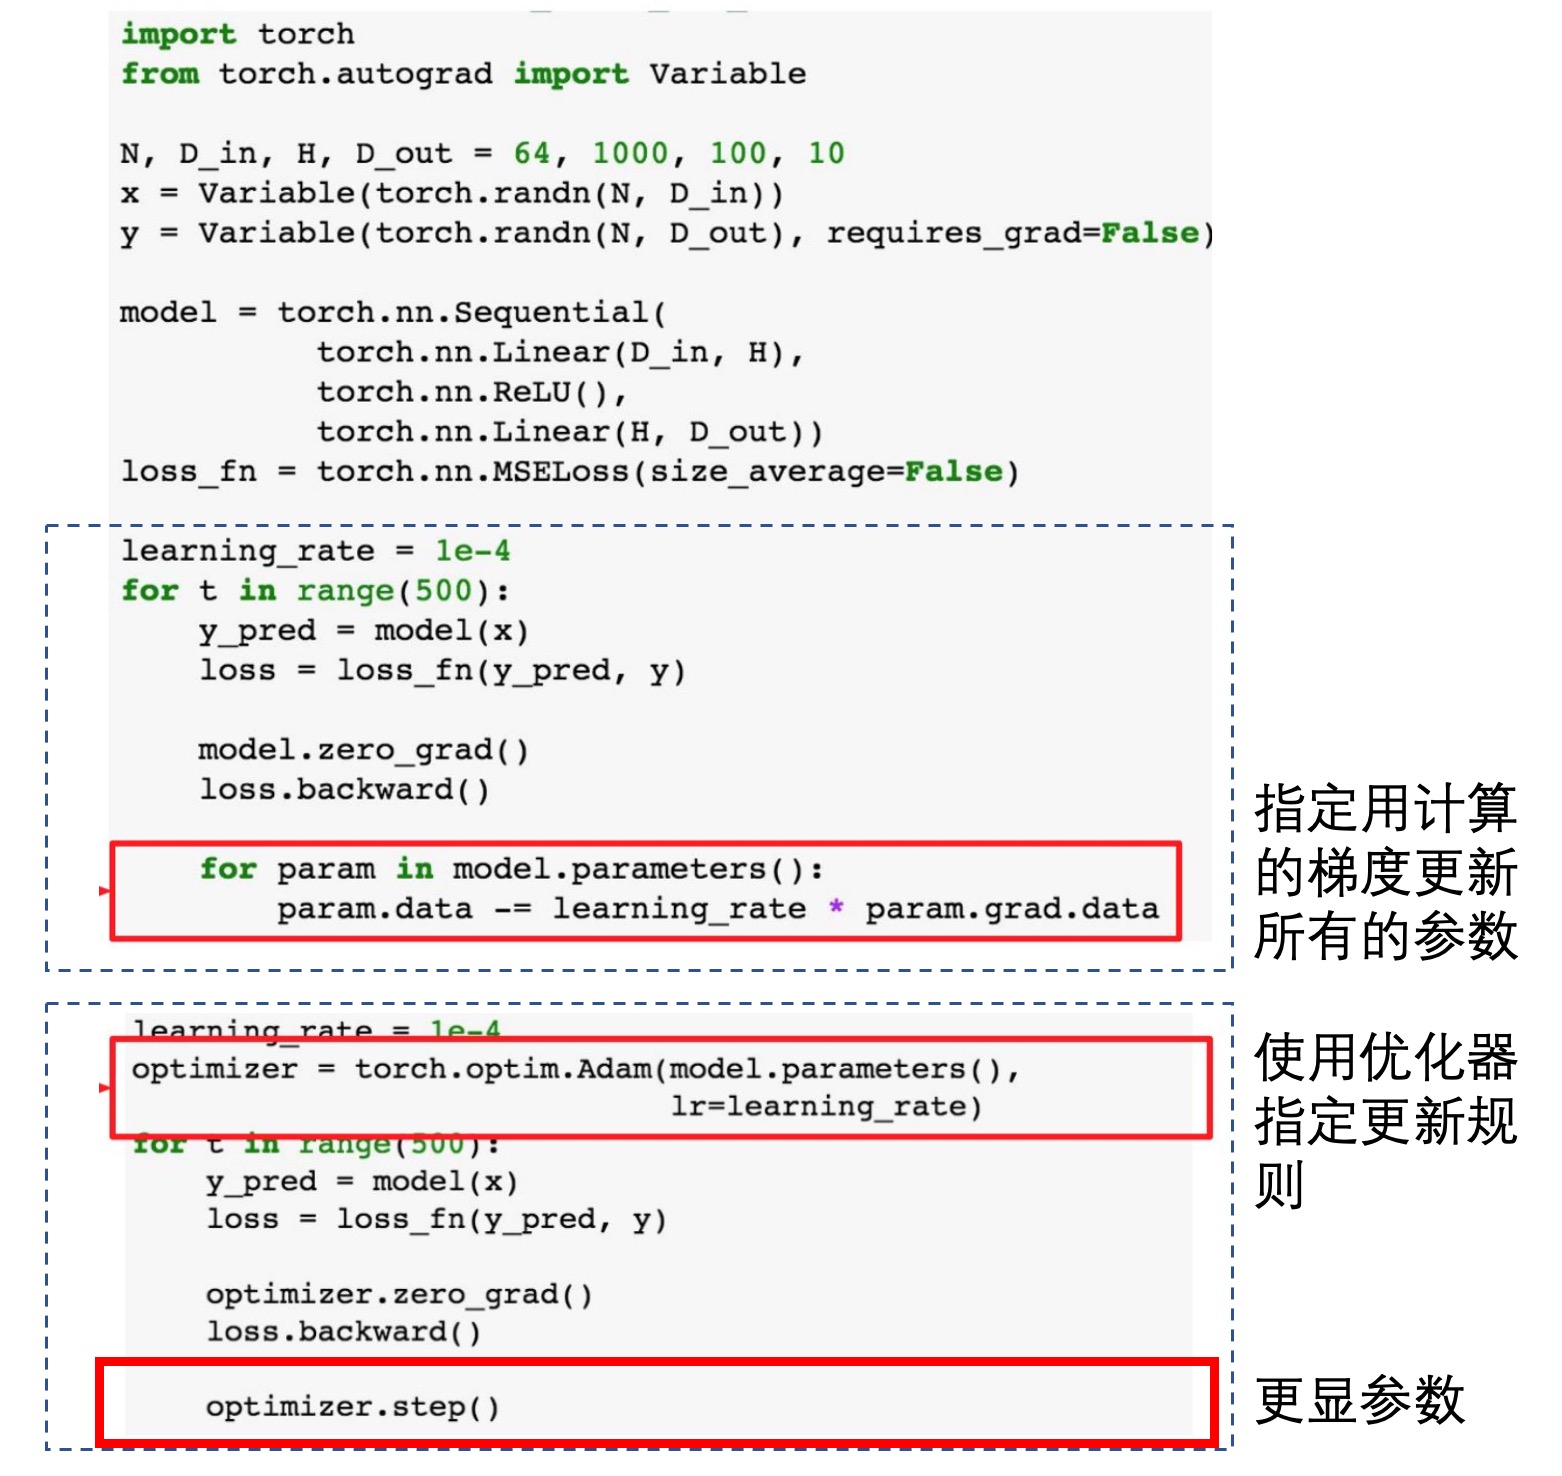
最好是直接调用优化器,但是最基础的也可手动指定更新(不推荐):
训练网络:
for epoch in range(2):  # loop over the dataset multiple times

    running_loss = 0.0
    for i, data in enumerate(trainloader, 0):
        # get the inputs
        inputs, labels = data

        # zero the parameter gradients
        optimizer.zero_grad()

        # forward + backward + optimize
        outputs = net(inputs)
        loss = criterion(outputs, labels)
        loss.backward()
        optimizer.step()

        # print statistics
        running_loss += loss.item()
        if i % 2000 == 1999:    # print every 2000 mini-batches
            print('[%d, %5d] loss: %.3f' % (epoch + 1, i + 1, running_loss / 2000))
            running_loss = 0.0

print('Finished Training')

# [1,  2000] loss: 2.182
# [1,  4000] loss: 1.819
# [1,  6000] loss: 1.648
# [1,  8000] loss: 1.569
# [1, 10000] loss: 1.511
# [1, 12000] loss: 1.473
# [2,  2000] loss: 1.414
# [2,  4000] loss: 1.365
# [2,  6000] loss: 1.358
# [2,  8000] loss: 1.322
# [2, 10000] loss: 1.298
# [2, 12000] loss: 1.282
# Finished Training
评估模型
correct = 0
total = 0
with torch.no_grad():
    for data in testloader:
        images, labels = data
        outputs = net(images)
        _, predicted = torch.max(outputs.data, 1)
        total += labels.size(0)
        correct += (predicted == labels).sum().item()

print('Accuracy of the network on the 10000 test images: %d %%' % (
    100 * correct / total))

# Accuracy of the network on the 10000 test images: 55 %
cheatsheet
- Pytorch official : https://pytorch.org/tutorials/beginner/ptcheat.html
- Pytorch_Tutorial : https://web.cs.ucdavis.edu/~yjlee/teaching/ecs289g-winter2018/Pytorch_Tutorial.pdf
参考
Read full-text »
【4-1】卷积神经网络
2019-02-20
目录
计算机视觉
- 深度学习的兴奋点:
- (1)CV的高速发展标志着新型应用产生的可能
- (2)新的神经网络结构与算法,启发创造CV和其他领域的交叉成果
- 例子:
- 图片分类(图片识别):识别出一只猫
- 目标检测:物体的具体位置,比如无人车中车辆的位置以避开
- 图片风格迁移:把一张图片转换为另一种风格的
- 挑战:
- 数据量大:3通道64x64大小(64x64x3=12288)
- 特征向量维度高,权值矩阵或者参数巨大
- 参数巨大:难以获得足够的数据防止过拟合
- 巨大的内存需求
边缘检测示例
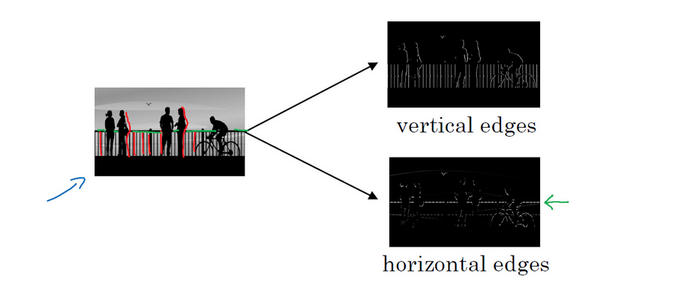
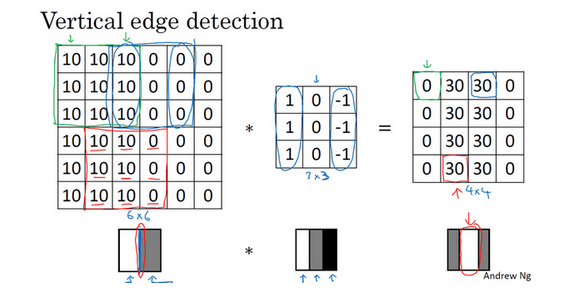
- 边缘检测例子:
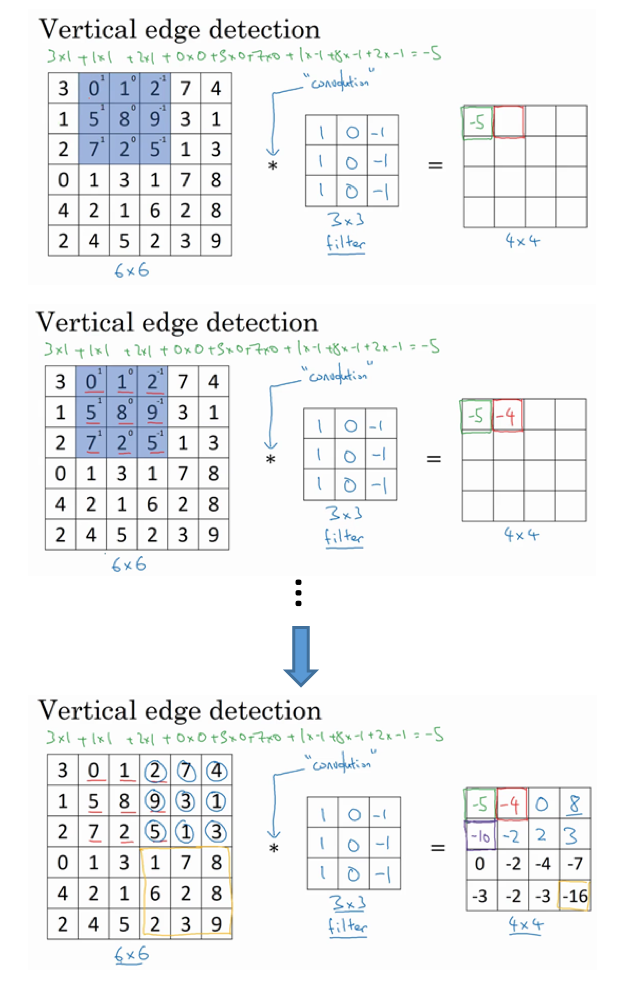
- 如何检测?
- 为啥是垂直边缘检测器?
- 换个图片例子:原始图片大小还是6x6的,但是里面的像素值变成现在的样子
- 原始图片:左侧是10,右侧全为0,对应的图像就是左侧近乎于白色(像素值大,比较亮),右侧近乎于灰色(像素值小,比较暗)。这里左右两侧的中间可以看到一个明显的垂直边缘,达到从白到黑的过度。
- 过滤器:此时左侧全为1(最亮,白色),中间全为0(一般,灰色),右侧全为-1(最小,黑色)。
- 卷积后:得到的图像左右两边全为0,中间为30,对应图像是左右两边近乎灰色(偏暗),中间是白色(偏亮)。
- 中间的两列其实对应的就是整个图像的一条亮线,只是由于这里图片太小(4x4),所以看不太出来。如果是1000x1000的,那么可以明显看到卷积之后是可以看到正中间有一条垂直边缘亮线的。
- 因此说:此时用到的这个过滤器可以检测图片中的额垂直边缘。
- 过度的变化可被检测到:
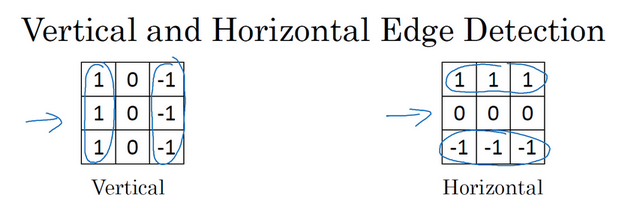
- 垂直检测与水平检测:
- 衍生:
- 为什么可以学习到图像的特征?
- 上面列举的可以检测到垂直或者水平的边缘
- 还有的其他过滤器可以学习45°、70°或者73°,甚至是任何角度的边缘
- 矩阵所有数字设置为参数,通过数据反馈,让神经网络自动学习,就可以学习到一些低级的特征,比如各种不同角度的边缘特征等。
- 过滤器数字参数化的思想,是CV中最为有效的思想之一
Padding
- 直接卷积的缺点:
- 输出缩小。每次卷积操作之后,图像就会缩小,比如从开始的6x6变为4x4,最后变为1x1等。
- 丢掉了图像边缘位置的许多信息。在角落或者边缘区域的像素点在输出中采用较少。
- 解决上述问题:
- 卷积前填充
- p是填充数量,习惯用0进行填充。填充后的输出:(n+2p-f+1)x(n+2p-f+1),此时输出的图像和原来可能更接近了。
- 边缘发挥小作用的缺点也被弱化。
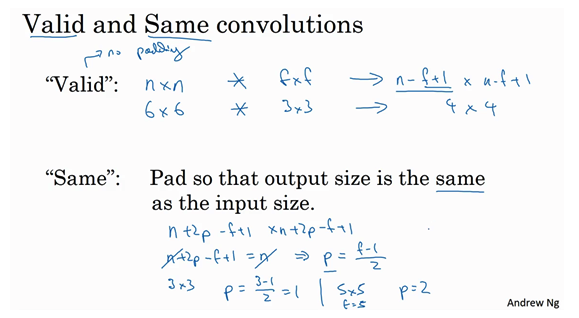
- 填充像素p:
- Valid卷积:不填充。输出:(n-f+1)x(n-f+1)
- Same卷积:填充后输出大小和输入大小一样。输出:(n+2p-f+1)x(n+2p-f+1),此时前后大小相等有:n+2p-f+1=n => p=(f-1)/2。所以当f为奇数时,选择合适的填充p大小,可以使得卷积前后大小相等。
- 为什么过滤器通常是奇数?
- 习惯:f通常为奇数。
- 如果f是偶数,只能使用一些不对称的填充
- 奇数过滤器有一个中心点,便于指出过滤器的位置
卷积步长
- 基本操作:步幅(stride)
- 例子:一个7x7的图像,使用一个3x3的过滤器,步幅f=2,padding=0
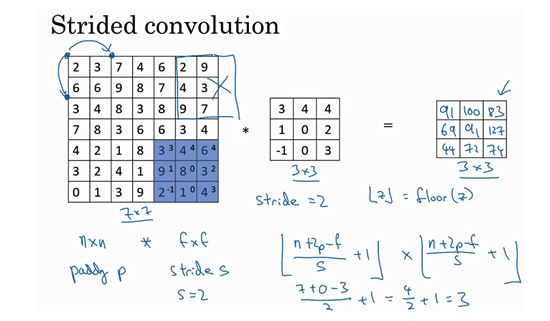
- 公式:
- 输出:\((\frac{n+2p-f}{s}+1) \times (\frac{n+2p-f}{s}+1)\)
- 如果商不为整数怎么办?
- 向下取整:对z进行地板除
- 惯例:只有上面的每一个篮框完全包括在图像或填充完的图像内部时,才对它进行运算。如有有任意的一个篮框移动到了外面,那么就不要进行相乘操作。
- 输出维度总结:
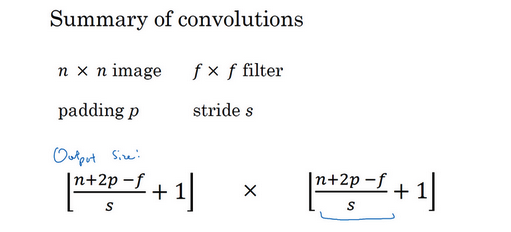
三维卷积
- 过滤器是三维的,对应RGB三个通道
- 例子:
- 输入:6x6x3的图像
- 过滤器:3x3x3
- 输出:4x4x1.注意不是4x4x3,对于每一个过滤器立方体,总共有27个数字,这27个数字对应相乘然后求和得到一个数字,称为新图像的一个元素。
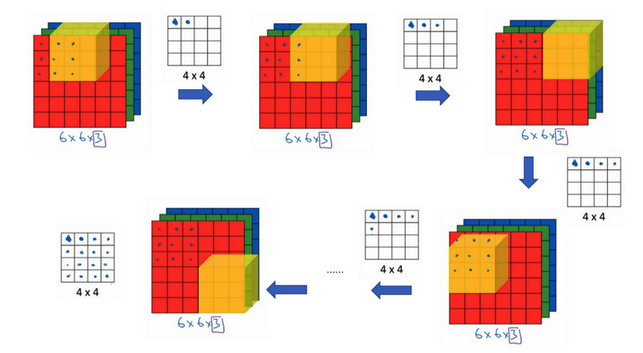
- 应用:比如如果绿色和蓝色通道全为0,红色通道设置一个垂直检测器,那么整个三维的过滤器就是一个只对红色通道有用的垂直边界检测器。
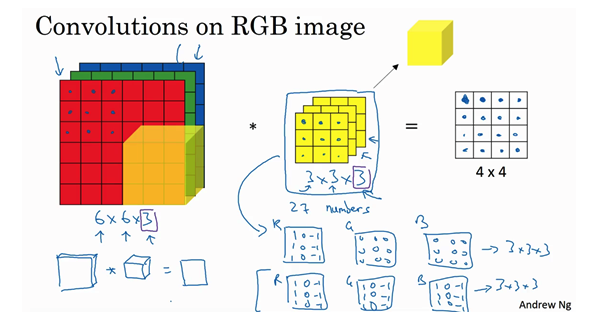
- 多过滤器:
- 一个三维立体过滤器实现一个特征检测
- 同时使用多个过滤器检测到不同的特征
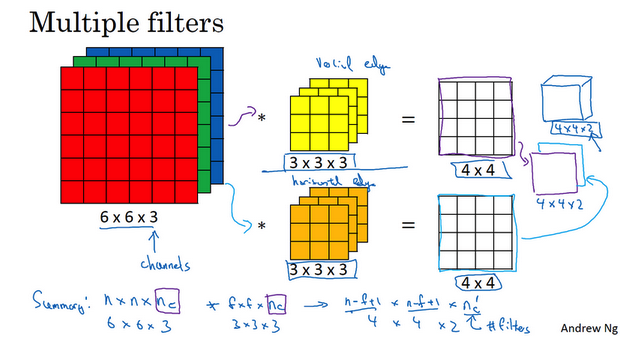
- 输出维度:
- 输入:n x n x nc(通道数)
- 卷积:f x f x nc,惯例nc是相等的
- padding:0
- stride:1
- 输出:(n-f+1) x (n-f+1) x nc’,nc’是下一层的通道数,也就是使用的过滤器的个数。
单层卷积网络
- 如何构建卷积?
- 根据输入图像,卷积得到卷积值,然后经过激活函数。
- 示例:a0到a1的演变:
- 先执行线性函数
- 所有元素相乘做卷积:运用线性函数再加上偏差
- 应用激活函数ReLU
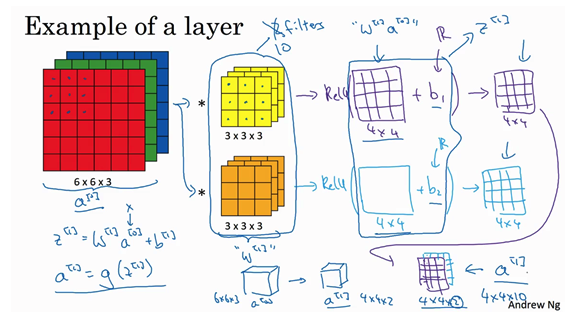
- 参数个数?
- 输入:1000x1000x3
- 过滤器:10个3x3x3的
- 参数:每一个过滤器是28个参数(3x3x3+1偏差),10个过滤器就是280个参数。【参数个数与输入图像的大小是无关的】
- 不管输入图片大小,参数都很少,这是卷积神经网络的避免过拟合的特性。
- 卷积层各种标记:
- 输入
- 过滤器大小
- padding
- stride
- 过滤器数目
- 输出:通道数量就是此层中过滤器的数量
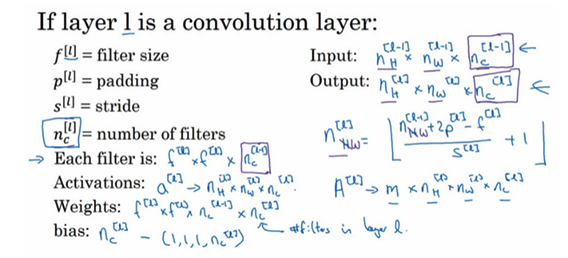
- 如何确定权重参数?
- 参数就是每个过滤器的数值的权重
- 数据拟合
简单卷积网络示例
- 通常一个卷积神经网络包含3层:
- 卷积层:CONV
- 池化层:POOL
- 全连接层:FC
- 一个简单的卷积网络示例:
- 这里是展示了几个卷积层
- 通过不同的卷积层之后图片的大小、每个卷积的设置等
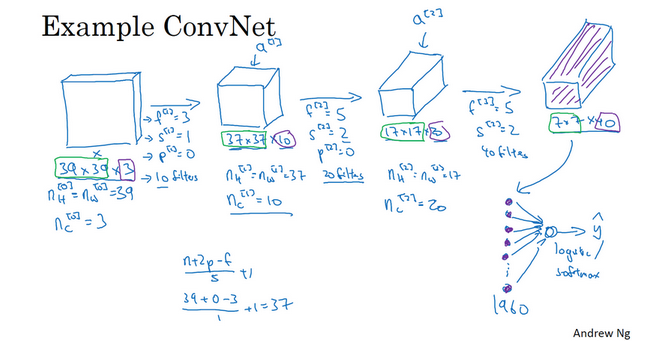
- 【输入-卷积层1】:
- 输入:39x39x3
- 卷积大小:f=3
- 步幅:s=1
- 填充:p=0.(不填充,属于valid卷积)
- 卷积数目:10
- 输出:37x37x10,37=(n+2p-f)/s + 1 = (39+0-3)/1 + 1=37, 10是使用10个过滤器,所以输出会有10个通道(三维堆叠,每一层是一个过滤器)
- 【卷积层1-卷积层2】:
- 输入:37x37x10
- 卷积大小:f=5
- 步幅:s=2
- 填充:p=0.(不填充,属于valid卷积)
- 卷积数目:20
- 输出:17x17x20,37=(n+2p-f)/s + 1 = (37+0-5)/2 + 1=17, 20是使用20个过滤器,所以输出会有20个通道(三维堆叠,每一层是一个过滤器)
- 【卷积层2-卷积层3】:
- 输入:17x17x20
- 卷积大小:f=5
- 步幅:s=2
- 填充:p=0.(不填充,属于valid卷积)
- 卷积数目:40
- 输出:7x7x40,37=(n+2p-f)/s + 1 = (17+0-5)/2 + 1=7, 40是使用40个过滤器,所以输出会有40个通道(三维堆叠,每一层是一个过滤器)
- 经过3个卷积之后,为图片提取7x7x40=1960个特征。可对提取的特征进行处理,比如展开向量,然后过逻辑回归或者softmax回归等。
池化层
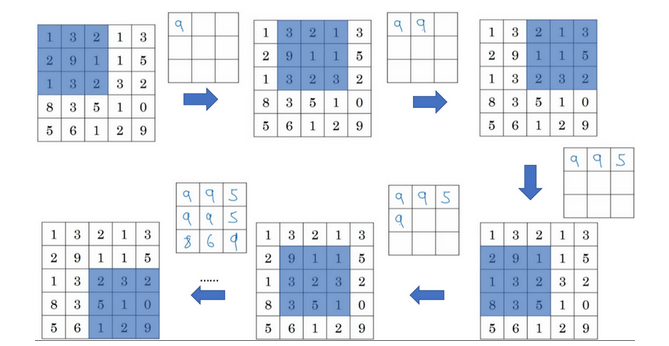
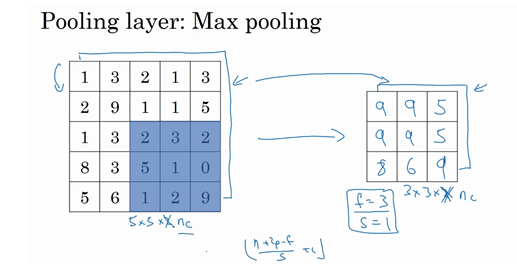
- 池化层:
- 缩减模型大小
- 提高计算速度
- 提高所提取特征的鲁棒性
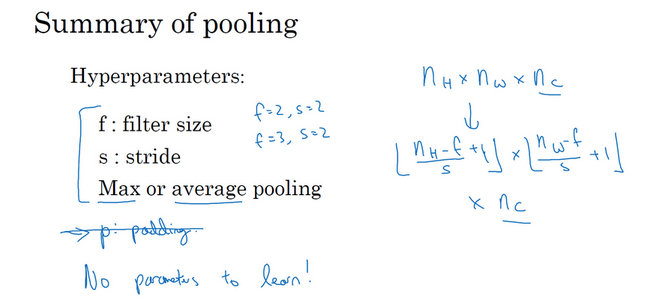
- 输出大小:
- 最大池化:
- 在任何一个象限内提取到某个特征,保留其最大值
- 很少用到超参数padding,p=0最常用
- 三维池化:
- 平均池化:
CNN示例
- 常见模式:
- 一个或者多个卷积层跟随一个池化层
- 然后一个或者多个卷积层再跟随一个池化层
- 然后是几个全连接层
- 最后是一个softmax
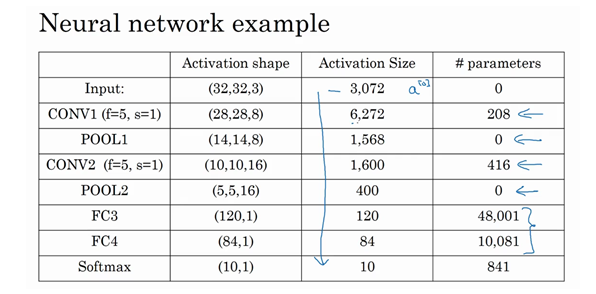
- 一个跟LeNet5很像的CNN:
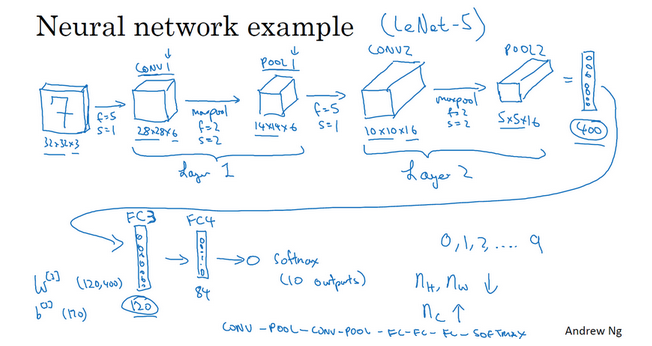
- Layer1:一个卷积+一个池化。也有的把他们作为单独的层。
- 计算神经网络多少层:通常只统计具有权重和参数的层,池化层没有权重和参数(只有超参数)
- 尽量不要自己设置超参数,而是查看文献中别人采用了哪些超参数
- 激活值形状、大小、参数数量:
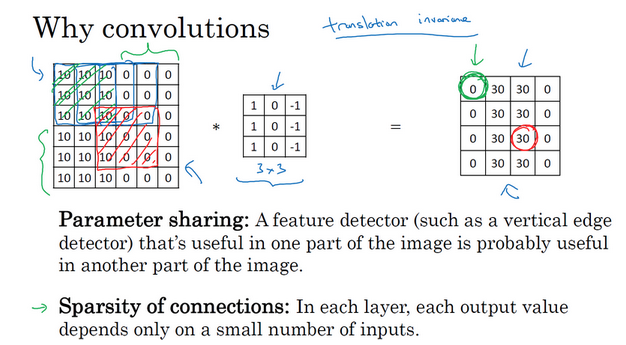
为什么使用卷积?
- 卷积层 vs 全连接层:
- 优点:
- 减少参数
- 使用更小的训练集训练
- 预防过拟合
- 善于捕捉平移不变:移动有限个像素,鉴定的猫依旧清晰可见
参考
Read full-text »
Latest articles
Links
- ZhangLab , RISE database , THU life , THU info
- Data analysis: pandas , numpy , scipy
- ML/DL: sklearn , sklearn(中文) , pytorch
- Visualization: seaborn , matplotlib , gallery
- Github: me

